สรุป Git command เผื่อได้ใช้กัน
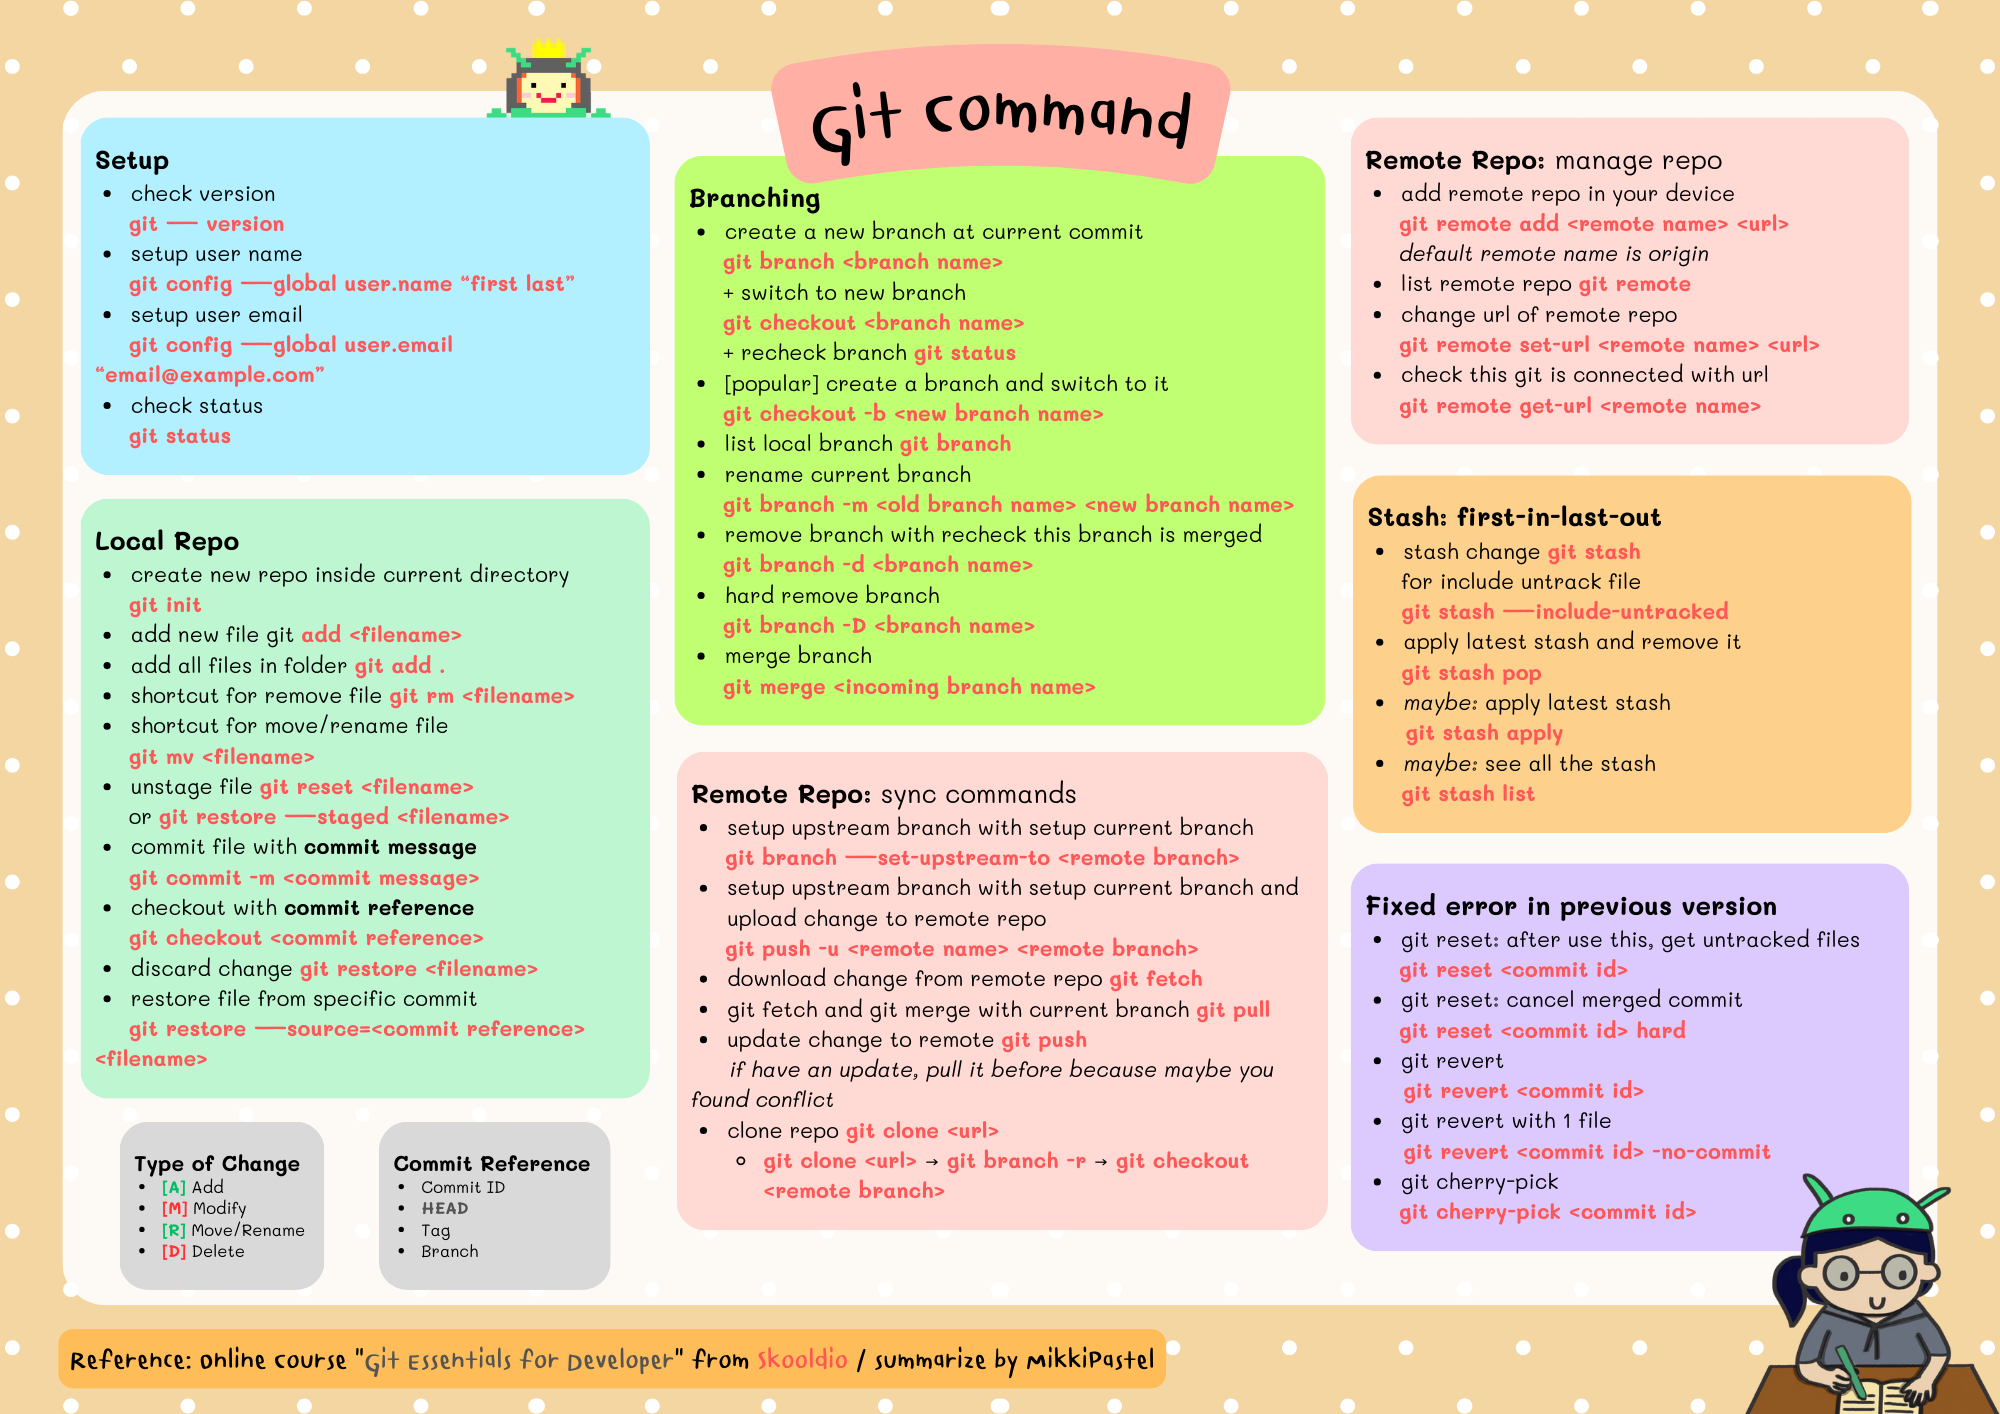
เราสรุป Git command ที่ได้จากการเรียนคอร์สออนไลน์ที่ชื่อว่า Git Essentials for Developers ของทาง Skooldio เลยทำ cheatsheet นี้ขึ้นมา เผื่อเพื่อน ๆ ได้เอามาใช้กันเนอะ

แล้ว Git command ต่าง ๆ มีอะไรบ้าง ไปดูกัน
Setup
เมื่อเราลง git กันแล้ว ก็อย่าลืม setup กันด้วยนะ
- ตรวจสอบ version ของ git
git — version - setup user name
git config —global user.name “first last” - setup user email
git config —global user.email “[email protected]” - ตรวจสอบ status
git status
Local Repo
- สร้าง repo ใหม่ใน current directory
git init- type of change: [A] Add, [M] Modify, [R] Move/Rename, [D] Delete
- เพิ่มไฟล์ใหม่
git add <filename> - เพิ่มทุกไฟล์บน folder
git add . - shortcut ในการลบไฟล์
git rm <filename> - shortcut ในการ move/rename ไฟล์
git mv <filename> - unstage file
git reset <filename>orgit restore —staged <filename> - commit file พร้อมใส่ commit message
git commit -m <commiy message> - checkout จาก commit reference ที่เราต้องการ
git checkout <commit reference>- Commit Reference → Commit ID, HEAD, Tag, Branch
- discard change
git restore <filename> - restore file จาก commit ที่ต้องการ
git restore —source=<commit reference> <filename>
Branching
- สร้าง branch ใหม่จาก ccommit ที่เราต้องการ
git branch <branch name>+ สลับไป branch ที่เพิ่งสร้างgit checkout <branch name>+ recheck branchgit status - [popular] สร้าง branch ใหม่ และ switch ไปให้เลย
git checkout -b <new branch name> - ดู local branch ทั้งหมด
git branch - ลบ branch ปัจจุบัน
git branch -m <old branch name> <new branch name> - ลบ branch ปัจจุบัน พร้อมดูว่า branch นี้ถูก merge หรือยัง
git branch -d <branch name> - ลบ branch แบบถาวร
git branch -D <branch name> - merge branch
git merge <incoming branch name>
Remote Repo
manage repo:
- เพิ่ม remote repo ในเครื่องของเรา
git remote add <remote name> <url>
ปกติ remote name จะชื่อ origin นะ - ดู remote repo ทั้งหมด
git remote - เปลี่ยน url ของ remote repo
git remote set-url <remote name> <url> - ดูว่าตัว repo นี้ connect กับ url ไหน
git remote get-url <remote name>
sync commands:
มันจะไม่ได้ connect แบบ real-time ให้และมันไม่ auto sync นะ ต้องใช้คำสั่งเพื่อ update เอง
- setup upstream branch with setup current branch
git branch —set-upstream-to <remote branch> - setup upstream branch with setup current branch and upload change to remote repo
git push -u <remote name> <remote branch> - download change จาก remote repo
git fetch - git fetch and git merge ที่ current branch
git pull - อัพเดต change จาก remote
git push- ถ้ามีอัพเดต แนะนำให้ pull มาลงก่อน เพราะอาจจะเจอ conflict ได้
- clone repo
git clone <url>git clone <url>→git branch -r→git checkout <remote branch>
Stash
เป็นการเก็บโค้ดของเราที่ยังไม่อยาก commit ไว้ มีความสัมพันธ์คือ first in last out
- เอา change ไปเก็บไว้ในชั่วคราว
git stashถ้าอยากรวม untrack file ให้ใช้อันนี้git stash —include-untracked - เอาของออกจาก stash เอา change ล่าสุดไปใส่
git stash pop - ไม่ได้ลบ change ล่าสุด ได้ change ตัวเดิมเรื่อย ๆ
git stash apply - โชว์ให้ดูว่าเรา stash อะไรบ้าง
git stash list
Fixing error in previous version
การแก้ error ต่าง ๆ ที่พบเจอ
- manual แก้มือเล้ยยย
- git command ใช้ command ของ git แบ่งเป็น
- git reset: ลบ commit อันล่าสุดกี่อันก็ได้ ซึ่งพอลบแล้วจะหายไปจาก git history จะทำให้หายจาก git history เลย ทำให้งานเราหายไปถาวร ใช้เฉพาะ commit ที่อยู่บนเครื่องของเราเท่านั้น
- ใช้
get reset <commit id>ได้ untracked files ออกมา - ยกเลิกการ merge งานหายตลอดกาล
get reset <commit id> -hard
- ใช้
- git rebase: เป็นการเปลี่ยนแปลง parent ของ commit นั้น ๆ อันนี้ไม่มี command ทำผ่าน UI เอา
- git revert: สร้าง commit ใหม่ที่มีผลกระทบตรงกันข้าม
git revert <commit id>เปิด text editor ใส่ commit message- แก้ไฟล์เดียว
git revert <commit id> —no-commitจัดการไฟล์ที่เราต้องการ แล้วค่อย commit ขึ้นไป
- git cheery-pick: สร้าง commit ใหม่จาก change ที่เราต้องการ
git cherry-pick <commit id>เอา change ที่ได้จาก commit นั้น มาใส่ของเรา
- git reset: ลบ commit อันล่าสุดกี่อันก็ได้ ซึ่งพอลบแล้วจะหายไปจาก git history จะทำให้หายจาก git history เลย ทำให้งานเราหายไปถาวร ใช้เฉพาะ commit ที่อยู่บนเครื่องของเราเท่านั้น
ทั้งหมดก็จะประมาณนี้เนอะ
ตัว cheatsheet นี้สามารถ download เป็น pdf ได้ด้านล่างจ้า
ติดตามข่าวสารตามช่องทางต่าง ๆ และทุกช่องทางโดเนทกันไว้ที่นี่เลย แนะนำให้ใช้ tipme เน้อ ผ่าน promptpay ได้เต็มไม่หักจ้า
ติดตามข่าวสารแบบไว ๆ มาที่ Twitter เลย บางอย่างไม่มีในบล็อก และหน้าเพจนะ
สวัสดีจ้า ฝากเนื้อฝากตัวกับชาวทวิตเตอร์ด้วยน้าา
— Minseo | Stocker DAO (@mikkipastel) August 24, 2020


