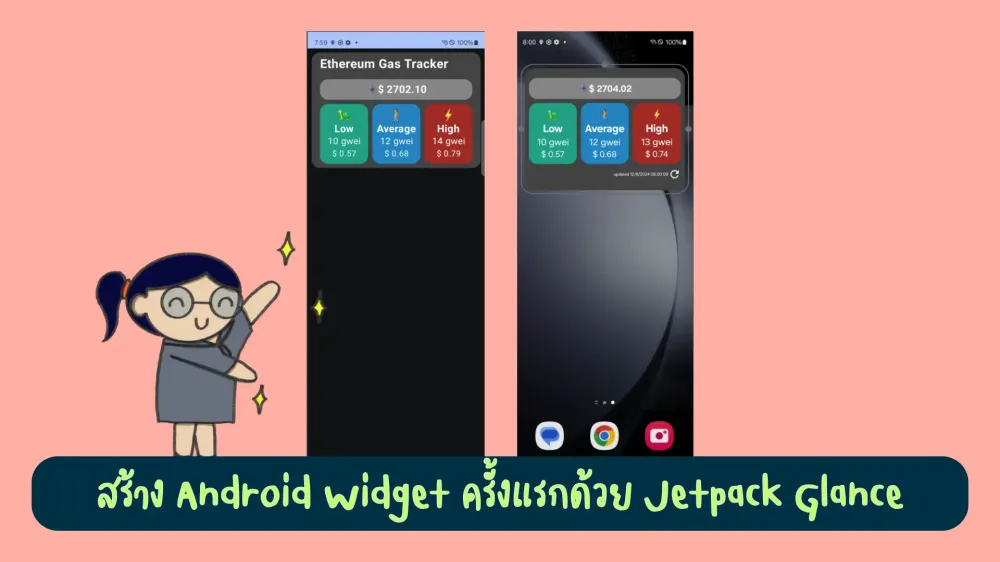
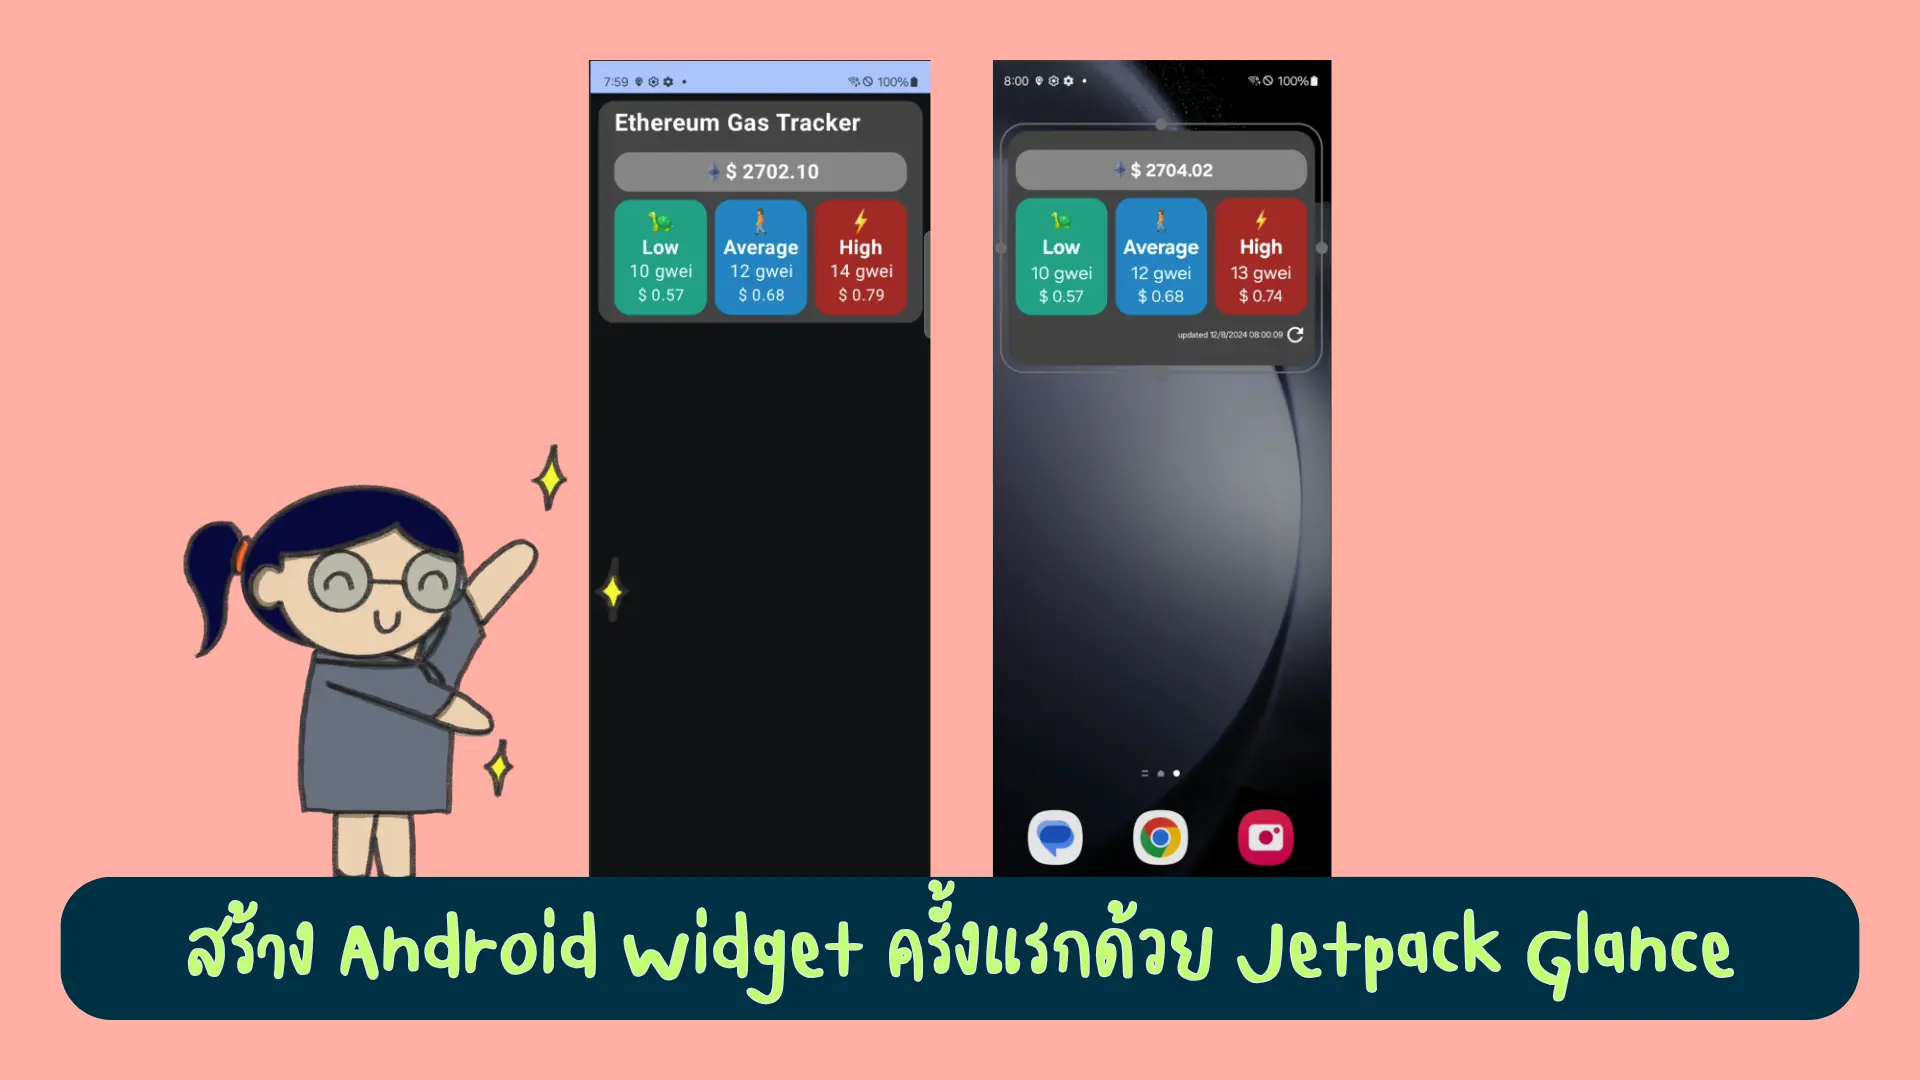
ทดลองทำ widget gas tracker ฉบับ Jetpack Compose กันเถอะ
เห็นชาวคริปโตติดตั้ง widget widgETH เป็น Ethereum gas price tracker app บน iOS แต่บน Android ไม่มีแบบเขาเลยต้องมาทำเองล่ะสิ!!
ทีนี้ก็ว้าวุ่นเลย อยากทำขึ้นมา แต่ไม่เคยทำ widget มาก่อนด้วย เราจะเริ่มยังไงดีนะ?
จุดเริ่มต้น
เจอจากคอมมู Tripster แหละ แบบเหย iOS เขามีแอพแบบดู Gas Tracker ของเชน Ethereum ด้วยอ่ะ
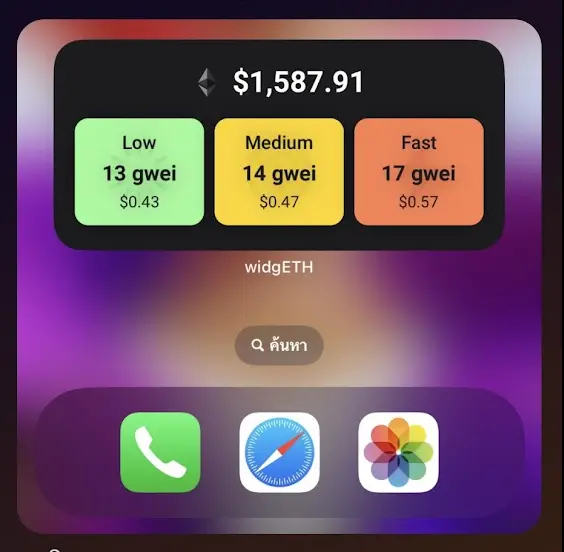
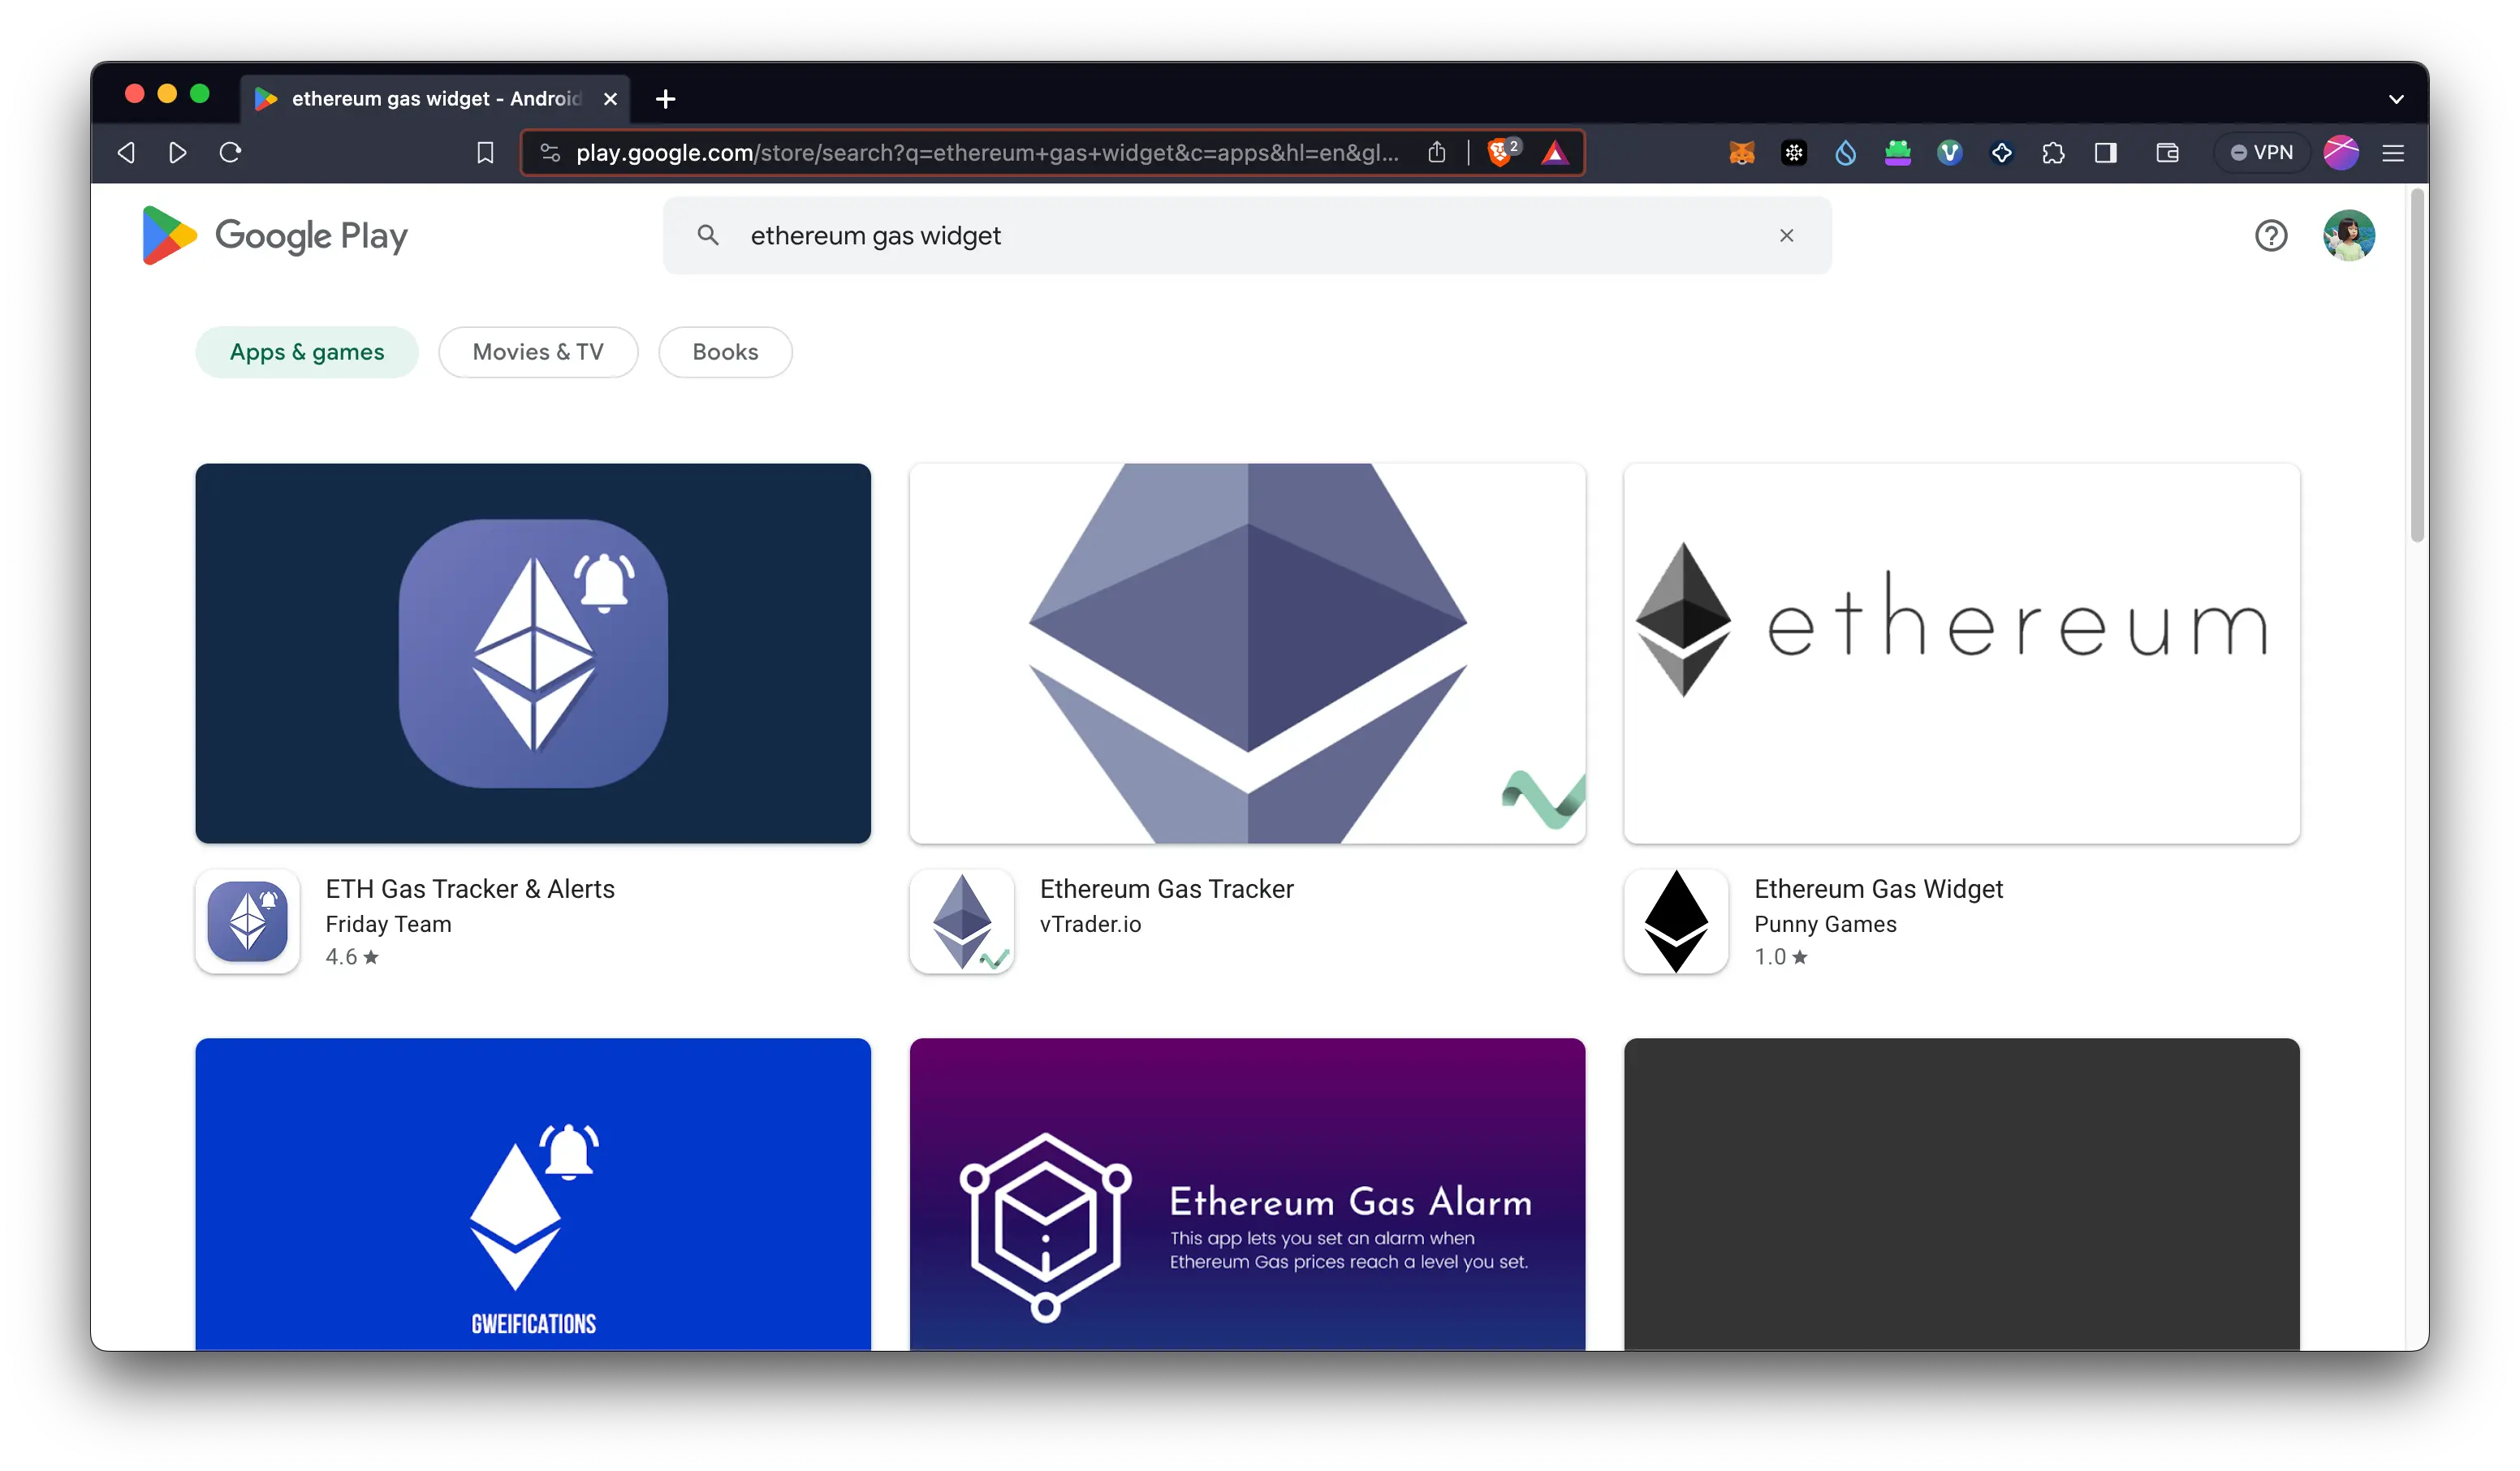
ใน Play Store ก็เหมือนจะไม่มีแบบนี้ด้วยมั้ง ไม่แน่ใจ งั้นทำเองดีกว่า 555
เริ่มต้นด้วยการสร้างโปรเจกต์ใหม่
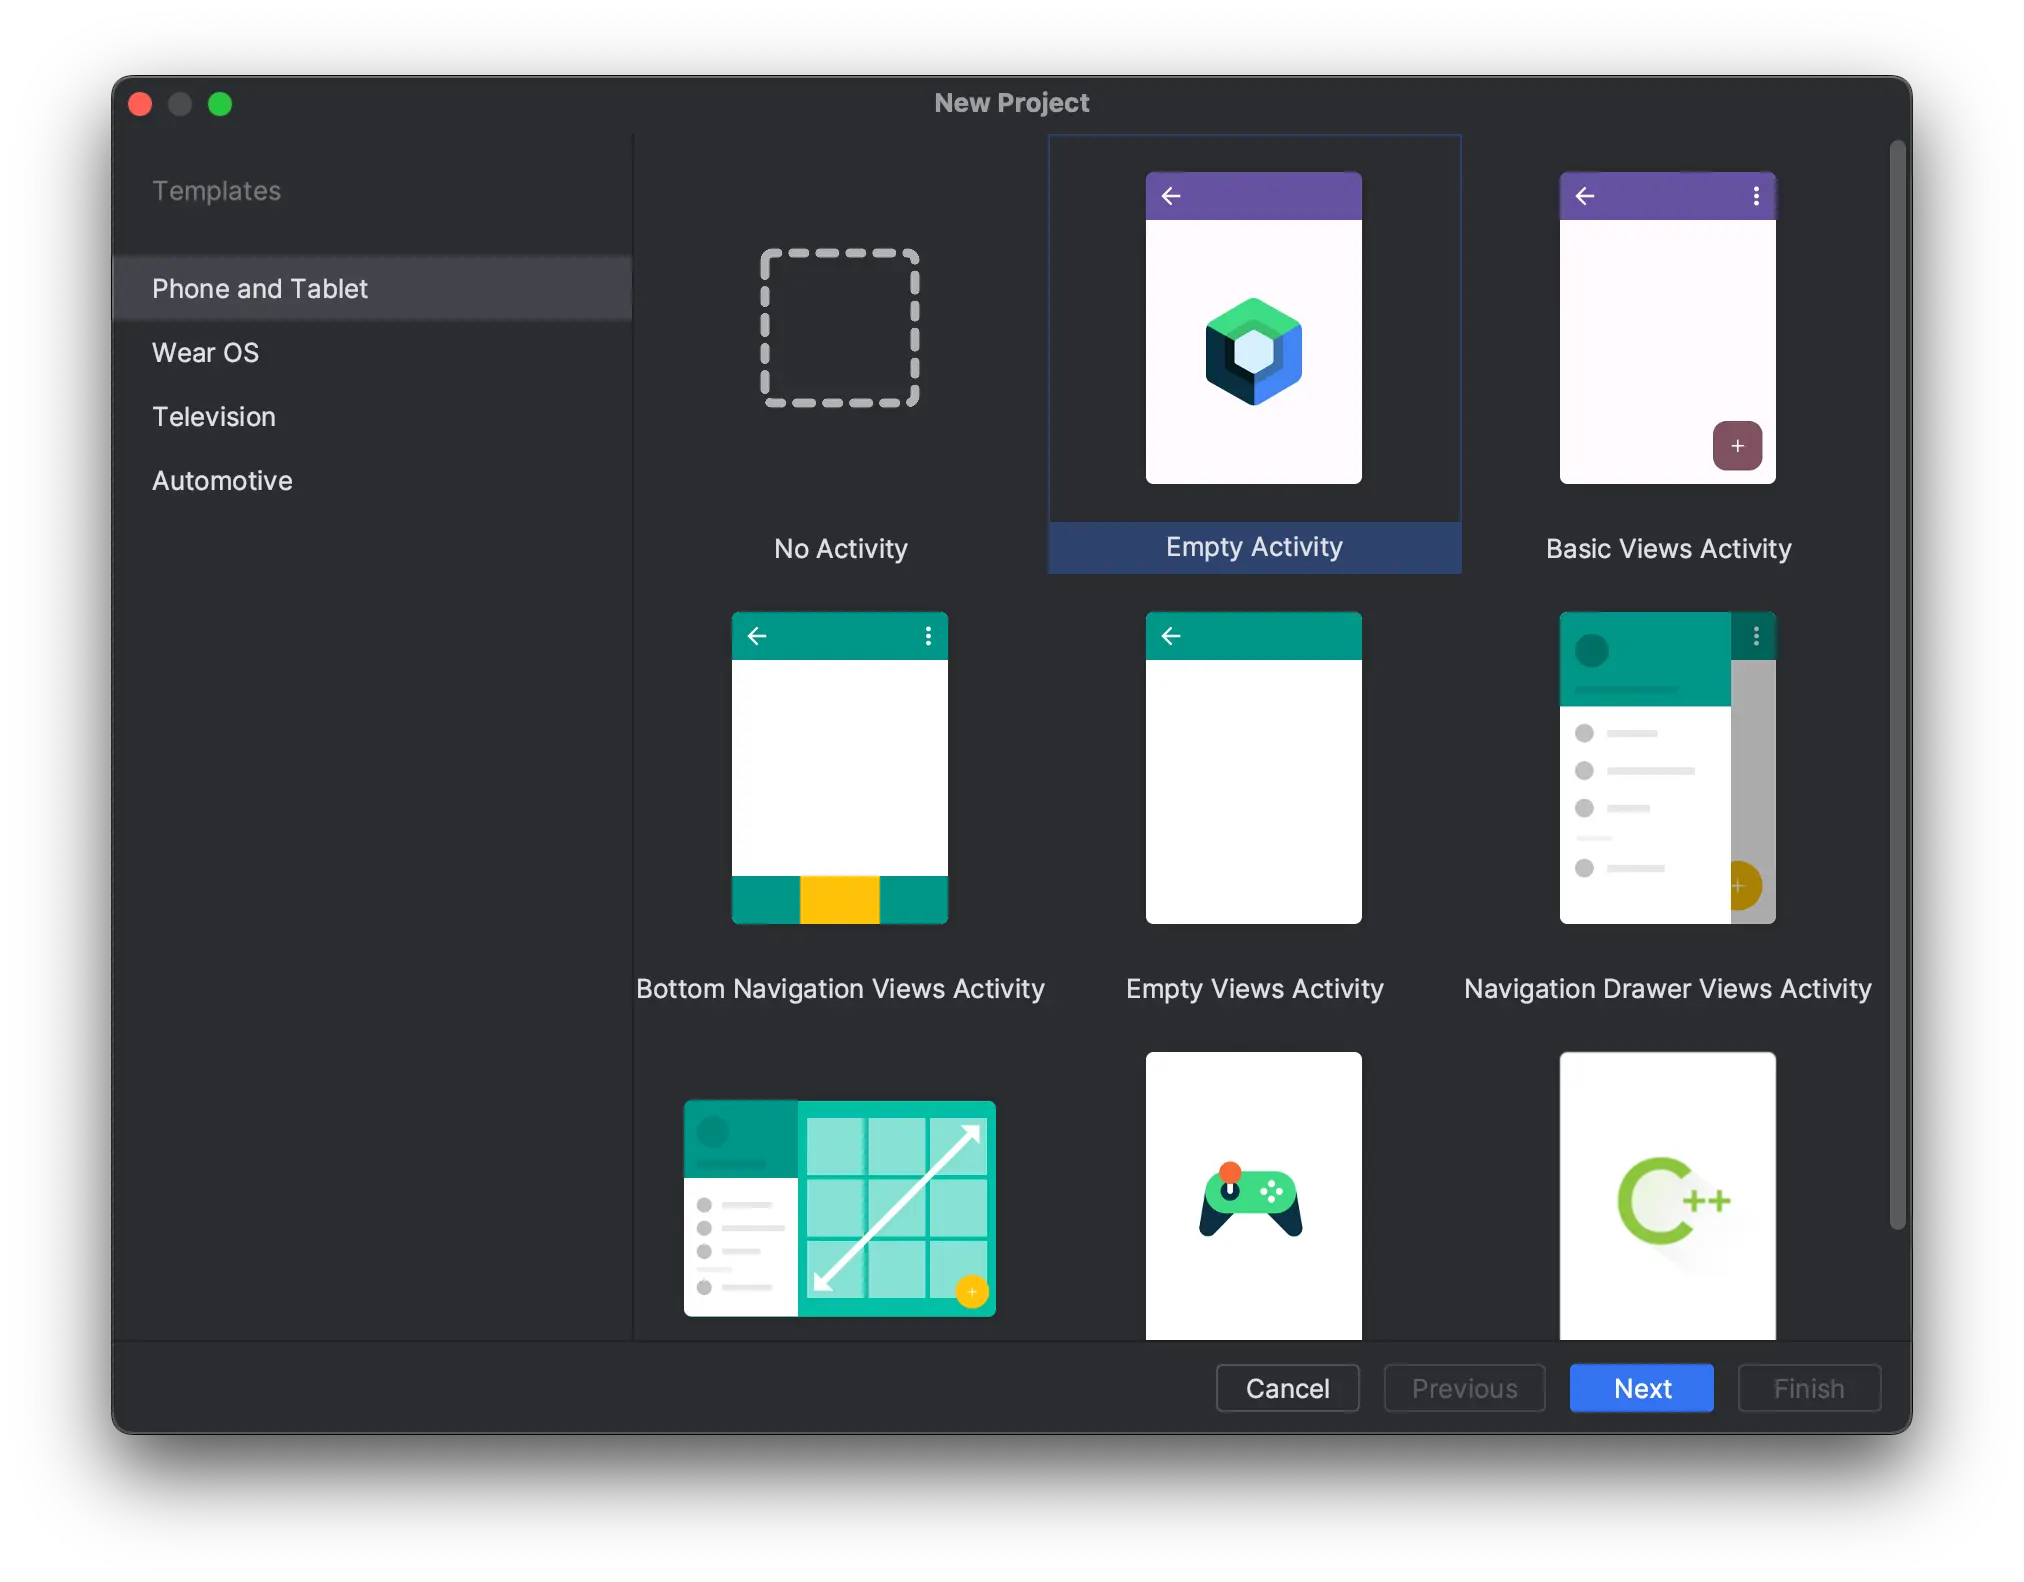
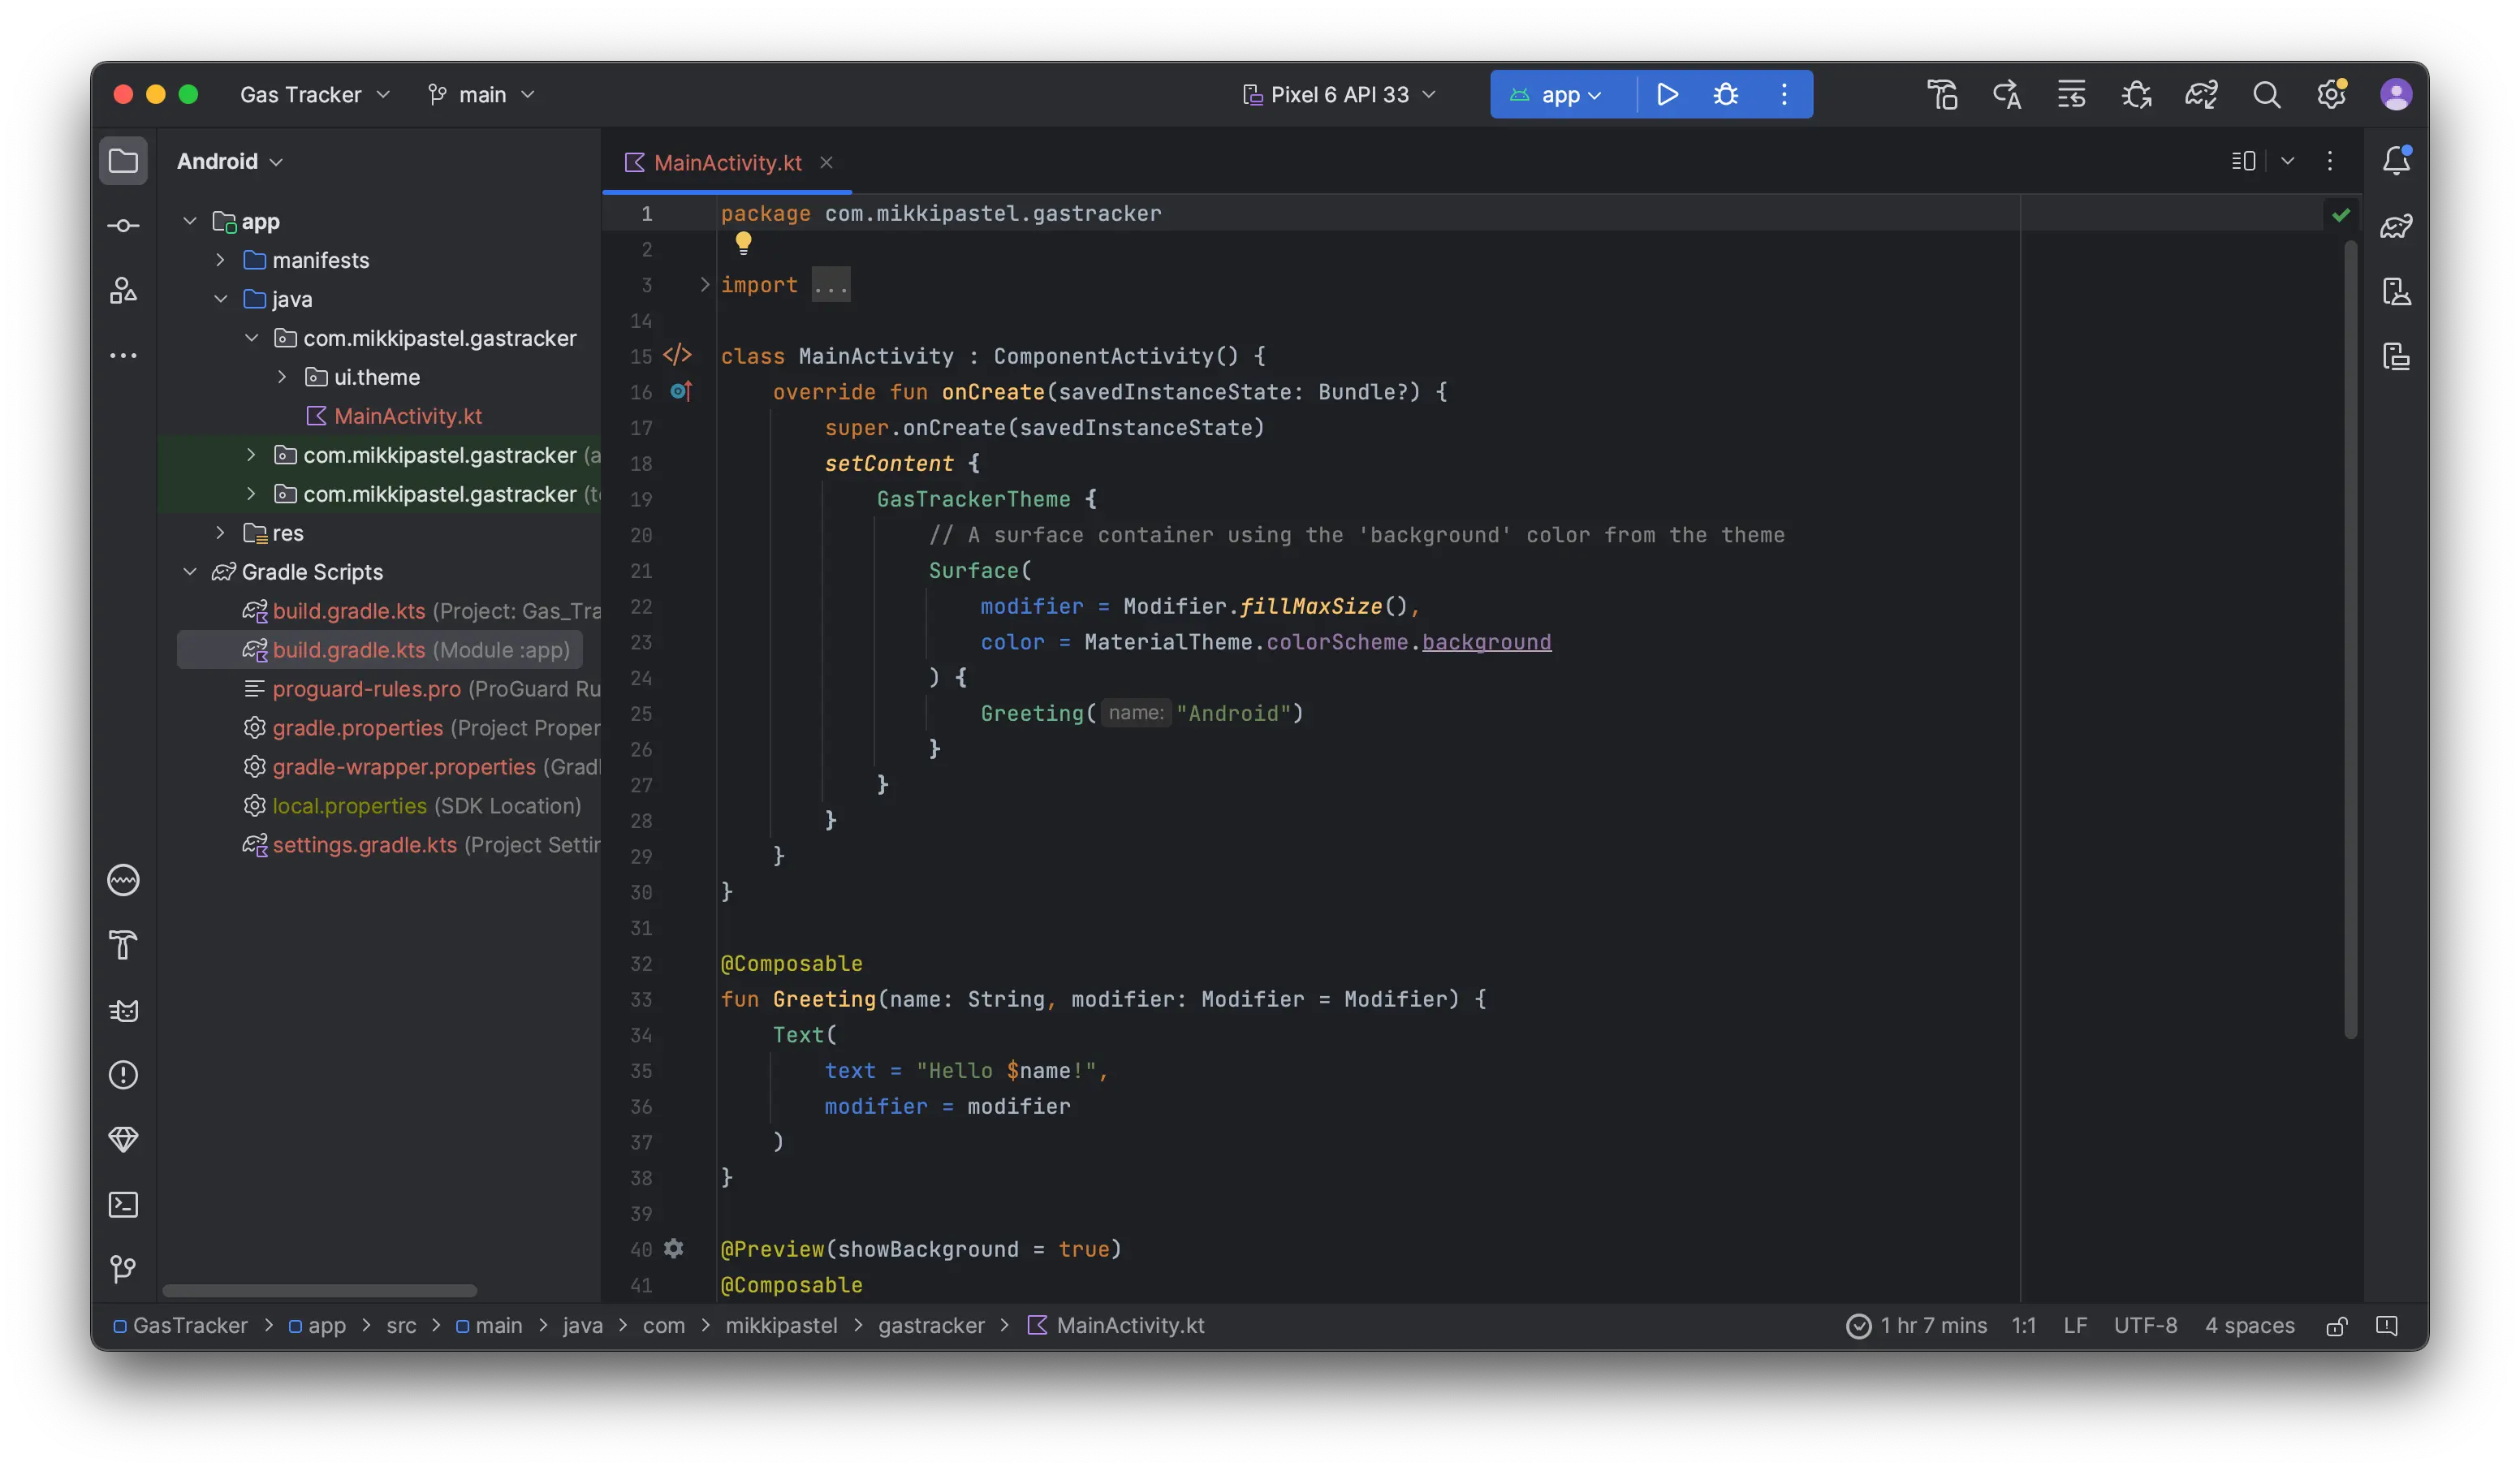
และด้วยความมึน เอ้าาา เราสร้างโปรเจกต์ Jetpack Compose ไปแล้ว งานงอกเลยทีนี้ อ่ะไม่เป็นไร ลองใช้หน่อยก็ได้เนอะ
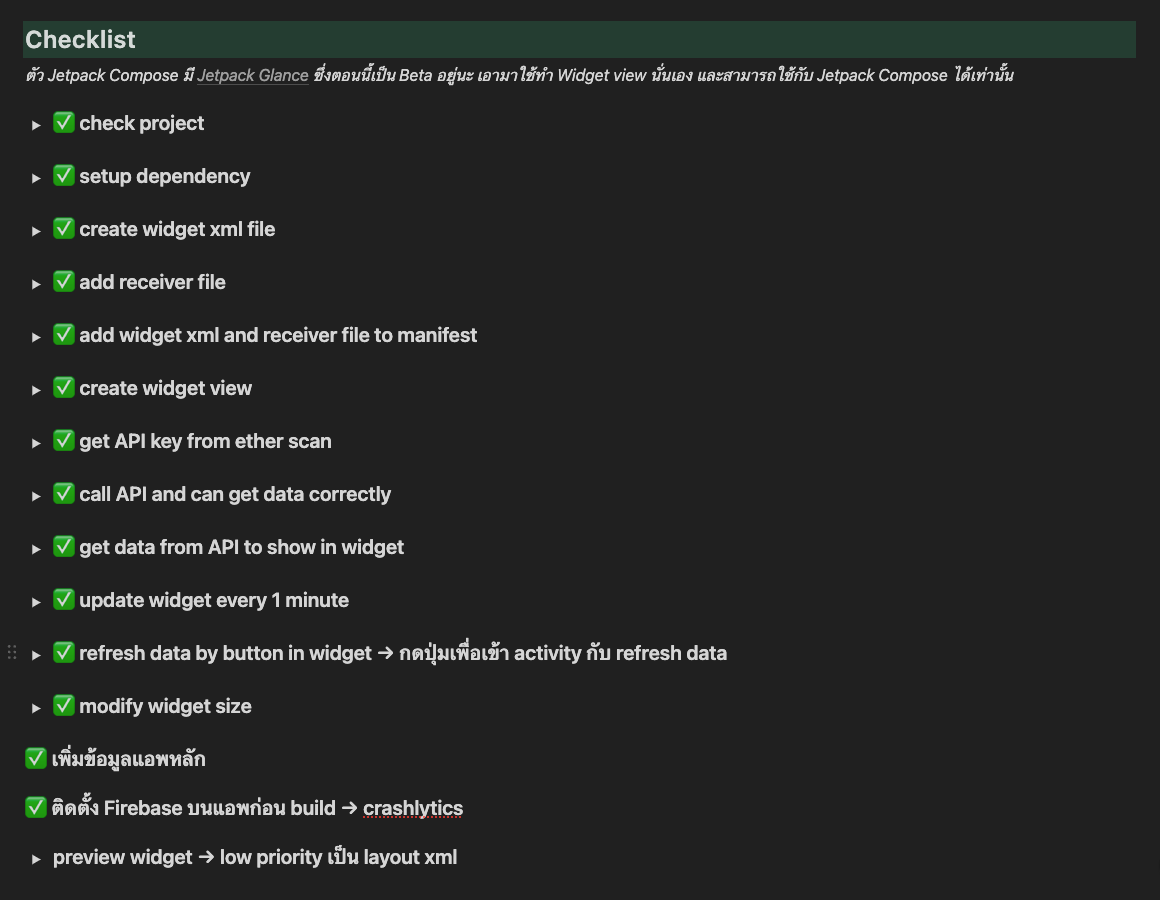
โดยตัว Jetpack Compose มี Jetpack Glance ซึ่งตอนนั้นเป็น Beta อยู่นะ ตอนนี้เป็น stable แล้ว เอามาใช้ทำ Widget view นั่นเอง และสามารถใช้กับ Jetpack Compose ได้เท่านั้น
เรามี checklist ที่ทำไว้ประมาณนี้ มาดูกันว่าเราเริ่มทำ POC การทำ Widget ด้วย Jetpack Glance ยังไง มีอะไรที่ได้ไม่ได้บ้าง ฉบับมือใหม่ที่ยังงง ๆ อยู่
Gas Tracker คืออะไร?
ก่อนอื่นรู้กันก่อนว่าเราจะทำอะไร?
เรามารู้จัก gas กันก่อน คนปกติอาจจะคิดว่าเป็นปั้มแก๊สหรือเปล่านะ หรือแก๊สหุงต้ม ไม่ใช่นะ
ในวง web3 ค่า gas คือค่าธรรมเนียมในการทำธุรกรรมต่าง ๆ บนโลก blockchain ไม่ว่าจะเป็นการแลกเงิน ลงทุน ซื้อของต่าง ๆ ซึ่งบน Ethereum เนี่ยถ้าคนจ่ายค่า gas ในการทำธุรกรรมที่สูงกว่าคนอื่น จะทำให้ธุรกรรมนั้นเสร็จก่อนคนอื่นด้วยเช่นกัน
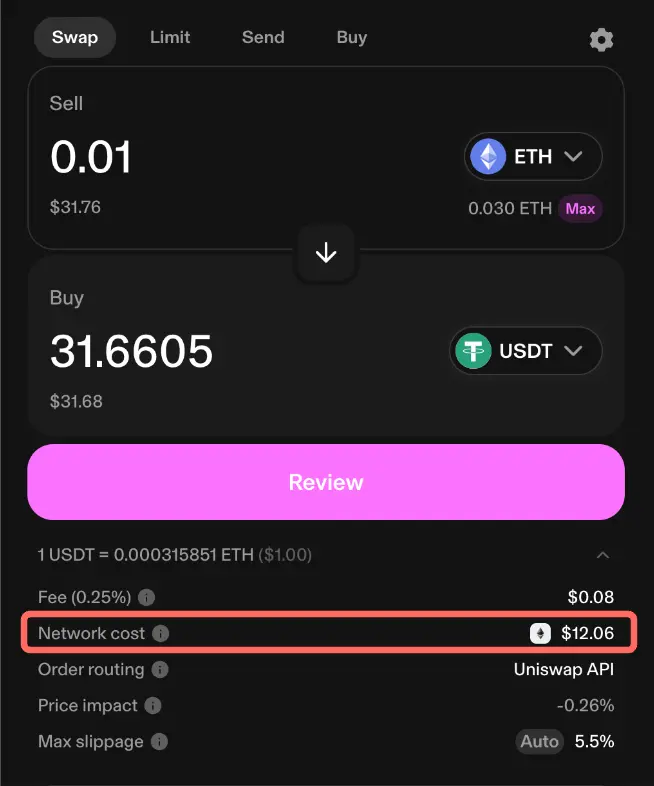
ตัวอย่าง สมมุติ ช่วงนี้ Etheruem ขึ้น เราแลกเงิน 0.01 ETH อยากแลกเป็น USDT ที่เป็น stable coin เก็บไว้ เราก็ connect wallet ของเราที่ Uniswap ซึ่งเป็น platform แลกเปลี่ยนเงินตราในโลก blockchain
ระบบจะคำนวณราคา ณ ปัจจุบันให้เรา ถ้าตอนนี้แลก 0.01 ETH ได้ 31 USDT นะ ซึ่งการที่เราจะทำธุรกรรมอะไรสัก จะต้องทำผ่าน smart contract เราต้อง sign การทำธุรกรรมนี้ก่อน เมื่อเรายืนยันในการทำธุรกรรมนี้แล้ว เราจะเสียค่า gas บนระบบ blockchain หรือในที่นี้คือ Network Cost และแน่นอนเสียค่า fee หรือ ค่าธรรมเนียมของ platform ด้วย
ในโลก web3 เมื่อจะทำธุรกรรมใด ๆ ต้อง connect wallet ก่อน แล้วตอนยืนยันทำธุรกรรม จะมีหน้าต่าง popup ของ software wallet เจ้านั้น ๆ เด้งขึ้นมา เพื่อให้เรา sign หรือลงชื่อเพื่อยืนยันการทำธุรกรรม บน Metamask เราจะเห็น low, average, high หรือบน Rabby จะเห็นเป็น Instant, Fast, Normal อันนี้เป็นการเลือก speed ในการทำธุรกรรม
และเวลาที่เราทำธุรกรรม เรารู้กันอยู่แล้วว่าเชน Etheruem นั้นมีค่า gas แพงขนาดไหน ดังนั้นเราเลยชอบเลือกค่า gas ที่น้อยที่สุด และมักจะทำตอนกลางวัน เพราะกลางคืน gas แพงกว่า และยิ่งตอนไหนในเชนเยอะ ทำใจไว้เลยค่า gas สูงขึ้นแน่นอน
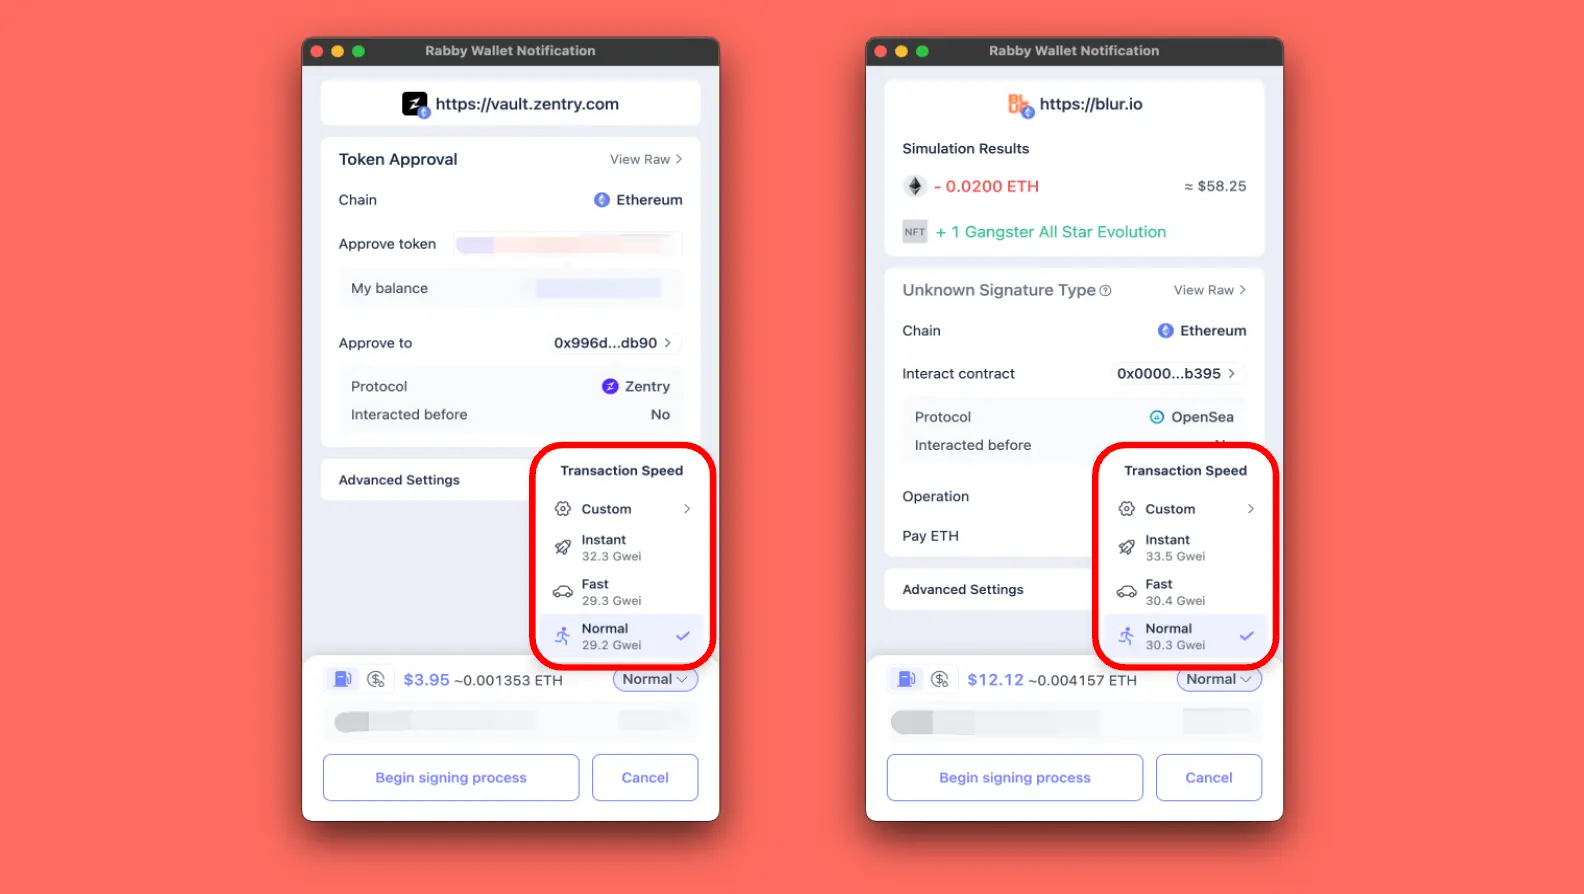
ถามว่า custom ค่า gas เองได้ไหม? ได้! สมัยก่อนที่ NFT รุ่งเรือง มีคน bid ค่า gas ให้สูง เพื่อทำธุรกรรมเสร็จก่อนใคร เช่น รีบกด NFT ดัง ๆ แต่ถ้าตอนนี้เราลอง bid ให้ตํ่ากว่า speed ที่มัน suggest ให้ก็รอนาน ถ้าอยากให้เสร็จไวขึ้นก็อัดเพิ่มหน่อย ไม่งั้นเราจะเสีย gas ฟรี
ดังนั้นเสียค่า gas เหมือนเติม gas ให้รถเดินไปได้ ธุรกรรมบน blockchain ก็เช่นกัน
ตัว gas tracker ก็คือเป็นตัวบอกว่าค่า gas ตอนนี้คร่าว ๆ เป็นเท่าไหร่ เราสามารถดูจากเว็บของเชนนั้น ๆ ได้ เช่น Etheruem ก็ดูที่ Etherscan
Jetpack Glance คืออะไร?
เป็น framework ในการทำ widget ซึ่งมัน on top มากับ Jetpack Compose
ตอนที่เราลองเป็น beta อยู่เลยเพิ่งมาใหม่ ตอนนี้เป็น stable version แล้ว release 1.1.1
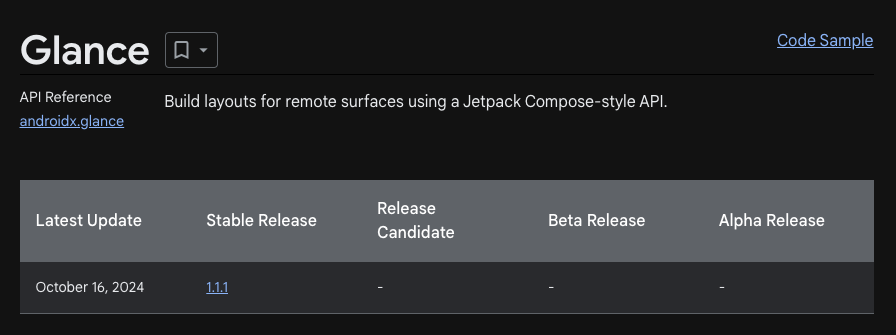
ตัว dependency เราก็ใส่ที่ build.gradle ของ module app ไว้ดังนี้
android {
   kotlinOptions {
       jvmTarget = "1.8"
   }
   buildFeatures {
       compose = true
   }
   composeOptions {
       kotlinCompilerExtensionVersion = "1.4.3"
   }
}

dependencies {
   // For AppWidgets support
   implementation("androidx.glance:glance-appwidget:1.1.0")

   // For interop APIs with Material 3
   implementation("androidx.glance:glance-material3:1.1.0")
}
Design
เมื่อเรารู้ว่าจะทำ widget อะไร ก็เริ่ม design กันก่อนเลยว่าจะหน้าตาประมาณไหน อยากให้มันทำอะไรได้บ้าง
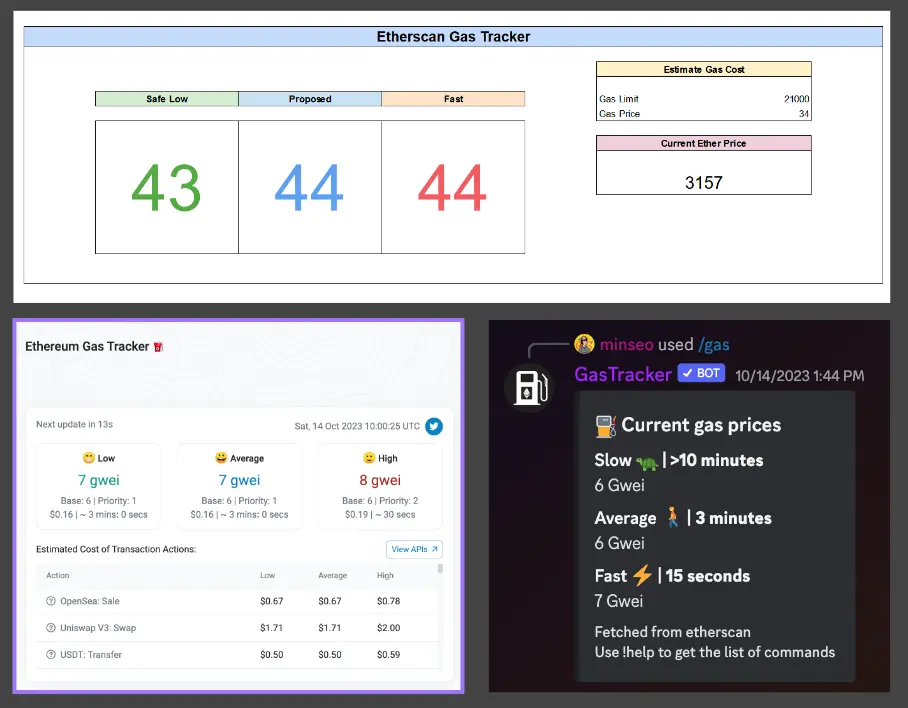
เอามาจากหลาย ๆ อย่างรวมกัน ข้อมูลที่เราต้องการคงหนีไม่พ้น ราคา ETH ต่อ USDT แล้วก็ gas tracker ว่าตอนนี้เป็นยังไงบ้าง โดยจะอิงสีจากตัว text จาก Etherscan แล้วก็ emoji จาก GasTracker ที่เป็น Discord Bot เนอะ
Setup Your Widget
เรามาเริ่มเพิ่ม widget ของเรากันดีกว่า ว่าเราต้องเพิ่มอะไรบ้าง เพื่อให้แอพของเรามี Widget
ก่อนอื่นสร้าง widget xml file กันก่อน เราตั้งชื่อว่า gas_tracker_widget_info.xml ใส่ใน folder xml ไปประมาณนี้ก่อน
<!-- xml/gas_tracker_widget_info.xml -->
<?xml version="1.0" encoding="utf-8"?>
<appwidget-provider
   xmlns:android="http://schemas.android.com/apk/res/android"
   xmlns:tools="http://schemas.android.com/tools"
   android:minWidth="160dp"
   android:minHeight="80dp"
   android:targetCellWidth="4"
   android:targetCellHeight="2"
android:resizeMode="horizontal|vertical" />targetCellWidthและtargetCellHeight: สำหรับ Android 12 ขึ้นไป ว่าเราอยากได้ขนาด default ของ widget เป็นกี่ cell ของเราอยากได้ขนาด 4x2 ก็ใส่targetCellWidth= 4 และtargetCellHeight= 2 และมันจะถูก ignore ถ้า home screen ไม่รองรับ grid-base layoutminWidthและminHeight: ถ้า Android 11 ลงมาจะใช้ default เป็นตัวนี้แทน ใส่เป็นค่า dp เท่าที่อ่านจาก document เข้าใจว่า 1 cell = 40dp ก็เลยเอา cell ไปคูณ จะได้minWidth= 160 และminHeight= 80 ถ้าขนาดไม่ match มันจะเอาค่าใกล้เคียงแบบปัดขึ้นresizeMode: เราอยาก resize widget ไปทางไหนได้บ้าง ถ้าอยาก resize แนวนอนใส่horizontalถ้าแนวตั้งใส่verticalในที่นี้ใส่ทั้ง 2 แนวเลยเป็นhorizontal|verticalถ้าไม่อยากก็ใส่noneไป
ต่อมาสร้าง widget view ไว้ก่อน สร้าง class ของ widget view ของเราก่อน ชื่อว่า GasTrackerWidget.kt ซึ่ง extend มาจาก GlanceAppWidget และ override provideGlance() เพื่อเขียน view ของ widget กัน
// GasTrackerWidget.kt
class GasTrackerWidget: GlanceAppWidget() {
   override suspend fun provideGlance(context: Context, id: GlanceId) {
       provideContent {
           SetGasTrackerWidget()
       }
   }

   @Preview (showBackground = true)
   @Composable
   private fun SetGasTrackerWidget() {
      GlanceTheme {
         ...
      }
   }
}
แล้วสร้าง receiver file ตั้งชื่อว่า GasTrackerWidgetReceiver.kt แล้วก็ extend GlanceAppWidgetReceiver()และ override glanceAppWidget แล้วใส่ค่าเป็น GasTrackerWidget ที่เราสร้างเมื่อกี้ ซึ่งใส่ไปแบบนี้ก่อน เดี๋ยวมาเพิ่มของทีหลัง
// GasTrackerWidgetReceiver.kt
class GasTrackerWidgetReceiver: GlanceAppWidgetReceiver() {
   override val glanceAppWidget: GlanceAppWidget = GasTrackerWidget()
}
จากนั้นมาประกาศ widget ที่ manifest กัน โดยกำหนด name ของ receive เป็น GasTrackerWidgetReceiver ที่เราสร้างเมื่อกี้ และ meta-data resource เป็น gas_tracker_widget_info ที่เราสร้างไว้
<!-- AndroidManifest.xml -->
<receiver android:name=".widget.GasTrackerWidgetReceiver"
   android:exported="true">
   <intent-filter>
       <action android:name="android.appwidget.action.APPWIDGET_UPDATE" />
   </intent-filter>
   <meta-data
       android:name="android.appwidget.provider"
       android:resource="@xml/gas_tracker_widget_info" />
</receiver>
สร้าง view ของ Widget กัน
ก่อนอื่นสร้าง class ของ widget view ของเราก่อน ชื่อว่า GasTrackerWidget.kt ซึ่ง extend มาจาก GlanceAppWidget และ override provideGlance() เพื่อเขียน view ของ widget กัน
// GasTrackerWidget.kt
class GasTrackerWidget : GlanceAppWidget() {
   override suspend fun provideGlance(context: Context, id: GlanceId) {
       provideContent {
           SetGasTrackerWidget()
       }
   }

   @Preview (showBackground = true)
   @Composable
   private fun SetGasTrackerWidget() {
      GlanceTheme {
          ...
      }
   }
}
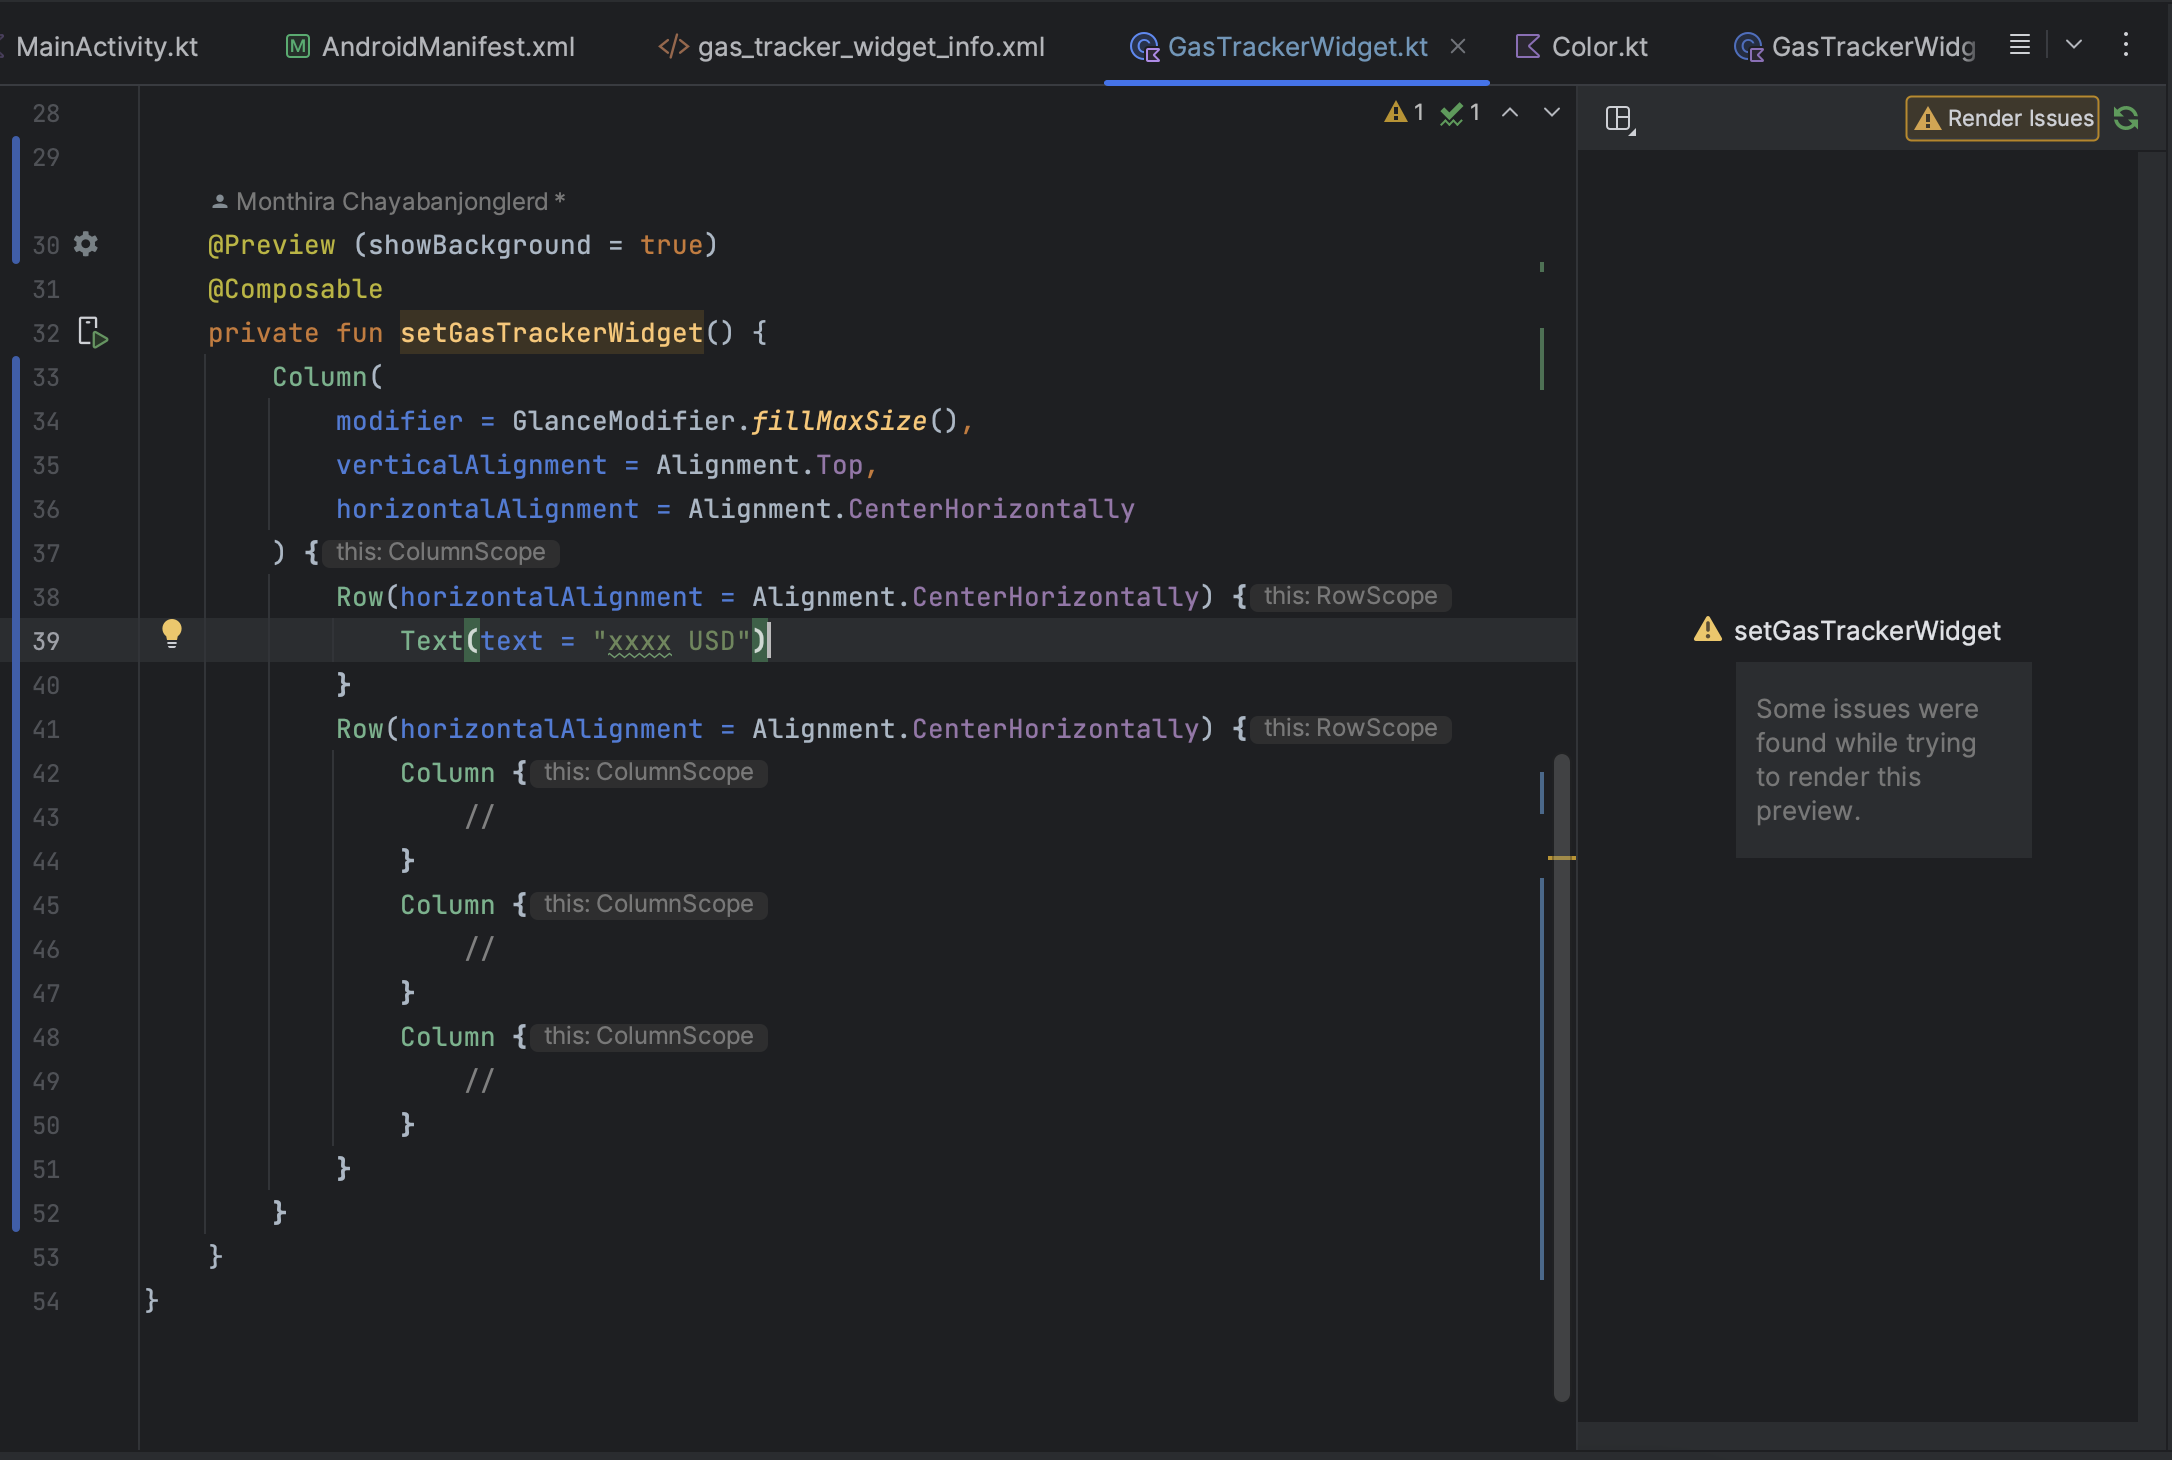
แน่นอนว่า Jetpack Glance นั้นถูก on-top บน Jetpack Compose ดังนั้นใครที่เขียน Jetpack Compose อยู่แล้ว หลักการเดียวกันเลย ถือรูปนี้ไว้เป็นสรณะ

โค้ดทั้งหมดในการสร้าง widget เป็นดังนี้ ซึ่งค่า mock ไว้ก่อน และโค้ดดูไม่ค่อยเรียบร้อยเท่าไหร่นัก
class GasTrackerWidget : GlanceAppWidget() {

    override suspend fun provideGlance(context: Context, id: GlanceId) {
        // In this method, load data needed to render the AppWidget.
        // Use `withContext` to switch to another thread for long running
        // operations.

        provideContent {
            setGasTrackerWidget()
        }
    }


    @Preview (showBackground = true)
    @Composable
    private fun setGasTrackerWidget() {
        GlanceTheme {
            GasTrackerWidget()
        }
    }

    @Composable
    private fun GasTrackerWidget() {
        val context = LocalContext.current
        val prefs = currentState<Preferences>()

        val ethusd = "2704.67"
        val timestamp = "12/11/2024 20:37:29"
        val lowGasPrice = "11"
        val averageGasPrice = "13"
        val highGasPrice = "16"

        Column(
            verticalAlignment = Alignment.CenterVertically,
            horizontalAlignment = Alignment.CenterHorizontally,
            modifier = GlanceModifier
                .fillMaxSize()
                .background(Color.DarkGray)
                .padding(8.dp)
                .clickable {
                    actionStartActivity<MainActivity>()
                }
        ) {
            etherPriceView(context, ethusd)
            Row(
                verticalAlignment = Alignment.CenterVertically,
                horizontalAlignment = Alignment.CenterHorizontally,
                modifier = GlanceModifier
                    .fillMaxWidth()
                    .padding(0.dp, 8.dp, 0.dp, 8.dp)
            ) {
                Column(
                    modifier = GlanceModifier
                        .background(R.color.bsSuccess)
                        .padding(8.dp)
                        .cornerRadius(16.dp)
                        .defaultWeight(),
                    verticalAlignment = Alignment.CenterVertically,
                    horizontalAlignment = Alignment.CenterHorizontally
                ) {
                    textEmojiHeader("🐢")
                    textLabelHeader(context.getString(R.string.text_gas_low))
                    textGwei(context.getString(R.string.text_gwei, lowGasPrice))
                    textGweiPrice(context.getString(R.string.text_usd, calculateGasPriceUsd(ethusd, lowGasPrice)))
                }
                spacerWidth8dp()
                Column(
                    modifier = GlanceModifier
                        .background(R.color.bsPrimary)
                        .padding(8.dp)
                        .cornerRadius(16.dp)
                        .defaultWeight(),
                    verticalAlignment = Alignment.CenterVertically,
                    horizontalAlignment = Alignment.CenterHorizontally
                ) {
                    textEmojiHeader("🚶")
                    textLabelHeader(context.getString(R.string.text_gas_avg))
                    textGwei(context.getString(R.string.text_gwei, averageGasPrice))
                    textGweiPrice(context.getString(R.string.text_usd, calculateGasPriceUsd(ethusd, averageGasPrice)))
                }
                spacerWidth8dp()
                Column(
                    modifier = GlanceModifier
                        .background(R.color.bsDanger)
                        .padding(8.dp)
                        .cornerRadius(16.dp)
                        .defaultWeight(),
                    verticalAlignment = Alignment.CenterVertically,
                    horizontalAlignment = Alignment.CenterHorizontally
                ) {
                    textEmojiHeader("⚡️")
                    textLabelHeader(context.getString(R.string.text_gas_high))
                    textGwei(context.getString(R.string.text_gwei, highGasPrice))
                    textGweiPrice(context.getString(R.string.text_usd, calculateGasPriceUsd(ethusd, highGasPrice)))
                }
            }
            Text(
                text = "updated $timestamp",
                style = TextStyle(
                    color = ColorProvider(Color.White),
                    fontSize = 8.sp,
                    textAlign = TextAlign.End
                ),
                modifier = GlanceModifier.fillMaxWidth()
            )
        }
    }

    @Composable
    private fun etherPriceView(context: Context, ethusd: String?) {
        Row(
            verticalAlignment = Alignment.CenterVertically,
            horizontalAlignment = Alignment.CenterHorizontally,
            modifier = GlanceModifier
                .fillMaxWidth()
                .background(Color.Gray)
                .padding(8.dp)
                .cornerRadius(16.dp)
        ) {
            Image(
                provider = ImageProvider(R.drawable.ic_eth_diamond_purple),
                contentDescription = "ETH logo",
                modifier = GlanceModifier.width(32.dp).height(32.dp)
            )
            Text(
                text = context.getString(R.string.text_usd, ethusd),
                style = TextStyle(
                    color = ColorProvider(Color.White),
                    fontSize = 24.sp,
                    fontWeight = FontWeight.Bold
                )
            )
        }
    }

    @Composable
    private fun textEmojiHeader(emoji: String) {
        Text(
            text = emoji,
            style = TextStyle(
                fontSize = 24.sp
            )
        )
    }

    @Composable
    private fun textLabelHeader(label: String) {
        Text(
            text = label,
            style = TextStyle(
                color = ColorProvider(Color.White),
                fontSize = 24.sp,
                fontWeight = FontWeight.Bold
            )
        )
    }

    @Composable
    private fun textGwei(gwei: String) {
        Text(
            text = gwei,
            style = TextStyle(
                color = ColorProvider(Color.White),
                fontSize = 20.sp
            )
        )
    }

    @Composable
    private fun textGweiPrice(price: String) {
        Text(
            text = price,
            style = TextStyle(
                color = ColorProvider(Color.White),
                fontSize = 16.sp
            )
        )
    }

    @Composable
    private fun textGweiAndPrice(gwei: String, price: String) {
        Text(
            text = "$gwei ($price)",
            style = TextStyle(
                color = ColorProvider(Color.White),
                fontSize = 16.sp
            )
        )
    }

    @Composable
    private fun spacerWidth8dp() {
        Spacer(
            modifier = GlanceModifier.width(8.dp)
        )
    }

    @Composable
    private fun spacerHeight8dp() {
        Spacer(
            modifier = GlanceModifier.height(8.dp)
        )
    }
}
ทีนี้เราได้ widget จากการ mock ค่ามาแล้ว ทีนี้ถ้าเคยเขียน Jetpack Compose มาประมาณนึงก็พบว่ามันก็ดูจะเหมือน ๆ กัน แต่ต่างกันที่ Modifier คนละตัวกัน โดยปกติใช้ Modifier จาก compose แต่ตัว Jetpack Glance ก็มีของตัวเองเช่นกัน
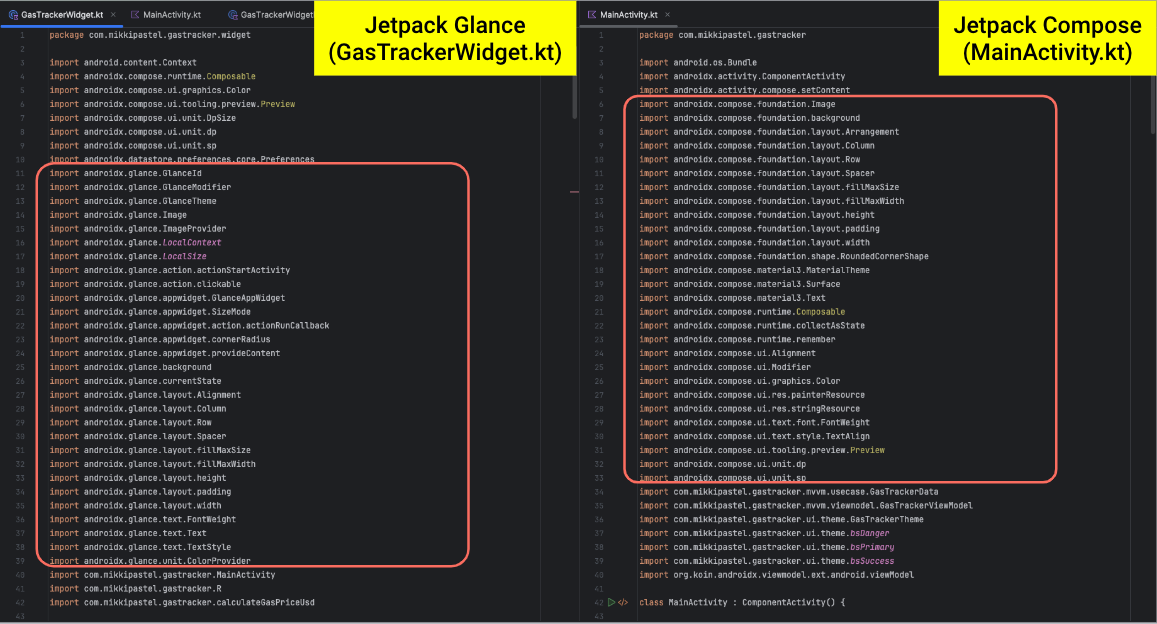
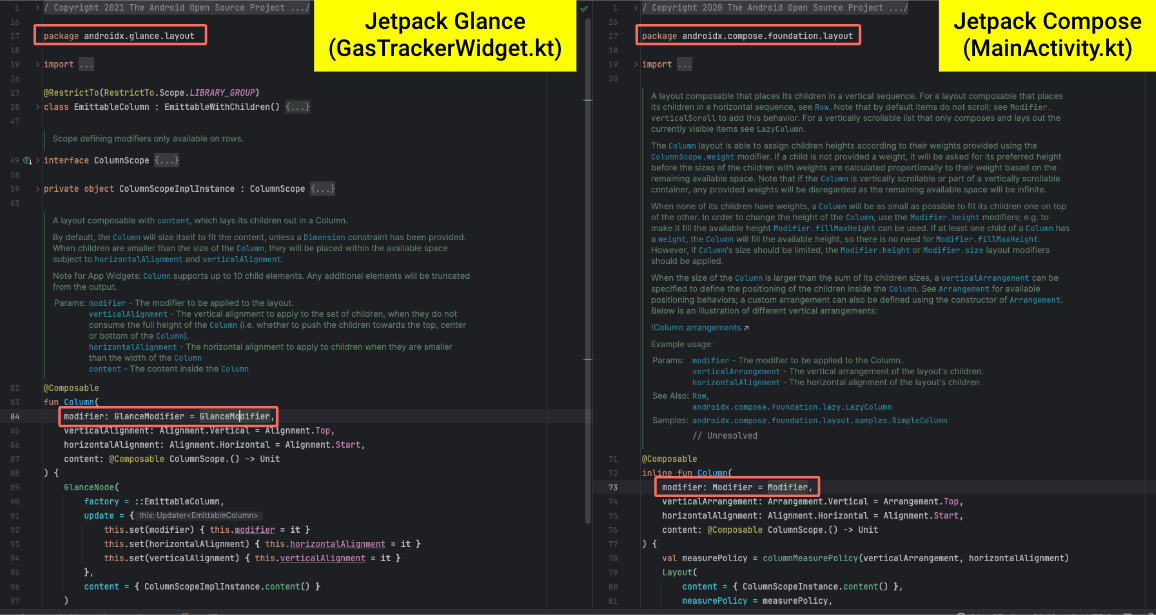
สำหรับใครที่ไม่เคยใช้ Jetpack Compose อาจจะงง ๆ ว่า Modifier คืออะไร? เป็นการ set attribute ของ view นั้น ๆ ว่าให้เป็นยังไงบ้าง พวกเกี่ยวกับ layout การ interaction กับมัน เหมือนตอน xml นั่นแหละ แต่เปลี่ยนมาเป็นการใช้ modifier แทน
ซึ่งการเขียน Jetpack Compose และ Jetpack Glance มันก็มีความต่างกันอยู่นิดนึงจากที่เราเจอมา เช่น การ set background ใช้ท่าไม่เหมือนกัน
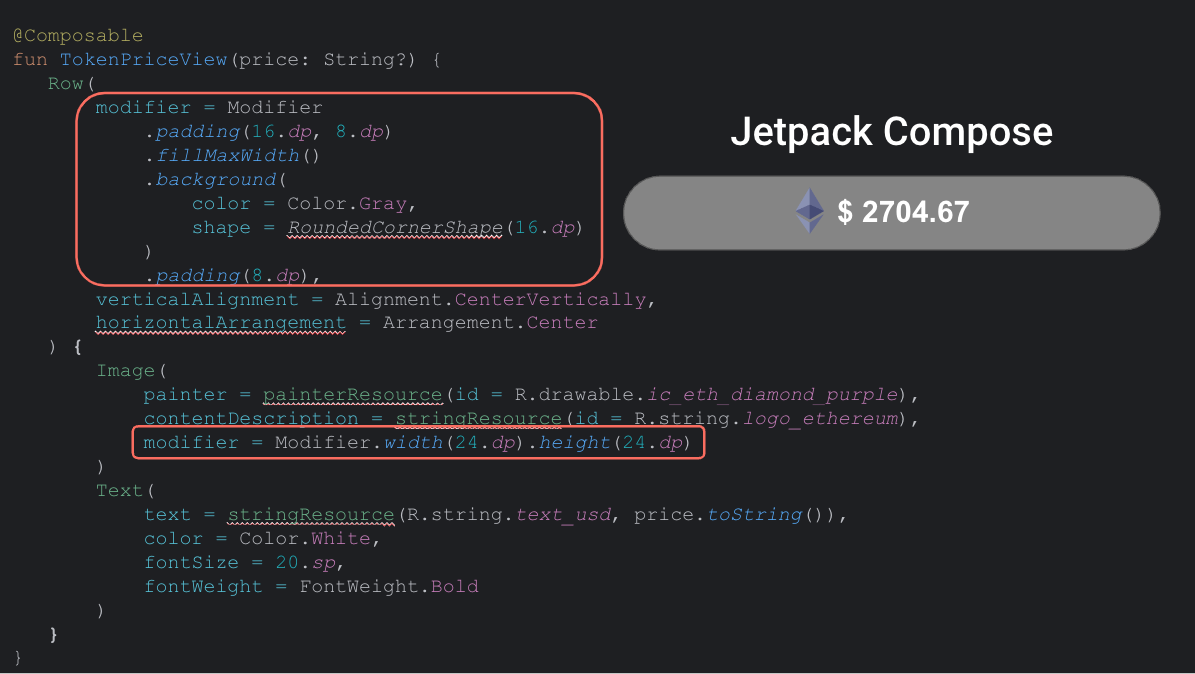
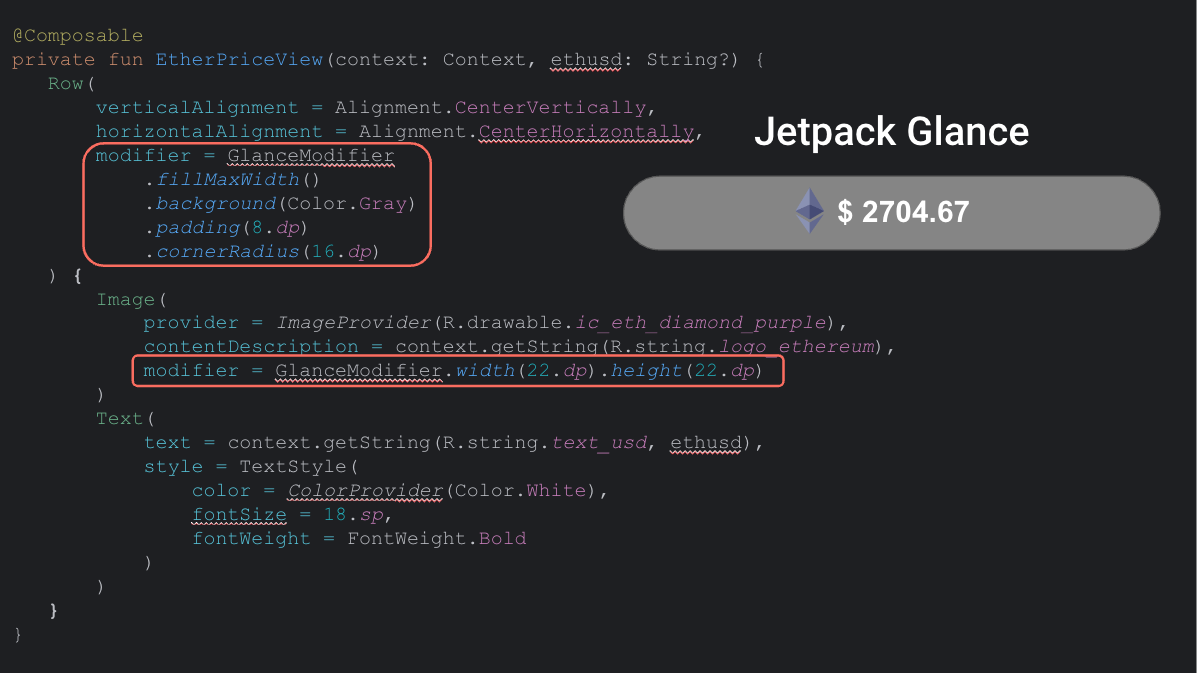
ซึ่งเคยเขียนไว้ที่นี่
.
เราเห็น widget แอพอื่น เรากดที่ widget แล้วไปที่หน้าแอพเขาเลย แล้วเราทำได้ไหม? ทำได้ โดยใส่ clickable ที่ Modifier ที่ชั้นนอกสุด แบบนี้
// GasTrackerWidget.kt
Column(
   verticalAlignment = Alignment.CenterVertically,
   horizontalAlignment = Alignment.CenterHorizontally,
   modifier = GlanceModifier
       .fillMaxSize()
       .background(Color.DarkGray)
       .padding(8.dp)
       .clickable(actionStartActivity<MainActivity>())
) {
    …
}
เท่านี้ก็กดที่ widget เพื่อไปหน้าหลักได้ล่ะ
เอา data จาก Etherscan มาแสดงกัน
ตัว Etherscan เขาก็มี API ให้ใช้เหมือนกันนะ บางเส้นฟรี บางเส้นจ่ายเงิน ซึ่งเส้นที่เราใช้เป็นเส้นฟรี ไม่ต้องกังวลไป
ก่อนอื่นไปที่เว็บ Etherscan กดปุ่ม Sign In เพื่อกดปุ่ม Sign Up อีกที จากนั้นกดยืนยัน email เป็นอันเสร็จ
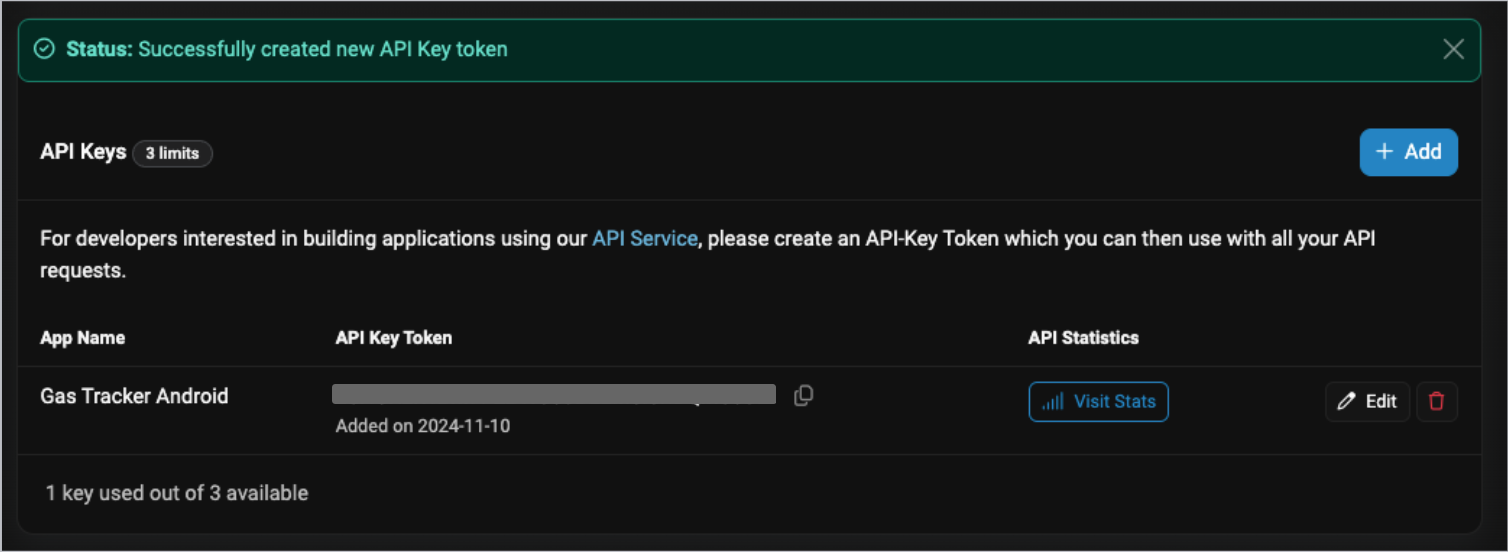
ต่อมามาสร้าง API Key กัน ไปที่หน้า profile กด API Keys
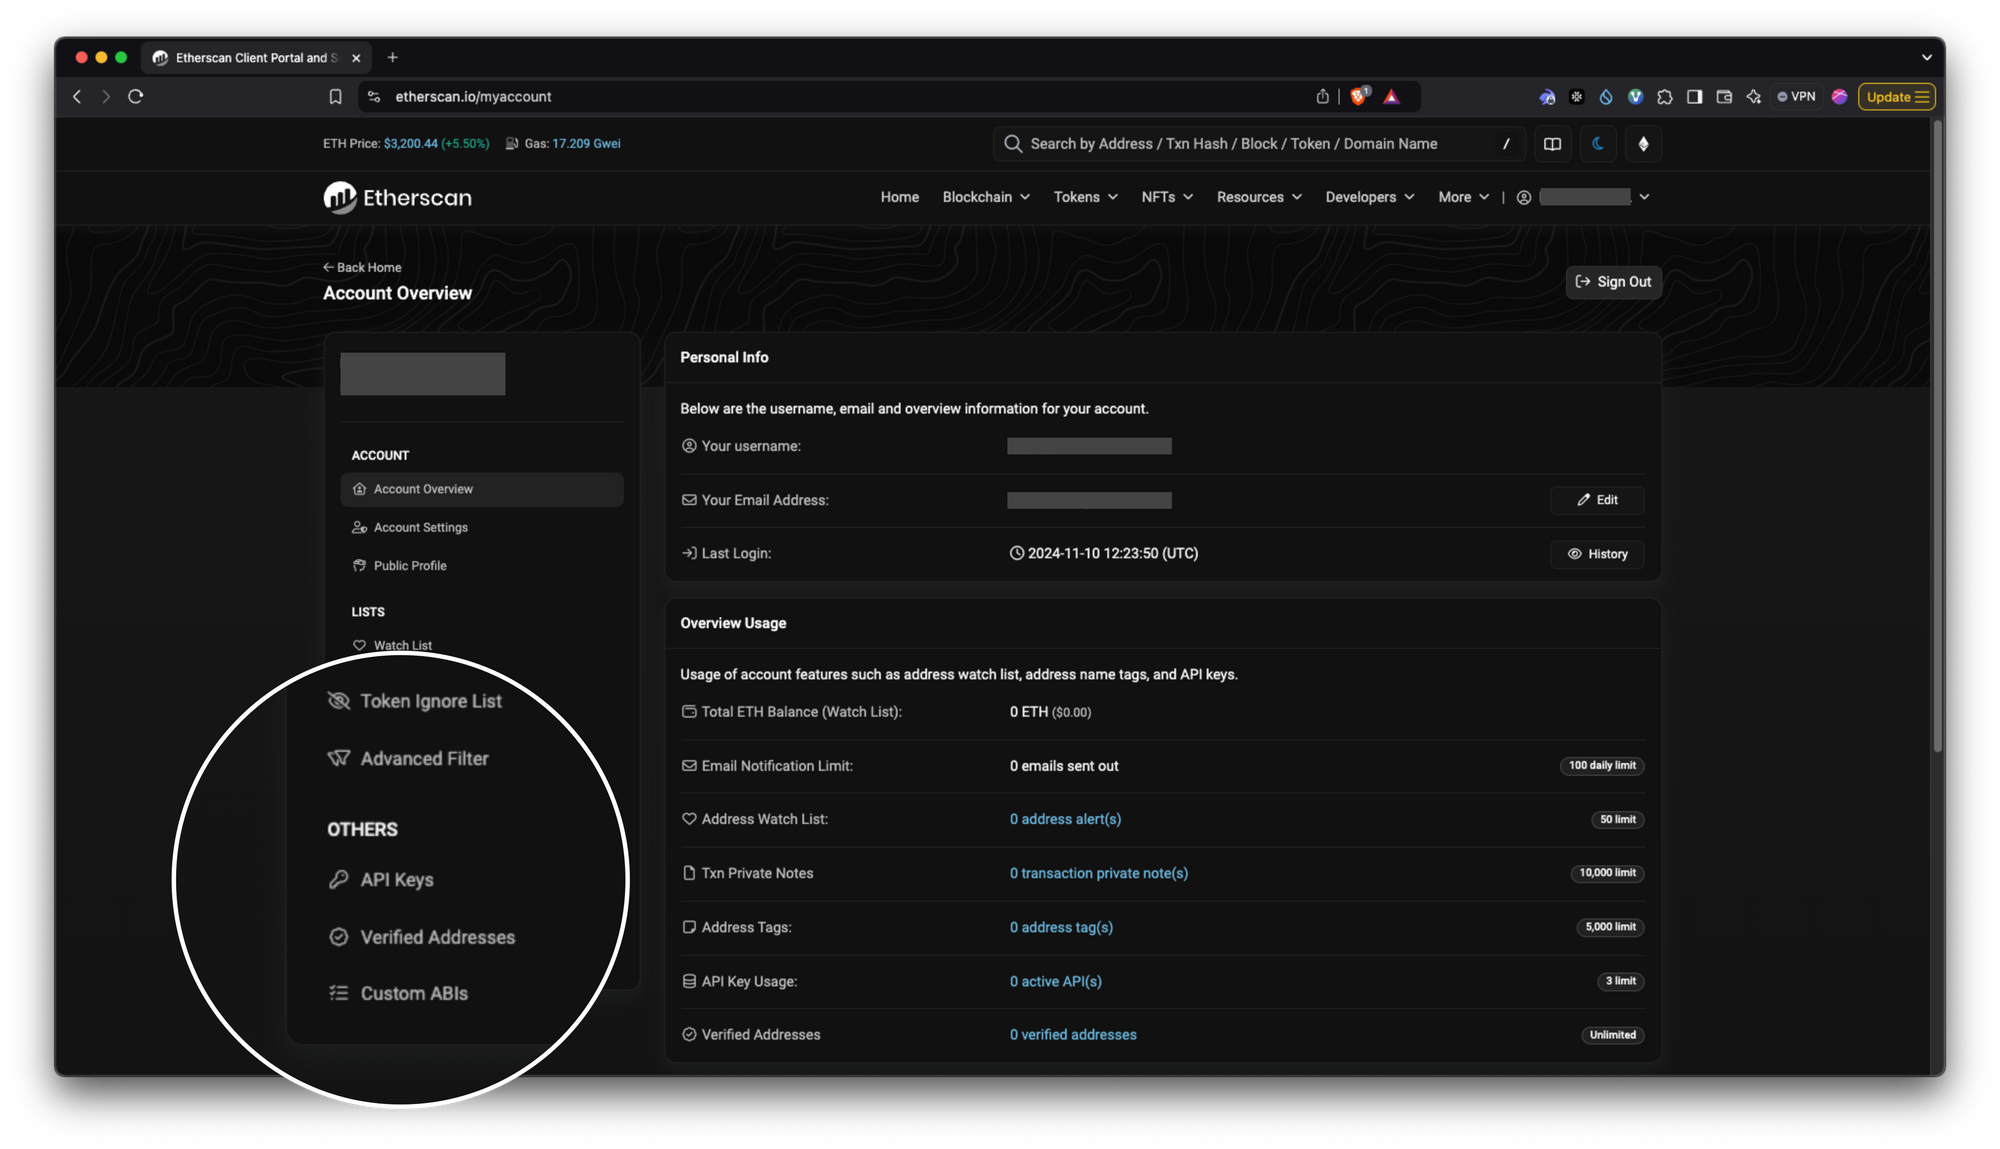
plan ของเราจะเป็น FREE API Plan ต่อวินาทีเราเรียกได้ 5 ครั้ง และวันนึงเรียกได้สูงสุด 100,000 ครั้ง ซึ่งน่าจะเพียงพอแล้วสำหรับ widget ตัวนี้
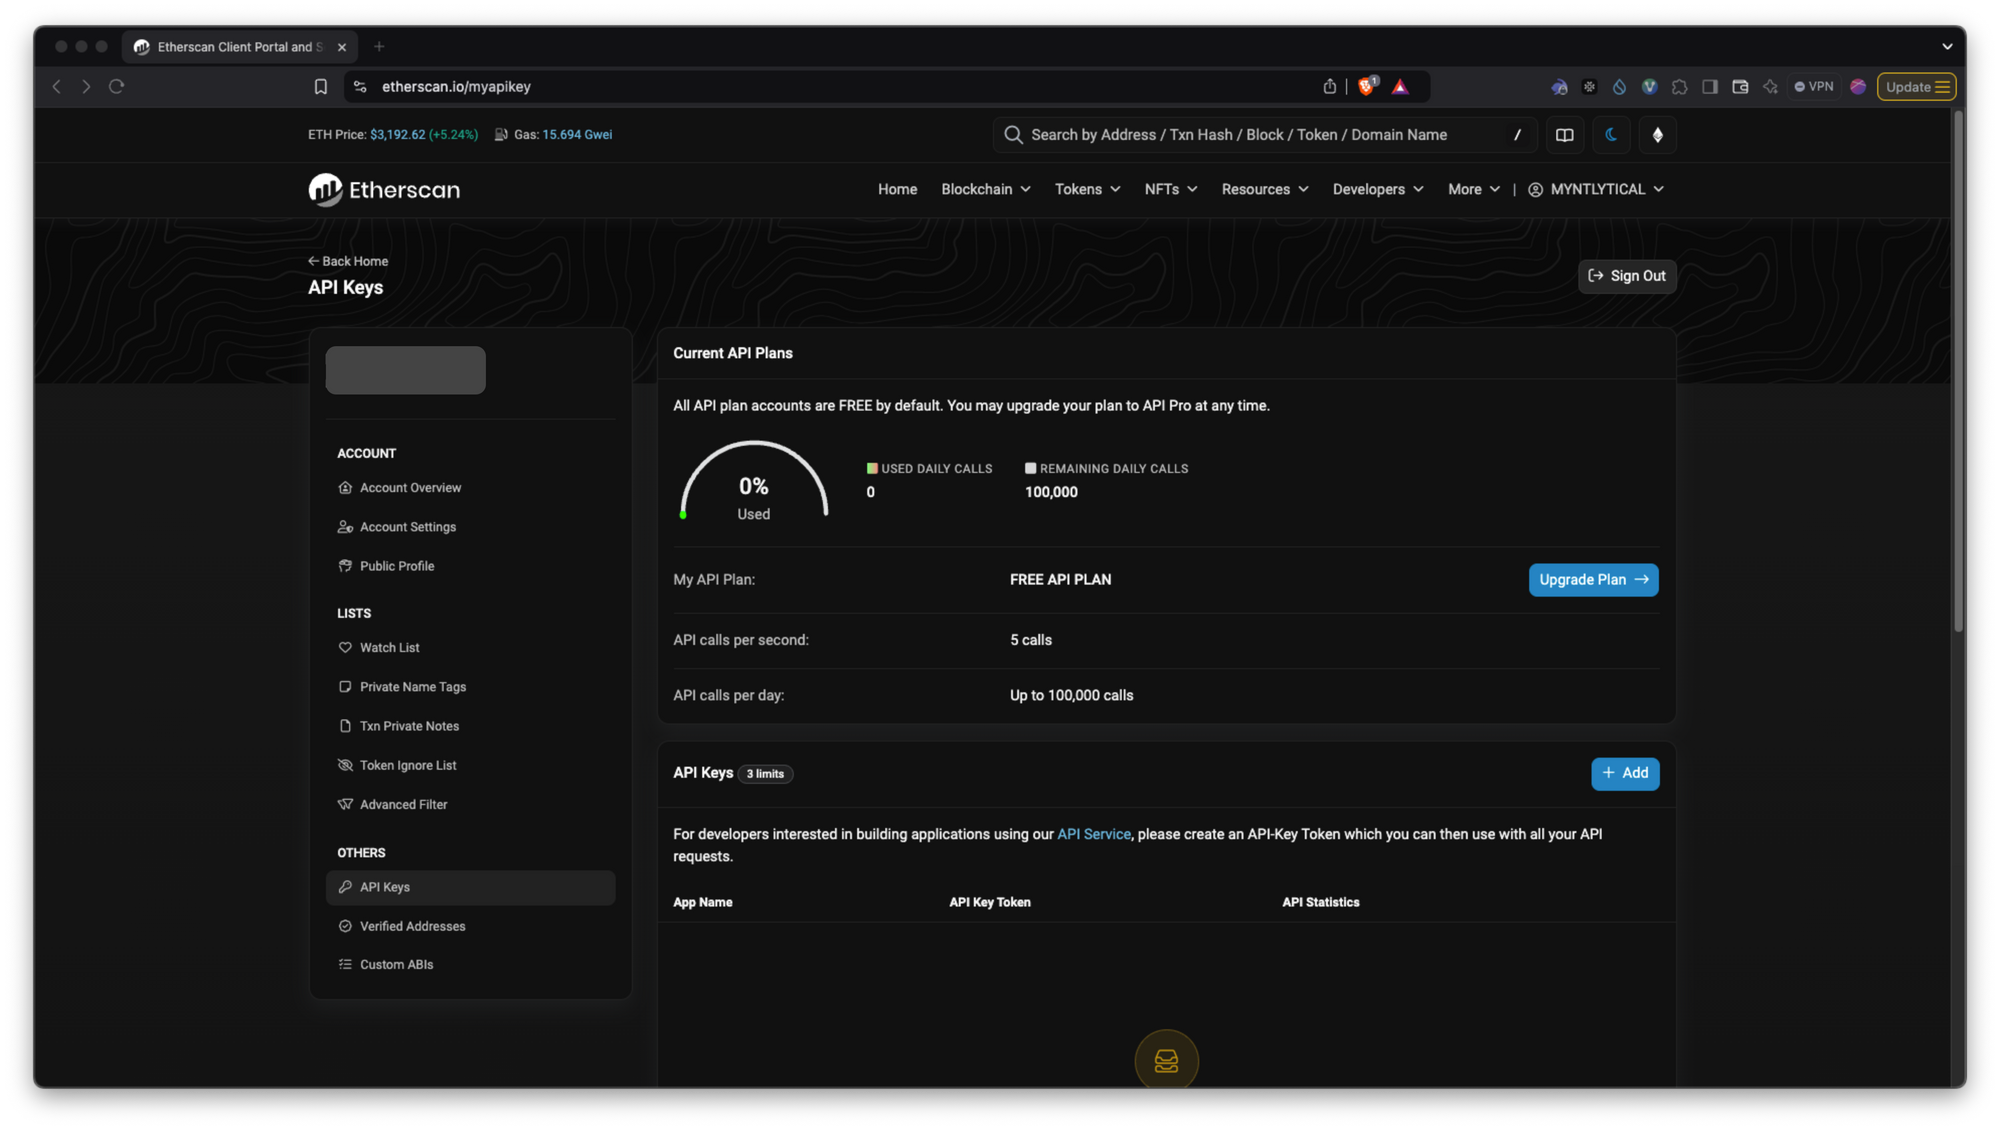
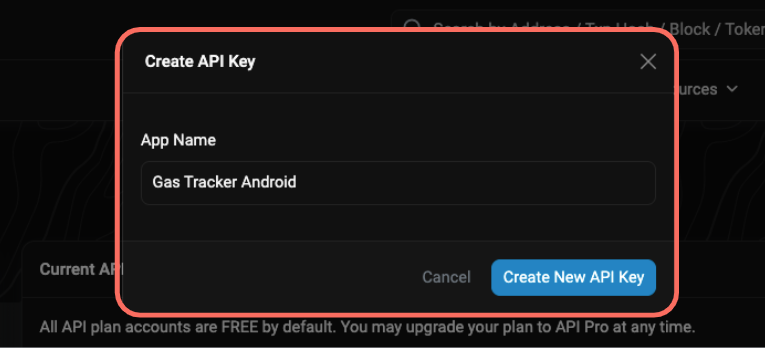
เรามาเพิ่ม API Key กัน กดปุ่ม Add แล้วก็ตั้งชื่อ เสร็จแล้วกด Create New API Key
แล้วเราจะได้ API Key Token เอาไปใช้ต่อได้เลย และเราสามารถขอได้อีก 2 keys เท่านั้นนะ
เส้น API ที่เราใช้
- Get Gas Oracle: ค่า gas ในปัจจุบัน เราดึง
SafeGasPrice,ProposeGasPrice,FastGasPriceออกมาแสดงบน Widget ซึ่งจะ return ค่าเป็น gwei ออกมา
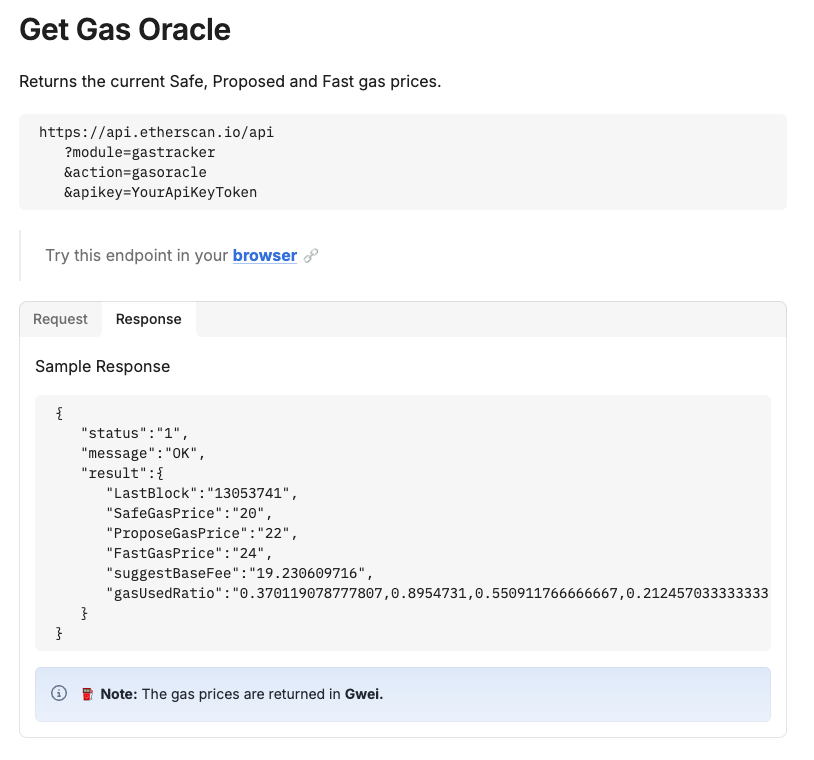
แล้ว gwei คืออะไรล่ะ? gwei คือ gigawei หรือ 1,000,000,000 และ wei เป็น unit ของ ether
ตามหลัก transection ปกติจะมี 21,000 units โดยพื้นฐาน
- Get Ether Last Price: อัพเดตราคา Eteruem ล่าสุด และเอาไปคำนวณค่า gas เป็น USDT คร่าว ๆ เราใช้แค่ ethusd
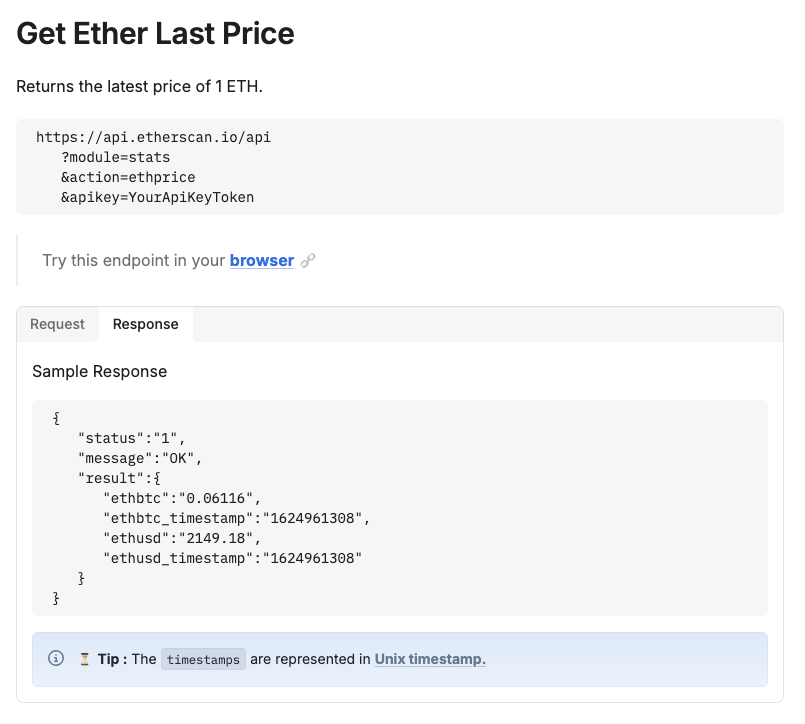
แล้วเรื่อง shock เรื่องนึง คือค่าพี่แกเล่น return String หมดไง แล้วเราจะเอาไปคำนวณต่อ แล้วตอนแรกเราแปลงเป็น Int ไป ๆ มา ๆ app crash เพราะมันเป็น Float แทน เลยต้องเปลี่ยน
และในที่นี้ยังเป็นเส้นแบบ v1 อยู่นะ ซึ่งแบบ v2 ตอนนี้กำลัง beta อยู่ เพิ่ม parameter chainId
.
จากนั้นมาคำนวณค่า gas เป็น USDT กัน อันนี้เป็นสูตรที่ใช้
eth = gas_unit * gwei * 0.000000001
usdt = eth * eth_price
ข้อควรระวัง เนื่องจากค่า 0.000000001 เวลาคูณใน kotlin มันจะเป็น 0 เพราะเรื่อง type เราเลยครอบเป็น BigDecimal ไปเพื่อให้ได้ผลลัพธ์ที่ถูกต้อง
fun calculateGasPriceUsd(ethPrice: String?, gasPrice: String?): String {
    val gasUnit = 21000
    val gasEthPrice = gasUnit.times(gasPrice?.toFloat() ?: 0f) * 0.000000001
    val result = ethPrice?.toFloat()?.times(gasEthPrice)
    return result.convertTo2Decimal()
}
ref:
ทั้งหมดก็มาทำ MVVM ตามปกติเลย
ต่อมาไปที่ GasTrackerWidgetReceiver เพื่อดึง data จาก API มาแสดงที่ widget ของเรา โดยเราสร้าง key โดยใช้ stringPreferencesKey เพื่อรับค่าจาก API ที่เราต้องการ 5 ค่าด้วยกัน คือ ethusd, timestamp, lowGasPrice, averageGasPrice, highGasPrice เพื่อเอาไปแสดงต่อที่ widget
จากนั้นเราก็เรียก useCase เพื่อดึงข้อมูลจาก API แล้วเอามาใส่ใน key ที่เราสร้างเมื่อกี้ จากนั้นมันจะทำการ recompose ด้วย glanceAppWidget.update(context, it)
class GasTrackerWidgetReceiver: GlanceAppWidgetReceiver() {
    override val glanceAppWidget: GlanceAppWidget = GasTrackerWidget()

    private val getEtherLastPriceUseCase = GetEtherLastPriceUseCase()
    private val getGasOracleUseCase = GetGasOracleUseCase()

    companion object {
        val ethusd = stringPreferencesKey("ethusd")
        val timestamp = stringPreferencesKey("timestamp")
        val lowGasPrice = stringPreferencesKey("lowGasPrice")
        val averageGasPrice = stringPreferencesKey("averageGasPrice")
        val highGasPrice = stringPreferencesKey("highGasPrice")
    }

    override fun onUpdate(
        context: Context,
        appWidgetManager: AppWidgetManager,
        appWidgetIds: IntArray
    ) {
        super.onUpdate(context, appWidgetManager, appWidgetIds)
        observeData(context)
    }

    private fun observeData(context: Context) {
        val coroutineScope = CoroutineScope(Dispatchers.Main)

        coroutineScope.launch {
            val etherPriceResult = getEtherLastPriceUseCase.invoke().result
            val gasOracleResult = getGasOracleUseCase.invoke().result

            val glanceId = GlanceAppWidgetManager(context).getGlanceIds(GasTrackerWidget::class.java).firstOrNull()

            glanceId?.let {
                updateAppWidgetState(context, PreferencesGlanceStateDefinition, it) { pref ->
                    pref.toMutablePreferences().apply {
                        this[ethusd] = etherPriceResult?.ethusd.convertTo2Decimal()
                        this[timestamp] = getCurrentTimeStamp()
                        this[lowGasPrice] = gasOracleResult?.lowGasPrice.convertTo2Decimal()
                        this[averageGasPrice] = gasOracleResult?.averageGasPrice.convertTo2Decimal()
                        this[highGasPrice] = gasOracleResult?.highGasPrice.convertTo2Decimal()
                    }
                }
                glanceAppWidget.update(context, it)
            }
        }
    }
}
ตอนเอาไปใช้จริงที่หน้า widget เราดึงค่าที่ได้เมื่อกี้ จาก key ทั้ง 5 ที่เราสร้าง
// GasTrackerWidget.kt
private fun SetGasTrackerWidget() {
   GlanceTheme {
       val context = LocalContext.current
       val prefs = currentState<Preferences>()

       val ethusd = prefs[GasTrackerWidgetReceiver.ethusd]
       val timestamp = prefs[GasTrackerWidgetReceiver.timestamp]
       val lowGasPrice = prefs[GasTrackerWidgetReceiver.lowGasPrice]
       val averageGasPrice = prefs[GasTrackerWidgetReceiver.averageGasPrice]
       val highGasPrice = prefs[GasTrackerWidgetReceiver.highGasPrice]

       GasTrackerWidget(
           context,
           ethusd,
           timestamp,
           lowGasPrice,
           averageGasPrice,
           highGasPrice
       )
   }
}
Update widget data
ในที่นี้มี 2 แบบ คืออัพเดตเอง กับกดปุ่ม refresh เพื่ออัพเดต
อัพเดตเอง
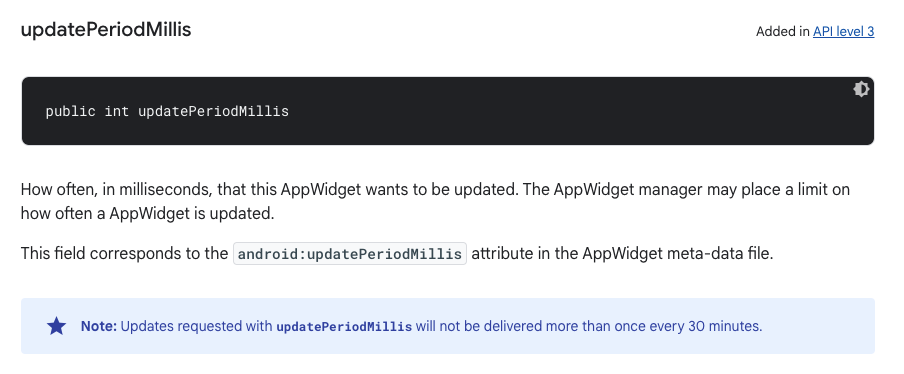
กลับไปที่ widget xml file ที่ชื่อว่า gas_tracker_widget_info.xml เราจะเพิ่ม updatePeriodMillis เพื่อบอกว่าอยากให้ widget ของเรา update ทุกเวลาเท่าไหร่ ใช้ควบคู่กับ onUpdate() ที่ GasTrackerWidgetReceiver.kt กัน
ข้อมูลหน้าเว็บ Etherscan ก็จะอัพเดตตลอดเวลา เนื่องจากเราคิดว่าคนไม่น่าสนใจข้อมูลบน widget ตลอดเวลา และตาม document เขาบอกว่า ข้อมูลจะไม่ถูกส่งมากกว่า 1 ครั้ง ในทุก ๆ 30 นาที คือ อัพเดตบ่อยกว่า 30 นาทีไม่ได้ เลยใส่ค่า updatePeriodMillis เป็น 30 นาที เป็น milisecond จะเป็น 1800000
<!-- xml/gas_tracker_widget_info.xml -->
<?xml version="1.0" encoding="utf-8"?>
<appwidget-provider
   xmlns:android="http://schemas.android.com/apk/res/android"
   xmlns:tools="http://schemas.android.com/tools"
   android:minWidth="160dp"
   android:minHeight="80dp"
   android:targetCellWidth="4"
   android:targetCellHeight="2"
   android:resizeMode="horizontal|vertical"
   android:updatePeriodMillis="1800000" />
พอถึงเวลามันจะไปที่ onUpdate() เอง แล้วไปเรียก API แล้วก็ recompose
override fun onUpdate(
    context: Context,
    appWidgetManager: AppWidgetManager,
    appWidgetIds: IntArray
) {
    super.onUpdate(context, appWidgetManager, appWidgetIds)
    observeData(context)
}
กดปุ่ม refresh
สร้าง callback ขึ้นมาก่อน ชื่อว่า GasTrackerCallback ก็แล้วกัน ส่ง intent.action ไปด้วย เมื่อเรากดปุ่มแล้วมันจะไปที่ receiver จะได้แยกออกว่าเป็นอันไหนเนอะ
//GasTrackerCallback.kt
class GasTrackerCallback: ActionCallback {

    companion object {
        const val UPDATE_ACTION = "updateAction"
    }
    override suspend fun onAction(
        context: Context,
        glanceId: GlanceId,
        parameters: ActionParameters
    ) {
        val intent = Intent(context, GasTrackerWidgetReceiver::class.java).apply {
            action = UPDATE_ACTION
        }
        context.sendBroadcast(intent)
    }
}
แล้วมา implement เพิ่มใน onReceive() ที่ GasTrackerWidgetReceiver เมื่อเรากดปุ่ม refresh มันจะมาอัพเดตที่ตรงนี้
override fun onReceive(context: Context, intent: Intent) {
    super.onReceive(context, intent)
    // refresh button
    if (intent.action == GasTrackerCallback.UPDATE_ACTION) {
        observeData(context)
    }
}
ตอนเอาไปใช้ก็ใช้ผ่าน modifier ได้เลย แบบนี้
// GasTrackerWidget.kt
Image(
   provider = ImageProvider(R.drawable.ic_refresh),
   contentDescription = context.getString(R.string.refresh),
   modifier = GlanceModifier.clickable(actionRunCallback<GasTrackerCallback>())
)
Resize widget
อันนี้ optional นะ ถ้า widget เรามันสามารถ resize ได้ ต้องทำยังไงบ้างนะ
แน่นอนเราต้องออกแบบก่อนว่าถ้าขนาดเล็กลงจะเป็นยังไง ผลจะออกมาแบบนี้
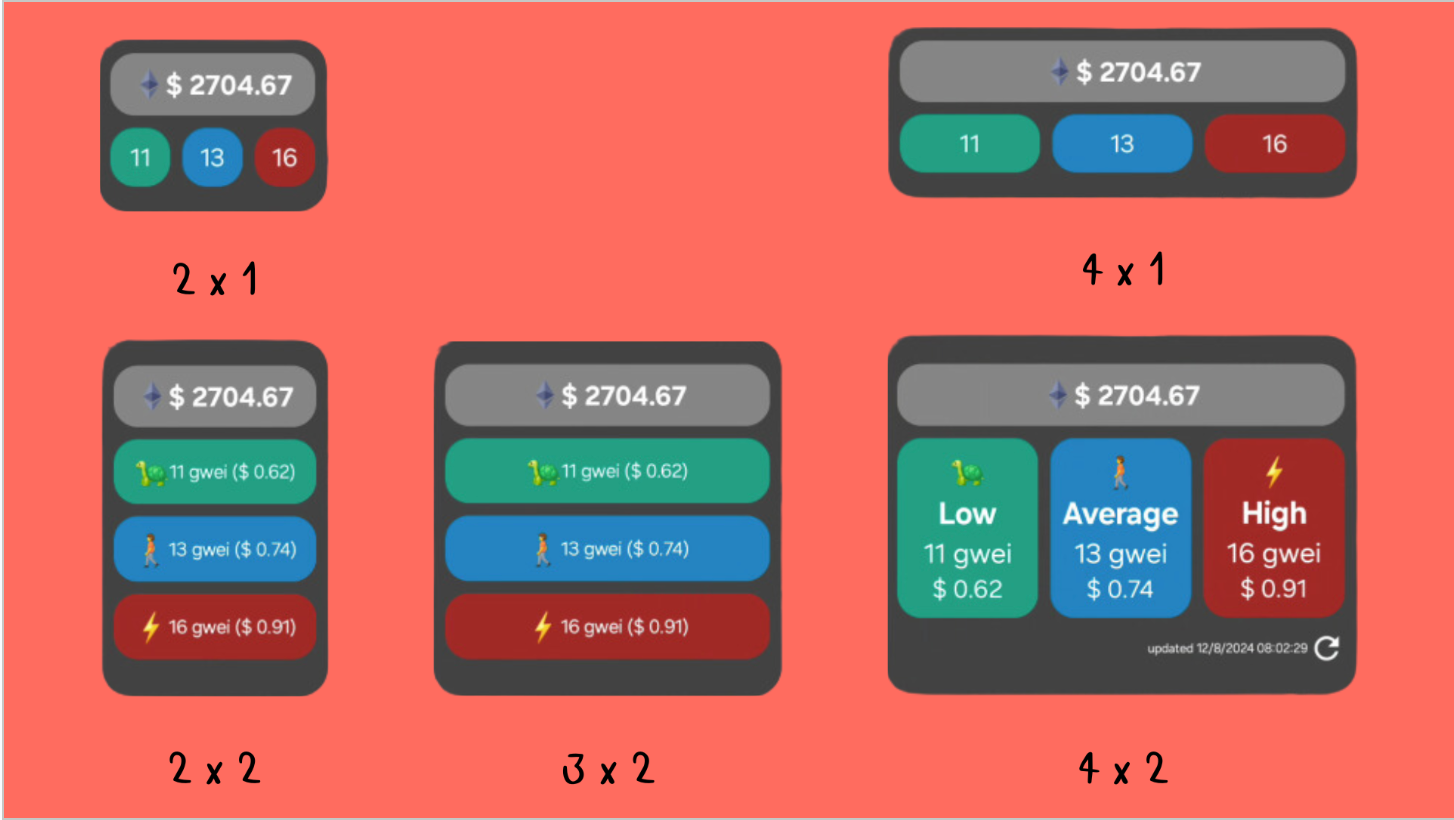
แล้วก็เอามาคำนวณ อาจจะไม่เป๊ะมาก น่าจะประมาณนี้

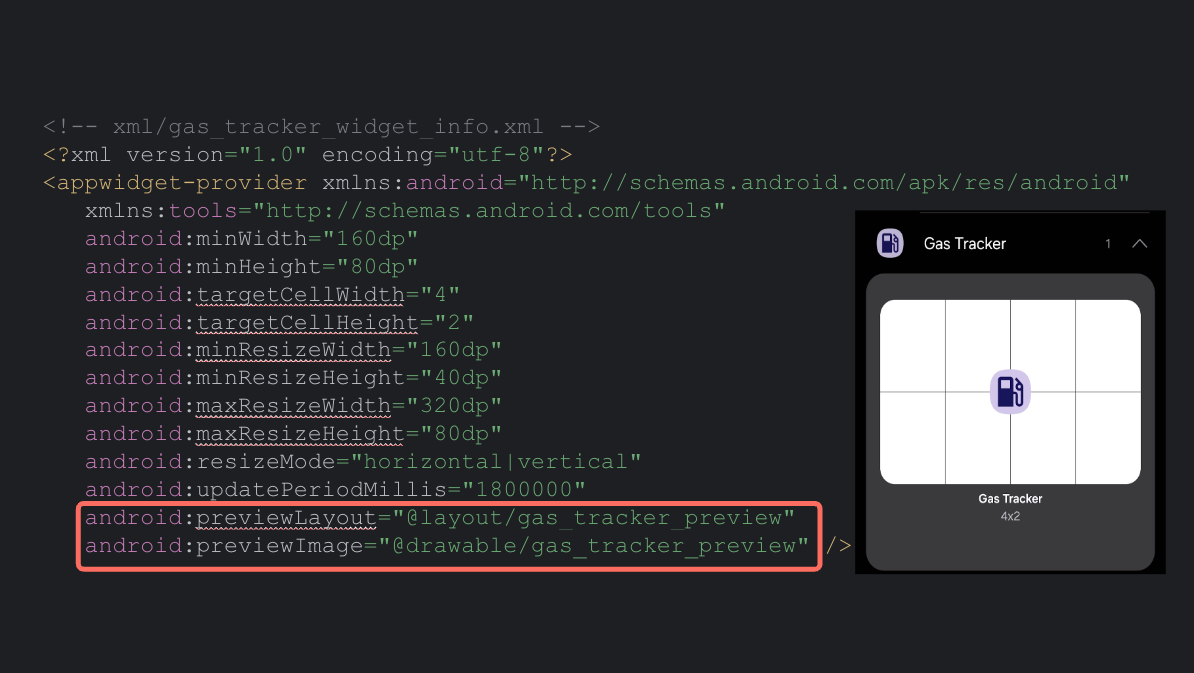
สิ่งที่ยังติดอยู่ คือ ตัว previewLayout ที่ต้องใส่ตัว xml เข้าไป สำหรับ Android 12 ขึ้นไป ซึ่งเอ่อออ เหนื่อยล่ะ ส่วน Android 11 ลงมาจะใช้ previewImage เลยจะเห็นขาว ๆ ตอนเลือก widget อ่ะ
แล้วก็เรื่องขนาดของแต่ละ device ยังไม่ค่อยเป๊ะมาก แบบเครื่องตัวเองสวย เครื่องคนอื่นไม่ค่อยสวย
demo
@mikkipastel แอพแอนดรอยด์ที่เราทำเอง ชื่อว่า Gas Tracker เป็น widget ที่แสดงค่า gas บนเชน Ethereum ในตอนนี้ ซึ่งเอามาประกอบกับ session "Create Android Widget First Time by Jetpack Glance" ที่งาน Android Bangkok Conference 2024 #Android #Widget #gastracker #JetpackCompose #jetpackglance ♬ เสียงต้นฉบับ มินซอ อินฟูที่เดฟได้นิดหน่อย
.
ทั้งหมดก็จะประมาณนี้ ข้างล่างเป็น github นะ
แล้วก็สไลด์ ไปดูในนี้ได้เลย
ซึ่งตอนแรกเนี่ย เผลอ push API key ขึ้นไป ดีที่ยังเป็น private repo อยู่ เลยรีบเปลี่ยน key และ refactor โดยพลัน
Reference



ส่วนอันนี้ session จาก Google I/O ปี 2024 ที่ตอนนั้น Jetpack Glance ใกล้จะปล่อย 1.1.0 เป็น stable ล่ะ แปะไว้ ยังไม่ได้ดูเลย555
ติดตามข่าวสารตามช่องทางต่าง ๆ และทุกช่องทางโดเนทกันไว้ที่นี่เลย แนะนำให้ใช้ tipme เน้อ ผ่าน promptpay ได้เต็มไม่หักจ้า
ติดตามข่าวสารแบบไว ๆ มาที่ Twitter เลย บางอย่างไม่มีในบล็อก และหน้าเพจนะ
สวัสดีจ้า ฝากเนื้อฝากตัวกับชาวทวิตเตอร์ด้วยน้าา
— Minseo | Stocker DAO (@mikkipastel) August 24, 2020
