มาแต่งซิ่งไปกับ MotionLayout บน Android แล้วมาขิง iOS กันเถอะ
พอดีเม้ากับพี่เอก เขาแนะนำว่าใช้ MotionLayout เถอะ (เห็นเอาไปใช้ใน LINE MAN แล้วนะแต่ตอนนี้เรายังหาไม่เจอว่าตรงไหนนะ) อ่ะยังไงเราก็ win อ่ะ เพราะเหมือน iOS จะยังไม่มีมั้งนะ
ความเดิมตอนที่แล้ว แน่นอนว่าเราจะขิงเป็น series
 Minseo Chayabanjonglerd
MotionLayout เป็น subclass ของ ConstraintLayout ใช้ในการจัดการ motion และการแสดง animation ต่างๆ ตัวนี้จะเป็นส่วนผสมรวมกันระหว่าง property animation framework, TransitionManager, และ CoordinatorLayout
สามารถอ่านเพิ่มเติมได้ที่นี่

การแสดง animation ใน MotionLayout ก็หลากหลายมากๆเช่นกัน location, size, visibility, alpha, color, elevation, rotation และ attributes อื่นๆสำหรับแสดงหลายๆ view ในเวลาเดียวกัน ฮู้วว ว้าวว
แน่นอนว่าเจ้า MotionLayout มาใน Constraint Layout 2.0 นะเออ เพราะฉันนั้นถ้าจะลองใช้ช่วยอัพเดต dependency เป็น version 2 ขึ้นไปน้า (ในวันที่ปล่อยบล็อกเป็น 2.0.1 นะ)
dependencies {
    implementation 'androidx.constraintlayout:constraintlayout:2.0.0'
}
ใน Constraint Layout 2.0 มีอะไรบ้าง นอกจาก MotionLayout แล้วยังมี Flow ช่วย wrap item ต่างๆให้สวยงาม และ Layer ตัวนี้ช่วยในการแสดง animation หลายๆ view พร้อมกัน ก็จะมี rotate, translate และ scale นะ
 Sean McQuillan
เนื้อหาตัวอย่างทั้งหมดจะอ้างอิงจาก codelab ตัวนี้จ้า


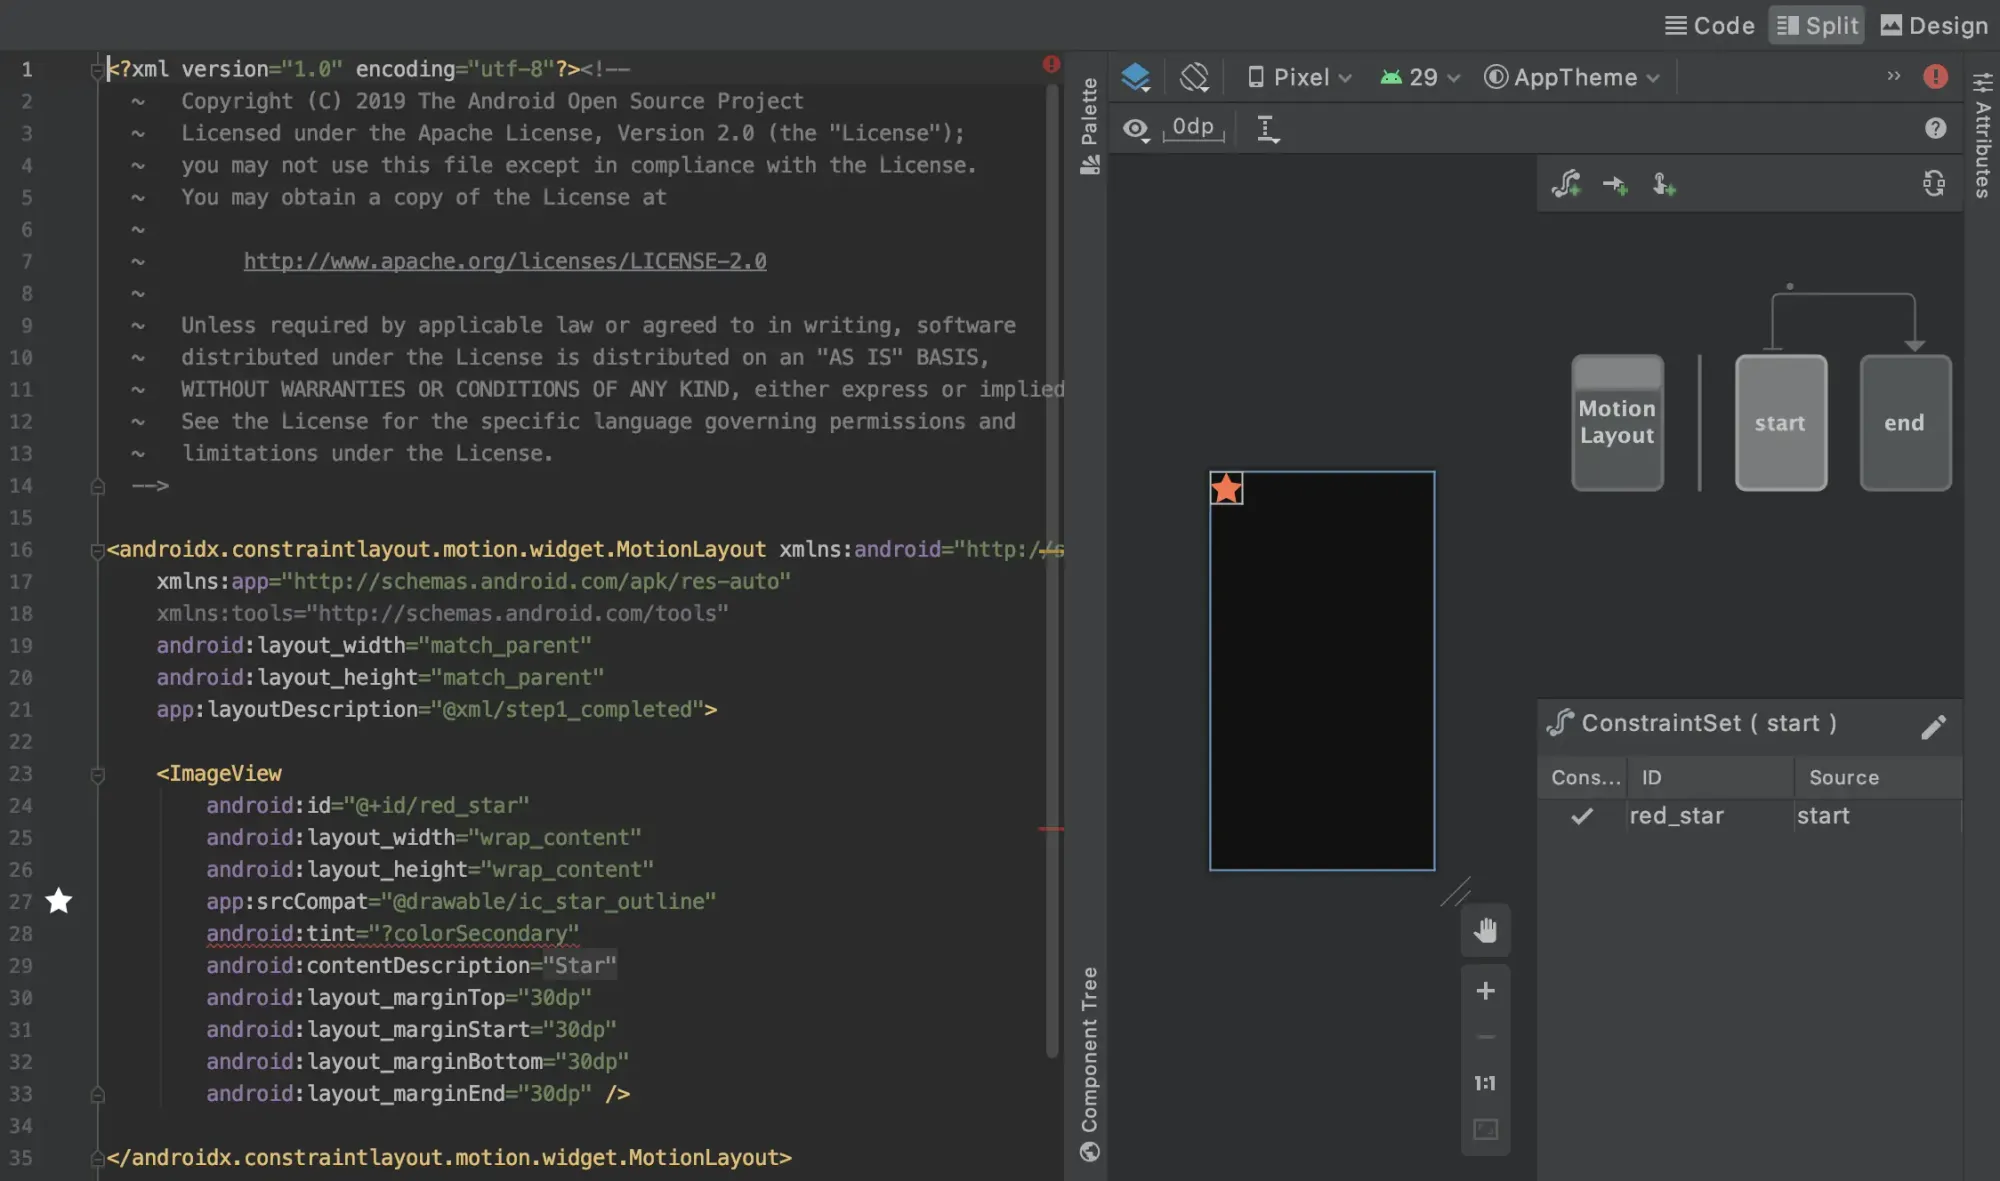
ก่อนอื่นเรามาสร้าง animation ง่ายๆบน MotionLayout กันเถอะ
เราจะให้ parent view เป็น MotionLayout จะพบว่า มันขึ้น error แดงๆน้าาาา เพราะมันขาด LayoutDescription นั่นเอง แล้วมันคืออะไรกันนะ
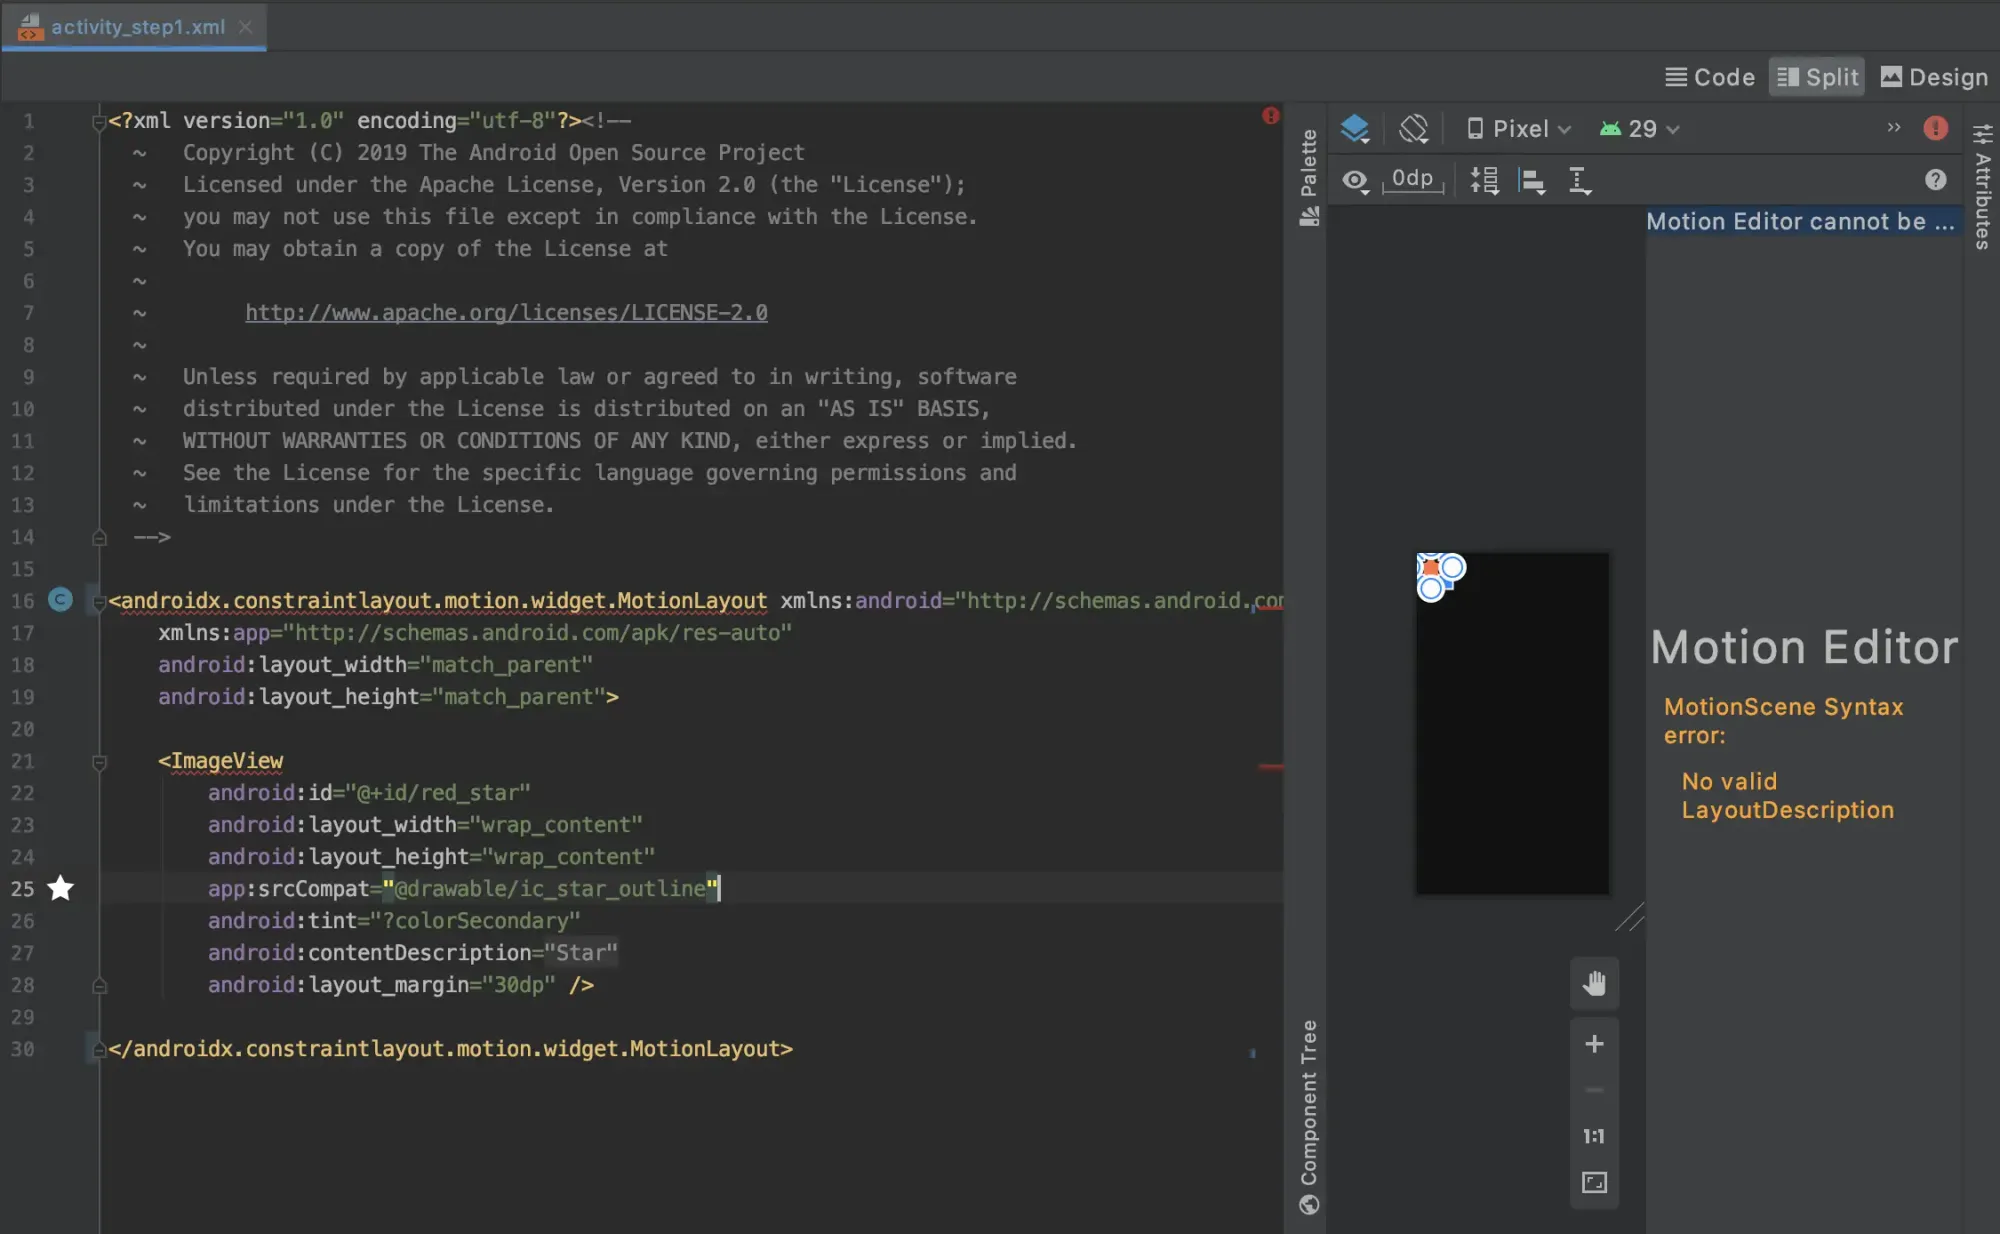
เพื่อให้หายข้องใจ เราไปกันต่อจ้า ไปเพิ่ม motion scene กันก่อน โดยไปสร้างไฟล์ xml ถ้าจาก codelab จะเป็น res/xml/step1.xml นะ แล้วไปเพิ่ม LayoutDescription ที่หายไป แบบนี้
<androidx.constraintlayout.motion.widget.MotionLayout xmlns:android="http://schemas.android.com/apk/res/android"
    xmlns:app="http://schemas.android.com/apk/res-auto"
    android:layout_width="match_parent"
    android:layout_height="match_parent"
    app:layoutDescription="@xml/step1">
แล้วไฟล์ที่ชื่อว่า step1.xml ข้างในมีอะไรบ้างนะ
ข้างในไฟล์นี้มีส่วนประกอบหลักๆคือ
MotionSceneเป็น parent ข้างในอธิบาย animation ที่จะเกิดขึ้นในMotionLayoutTransitionในนี้จะต้องระบุว่า view เริ่มต้นคือตัวไหนในconstraintSetStartและ view สิ้นสุดคือตัวไหนในconstraintSetEndส่วนอื่นๆ เช่นdurationระบุว่าเราจะให้แสดง animation ตั้งแต่ต้นจนจบใช้เวลาเท่าไหร่ ไม่ใส่ก็ได้แต่มันจะแบบวิ่งไวมากอ่ะ ในนี้สามารถใส่ลูกได้ 3 ตัว คือKeyFrameSet,OnClickและOnSwipeConstraintSetเป็นกลุ่มก้อนของ view และจะมีลูกข้างในจะเป็นConstraintในที่นี้เราจะสร้างมา 2 อัน ชื่อว่าstartและendเนอะ
มาดูแต่ละส่วนกันเลยดีกว่า
view เริ่มต้น ชื่อว่า start ตำแหน่งของรูปดาวนั้นจะอยู่บนซ้าย แน่นอนว่า id ใน Constraint ต้องตรงกับ view ที่มีใน MotionLayout นะเออ ไม่งั้นมันจะไม่ขยับนะ
<ConstraintSet android:id="@+id/start">
    <Constraint
        android:id="@+id/red_star"
        android:layout_width="wrap_content"
        android:layout_height="wrap_content"
        app:layout_constraintStart_toStartOf="parent"
        app:layout_constraintTop_toTopOf="parent" />
</ConstraintSet>
และ view สิ้นสุด ชื่อว่า end ตำแหน่งรูปดาวอยู่ล่างขวาเนอะ
<ConstraintSet android:id="@+id/end">
    <Constraint
        android:id="@+id/red_star"
        android:layout_width="wrap_content"
        android:layout_height="wrap_content"
        app:layout_constraintEnd_toEndOf="parent"
        app:layout_constraintBottom_toBottomOf="parent" />
</ConstraintSet>
และเราต้องการให้น้องดาวเคลื่อนที่โดยการกดที่รูปดาว โดยการเพิ่ม OnClick เข้าไปว่าให้ targetId view ที่ถูดกดคือตัวไหน และ clickAction เป็นแบบไหน เช่น toggle คือช่วย reverse ระหว่าง start กับ end ให้หน่อยหลังจากการกด
<Transition
    app:constraintSetStart="@+id/start"
    app:constraintSetEnd="@+id/end"
    app:duration="2000">
    <OnClick
        app:targetId="@id/red_star"
        app:clickAction="toggle" />
</Transition>
เมื่อทำเสร็จแล้วจะเป็นแบบนี้นะ
ผลที่ได้ ขอแปะรูปจาก codelab แล้วกัน
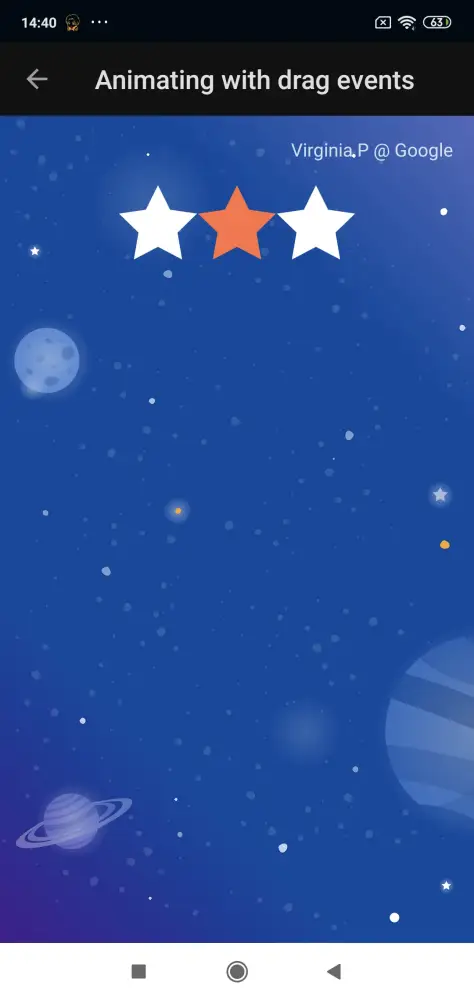
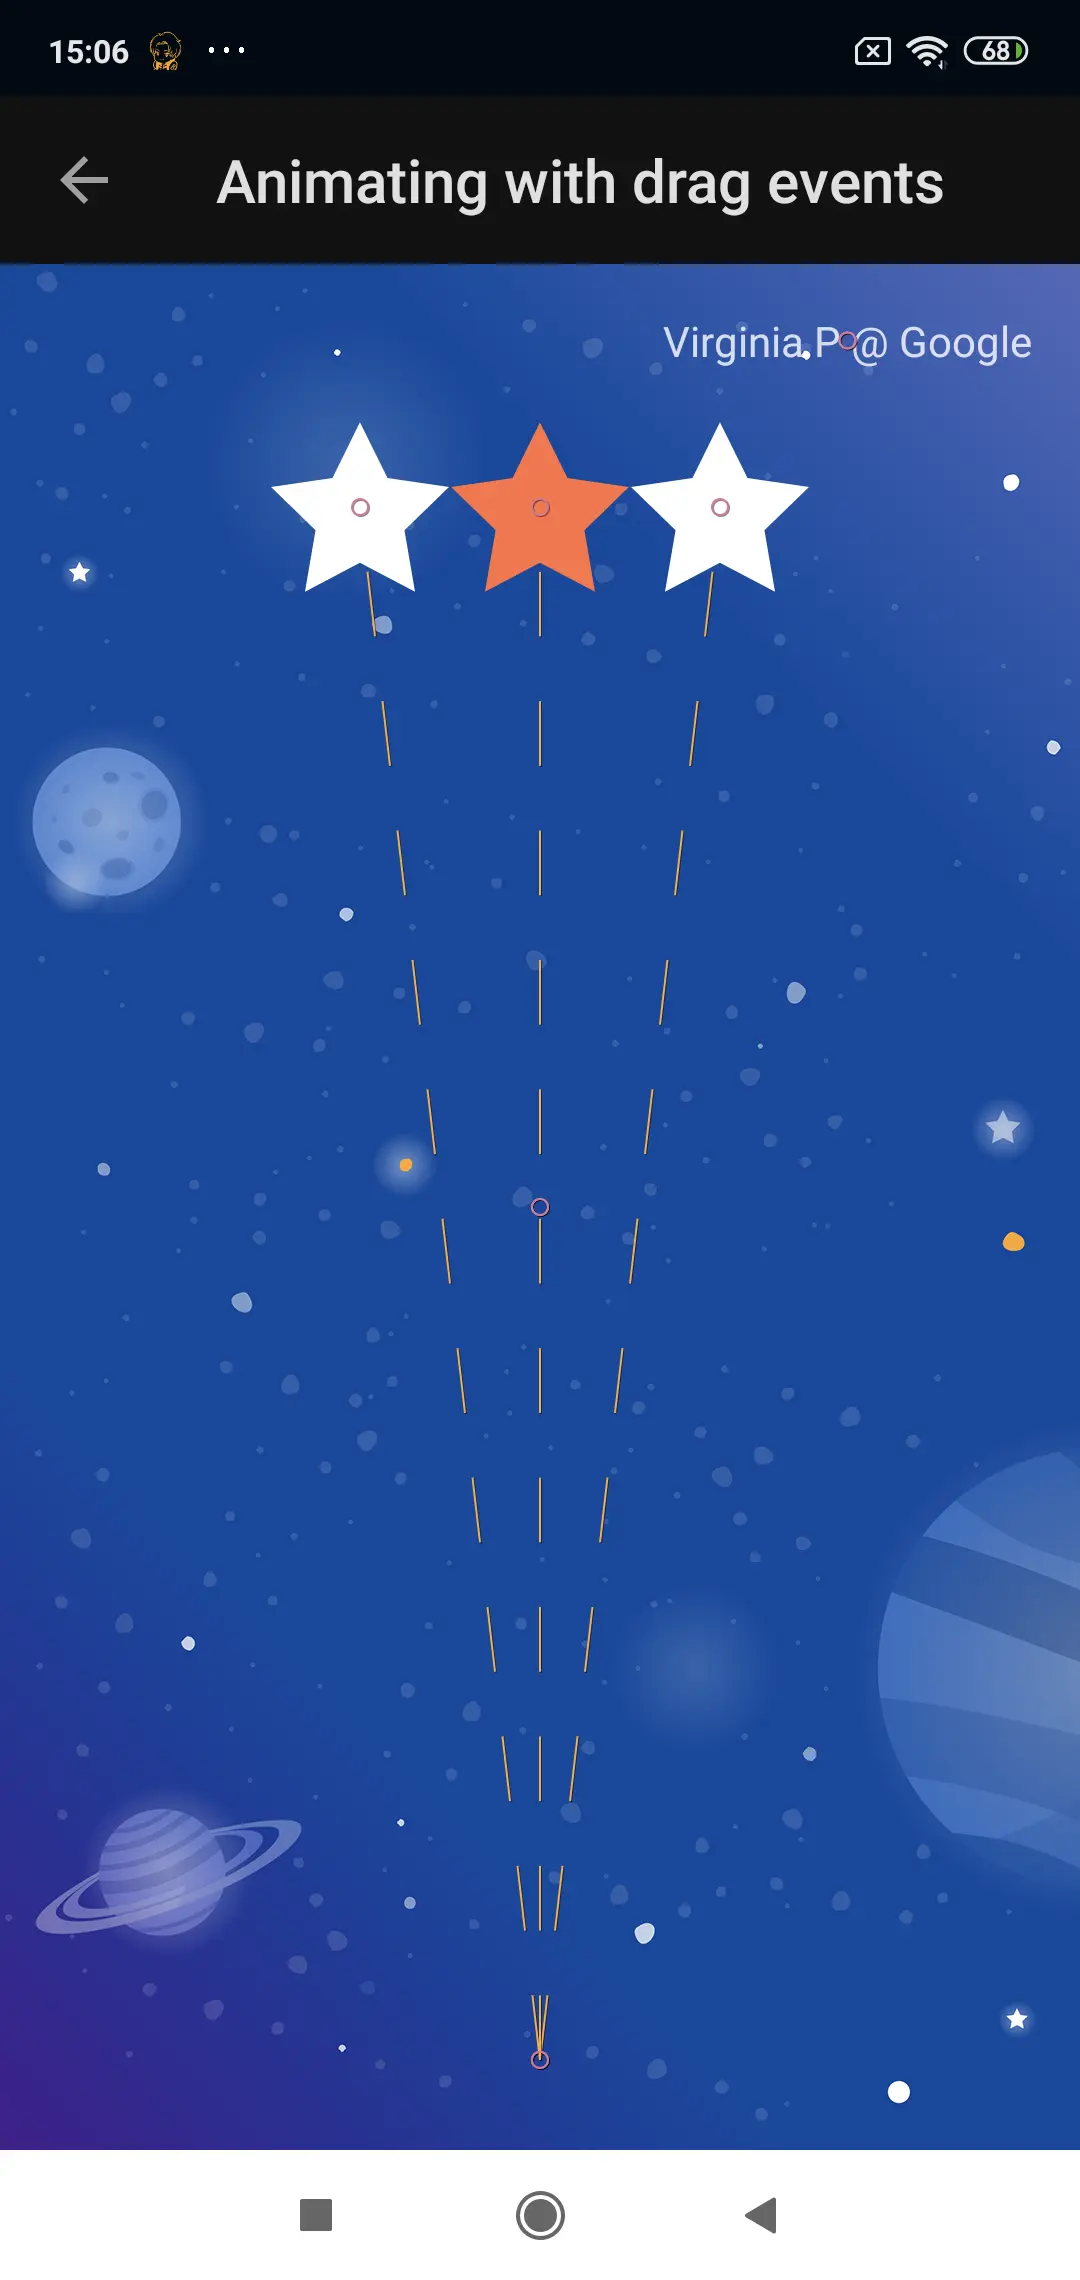
ลองทำท่ายากขึ้นมาหน่อยสำหรับแสดง animation มากกว่า 1 view

ก่อนอื่นเรามากำหนด ConstraintSet เริ่มต้น โดยให้ดาวแดงอยู่ตรงกลาง และดาวซ้ายขวามีค่า alpha เป็น 0 ก่อน
<ConstraintSet android:id="@+id/start">
   <Constraint
           android:id="@+id/red_star"
           android:layout_width="wrap_content"
           android:layout_height="wrap_content"
           app:layout_constraintStart_toStartOf="parent"
           app:layout_constraintEnd_toEndOf="parent"
           app:layout_constraintBottom_toBottomOf="parent" />

   <Constraint
           android:id="@+id/left_star"
           android:layout_width="wrap_content"
           android:layout_height="wrap_content"
           android:alpha="0.0"
           app:layout_constraintStart_toStartOf="parent"
           app:layout_constraintEnd_toEndOf="parent"
           app:layout_constraintBottom_toBottomOf="parent" />

   <Constraint
           android:id="@+id/right_star"
           android:layout_width="wrap_content"
           android:layout_height="wrap_content"
           android:alpha="0.0"
           app:layout_constraintStart_toStartOf="parent"
           app:layout_constraintEnd_toEndOf="parent"
           app:layout_constraintBottom_toBottomOf="parent" />
</ConstraintSet>

และ ConstraintSet สุดท้ายคือแสดงดาวทั้งหมดสามอัน โดยจะมีดาวสีขาวขนาบซ้ายขวา และมีค่า alpha เป็น 1
<ConstraintSet android:id="@+id/end">
   <Constraint
           android:id="@+id/left_star"
           android:layout_width="wrap_content"
           android:layout_height="wrap_content"
           android:alpha="1.0"
           app:layout_constraintHorizontal_chainStyle="packed"
           app:layout_constraintStart_toStartOf="parent"
           app:layout_constraintEnd_toStartOf="@id/red_star"
           app:layout_constraintTop_toBottomOf="@id/credits" />

   <Constraint
           android:id="@+id/red_star"
           android:layout_width="wrap_content"
           android:layout_height="wrap_content"
           app:layout_constraintStart_toEndOf="@id/left_star"
           app:layout_constraintEnd_toStartOf="@id/right_star"
           app:layout_constraintTop_toBottomOf="@id/credits" />

   <Constraint
           android:id="@+id/right_star"
           android:layout_width="wrap_content"
           android:layout_height="wrap_content"
           android:alpha="1.0"
           app:layout_constraintStart_toEndOf="@id/red_star"
           app:layout_constraintEnd_toEndOf="parent"
           app:layout_constraintTop_toBottomOf="@id/credits" />
</ConstraintSet>
และไปส่วน Transition นั้นเราก็ระบุ constraintSetStart และ constraintSetEnd แล้วใส่ OnSwipe เข้าไป โดยมี attribute ที่สำคัญ คือ
touchAnchorId[อันนี้ต้องใส่] view ที่เรา track การเคลื่อนไหวไว้touchAnchorSideด้านข้างของ target view ในการกวาดนิ้วเพื่อ swipe โดยตัว MotionLayout จะพยายามรักษาระยะห่างนะหว่างตัว anchor กับนิ้วของ user (เอ้ออออแปลจาก document แล้วงงๆเนอะ) สามารถใส่ค่าได้คือleft,right,top, และbottomเท่านั้นนะ (ใน codelab บทท้ายๆจะมีการอธิบายเพิ่ม แล้วแต่ดุลยพินิจแหละว่าอันไหนมันเหมาะกับงานของเรา)dragDirectiondirection ของการ swipe ว่าจะให้เป็นบนล่างซ้ายขวาเนาะ ยังไม่มีตีลังกาให้นะจ๊ะ ค่าที่สามารถใส่ได้คือdragLeft,dragRight,dragUp,dragDown
สามารถอ่านเพิ่มเติมได้ที่นี่
ในตัวอย่างนี้จะเป็นดังนี้นะ
<Transition
        app:constraintSetStart="@+id/start"
        app:constraintSetEnd="@+id/end">
    <OnSwipe app:touchAnchorId="@id/red_star" />
</Transition>

จริงๆเราสามารถดู path debugging ได้นะ โดยการใส่ app:motionDebug="SHOW_PATH" ใน MotionLayout ที่ layout ผลจะเป็นดังนี้
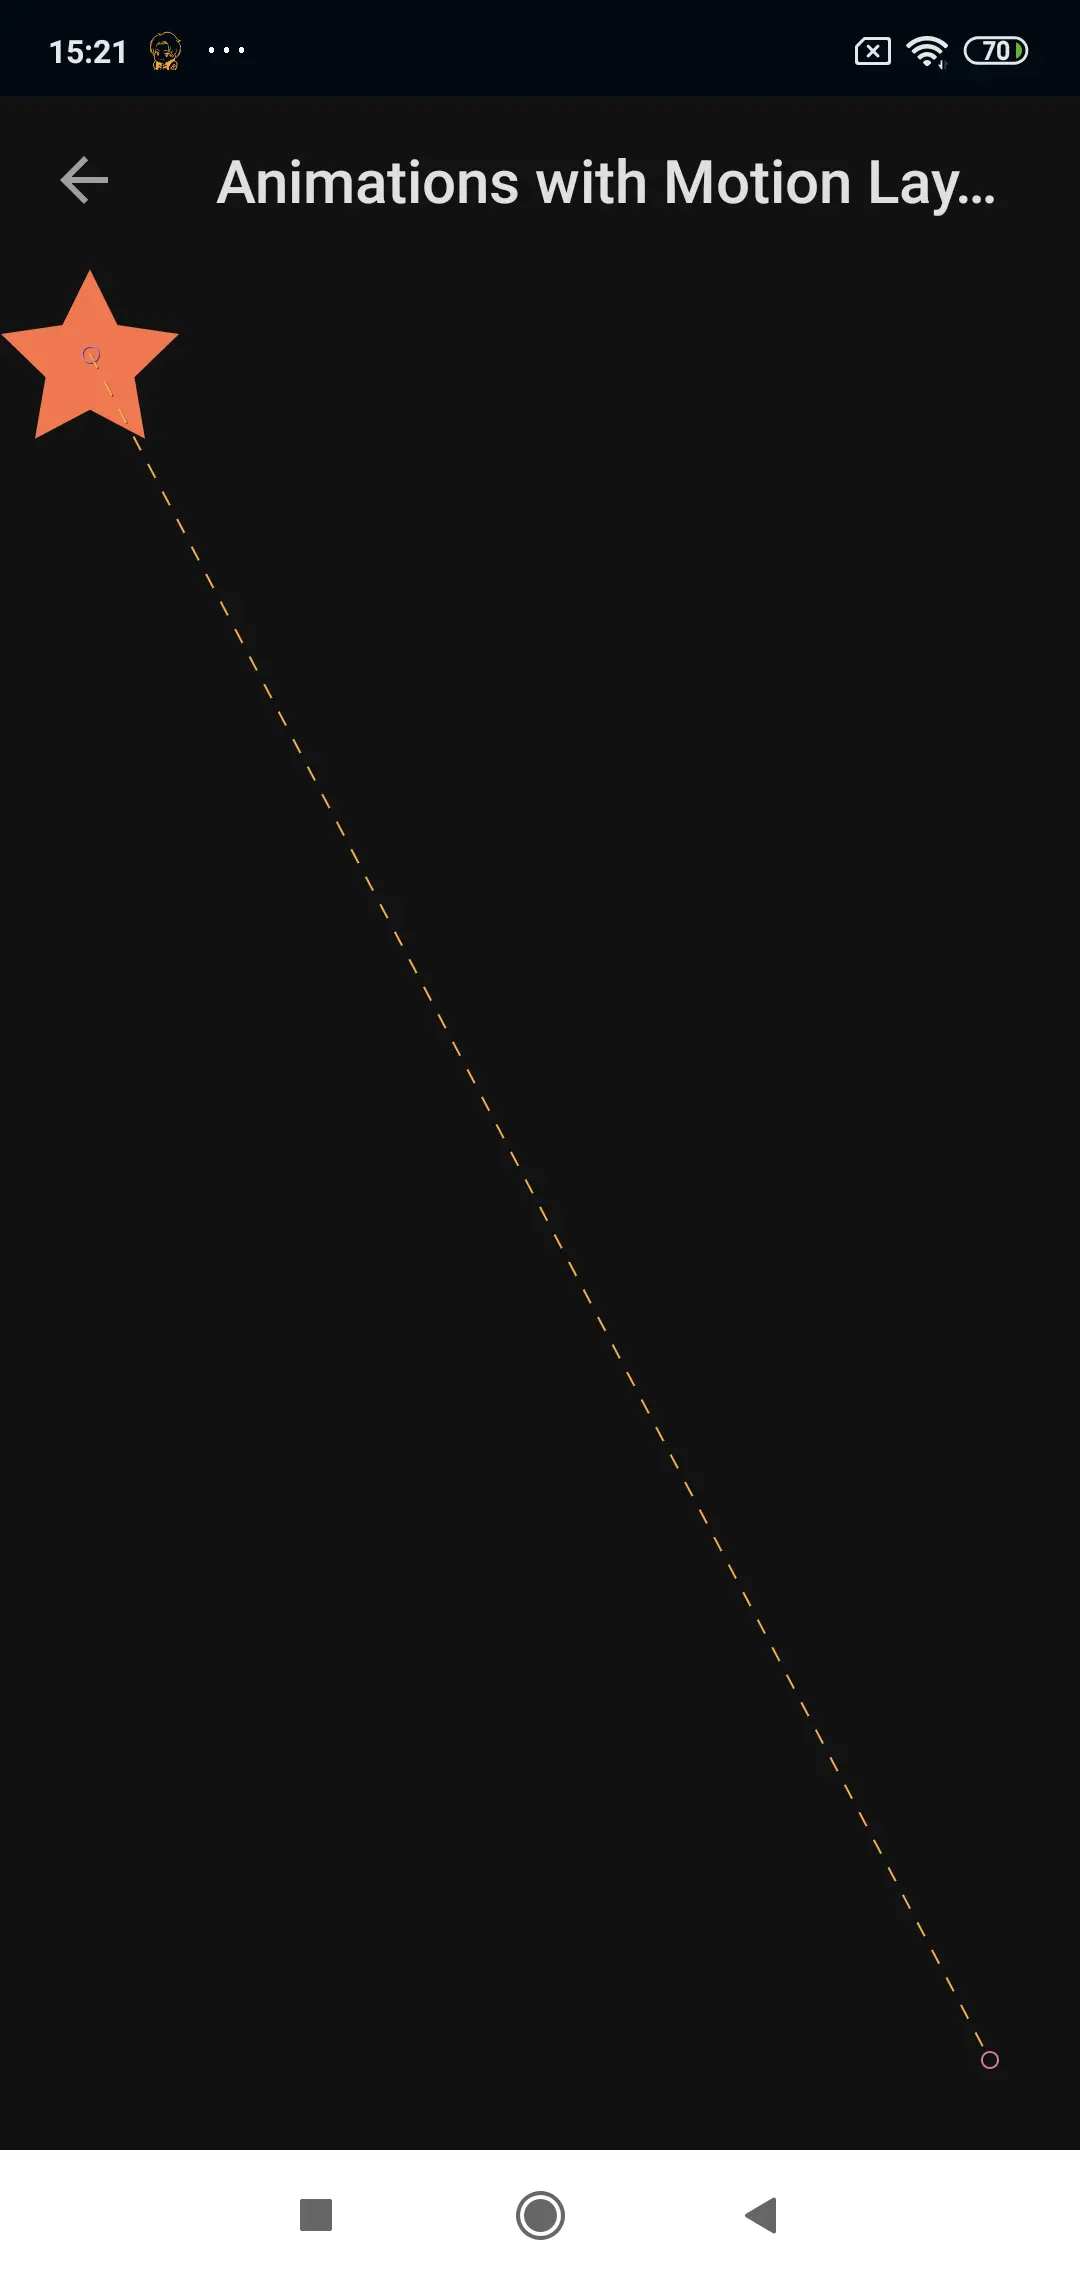
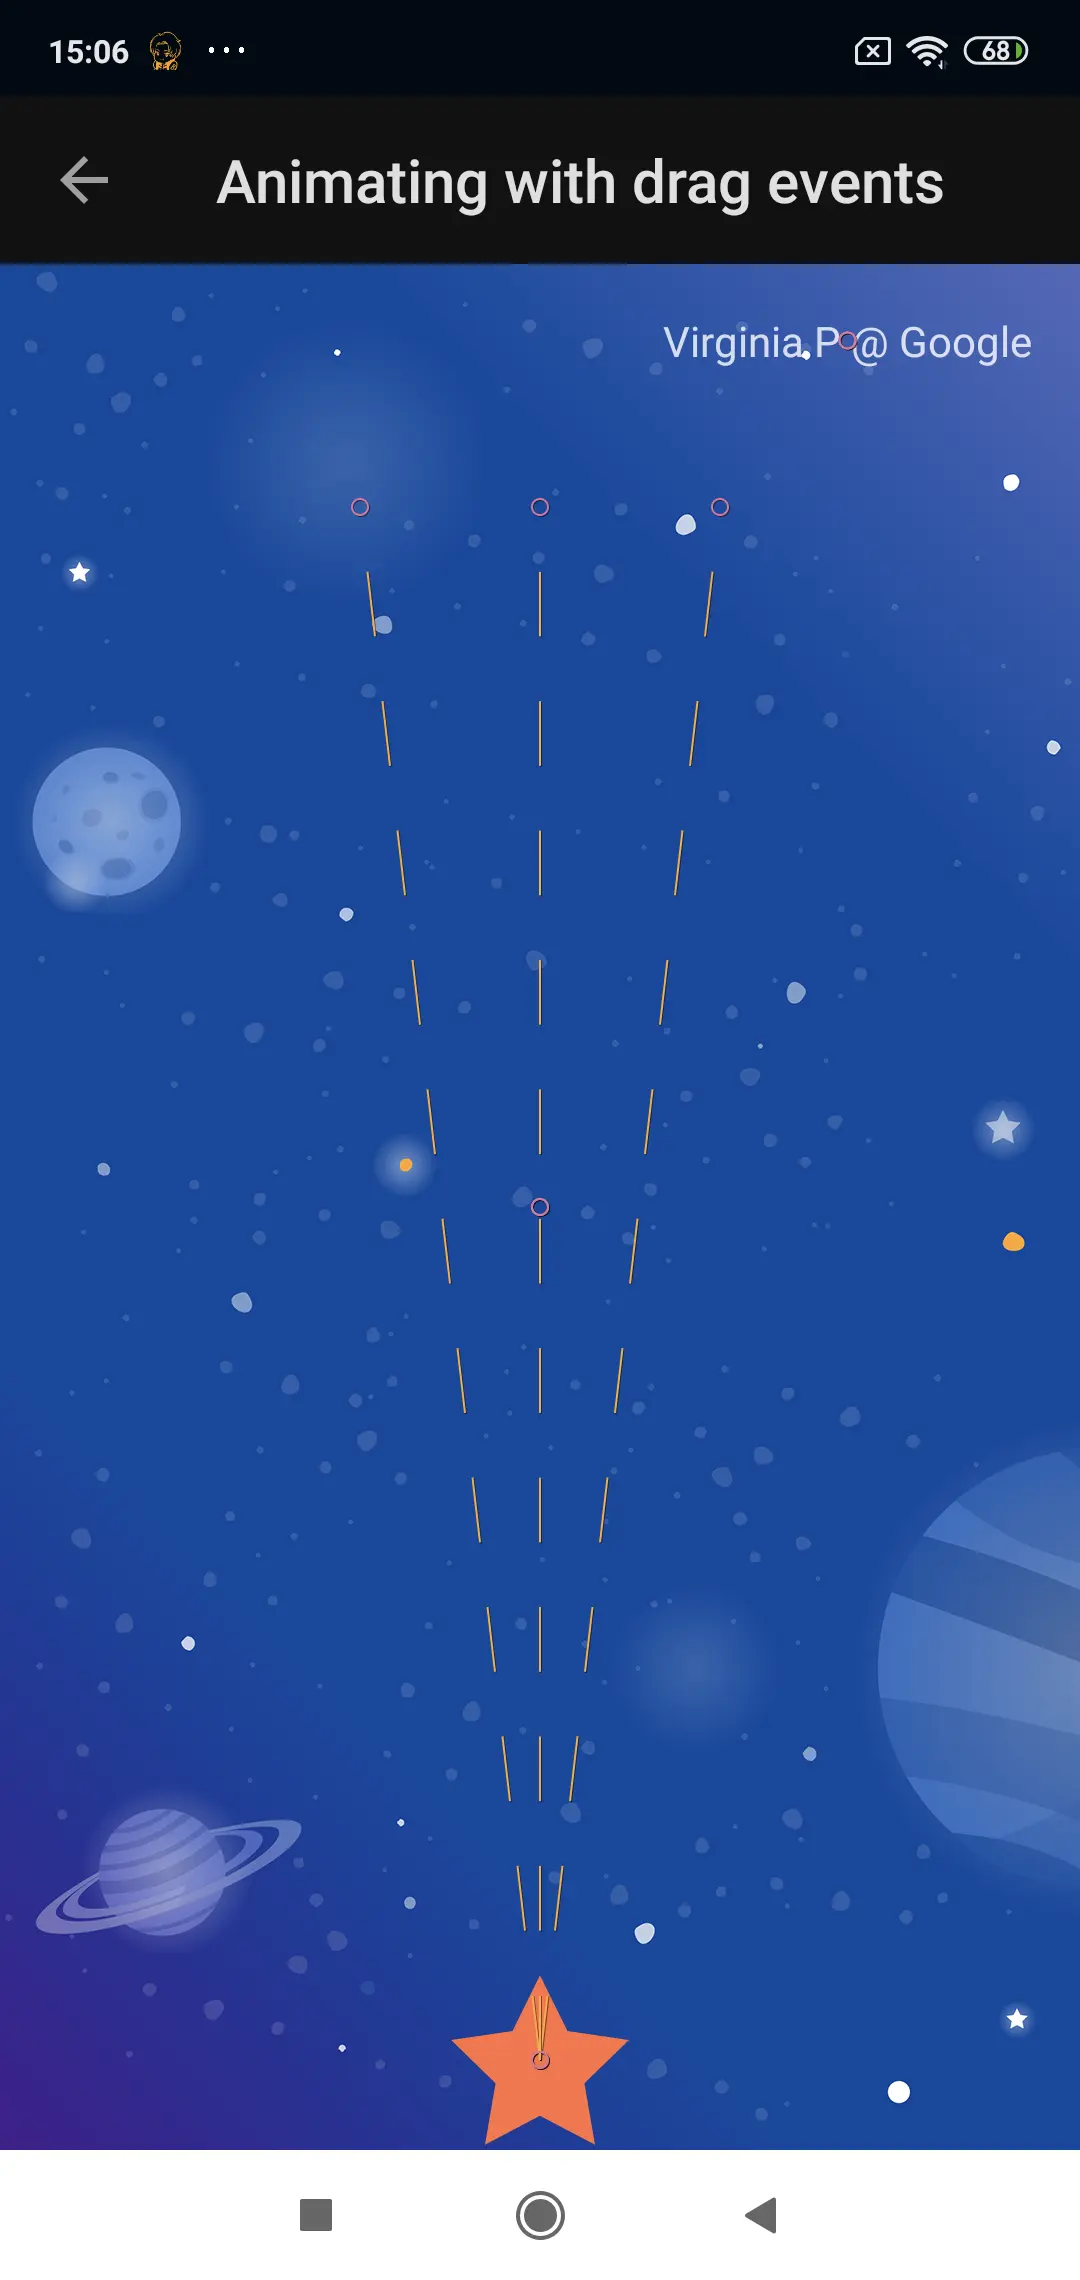
- วงกลม คือสัญลักษณ์แทน view ใน
MotionLayout - เส้นนี้เขาเรียกว่า Motion Path เป็นเส้นการเดินทางของ view
- มีอีกอันรูปเพชร เป็น
KeyPositionเดี๋ยวเราจะเล่าถัดไป

มาแก้เส้น Path โดยเพิ่ม KeyFrameSet และ KeyPosition กันเถอะ
ไปเพิ่ม KeyFrameSet ใน Transition กันก่อน
<KeyFrameSet>
   <KeyPosition
           app:framePosition="50"
           app:motionTarget="@id/moon"
           app:keyPositionType="parentRelative"
           app:percentY="0.5"/>
</KeyFrameSet>

เราก็จะเห็นรูปเพชรงอกมา ตรงไหนกัน เห็นเป็นวงกลมสีส้มๆ555 มันไม่เพชรเว้ย
KeyPosition เป็นบุตรหลานของ Transition นำไปใช้ตอน transition โดย MotionLayout จะไปคำนวณ path ในส่วนการเคลื่อนที่ในวัตถุที่เราต้องการ
attribute ที่สำคัญและจำเป็นมีดังนี้
framePositionมีค่าระหว่าง 0-100 อยากให้มองเป็น % ก็ได้เนอะ โดยในที่นี้ set ค่าเป็น 50 คือจะอยู่กลางใจ ไม่ใช่กลางใจหน่ะนะ .......... อันนี้คิดจาก path นะเออ โดยค่าน้อยๆจะใกล้จุด start ส่วนค่าเยอะๆก็จะใกล้จุด endmotionTargetview ที่ต้องการไปอยู่ใน position ตรงนั้นkeyPositionTypeจะให้KeyPositionอยู่ยังไง เป็น attribute ที่เกี่ยวกับ coordinate system โดยสามารถเลือกค่าเอามาใส่ได้ 3 ตัว คือ
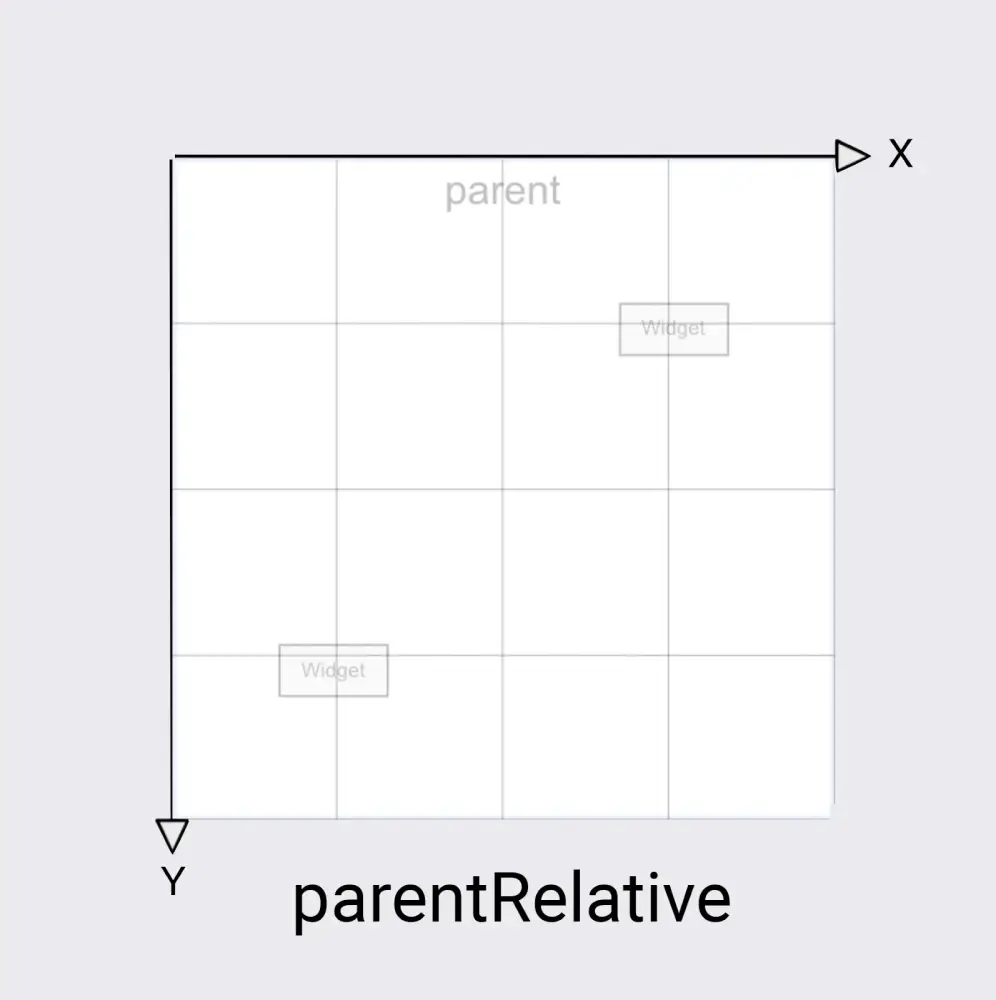
1) parentRelative พิกัด (0, 0) อยู่ซ้ายบน ส่วน (1,1) อยู่ขวาล่าง ใช้เมื่อเราจะสร้าง animation ที่เคลื่อนผ่านกัน
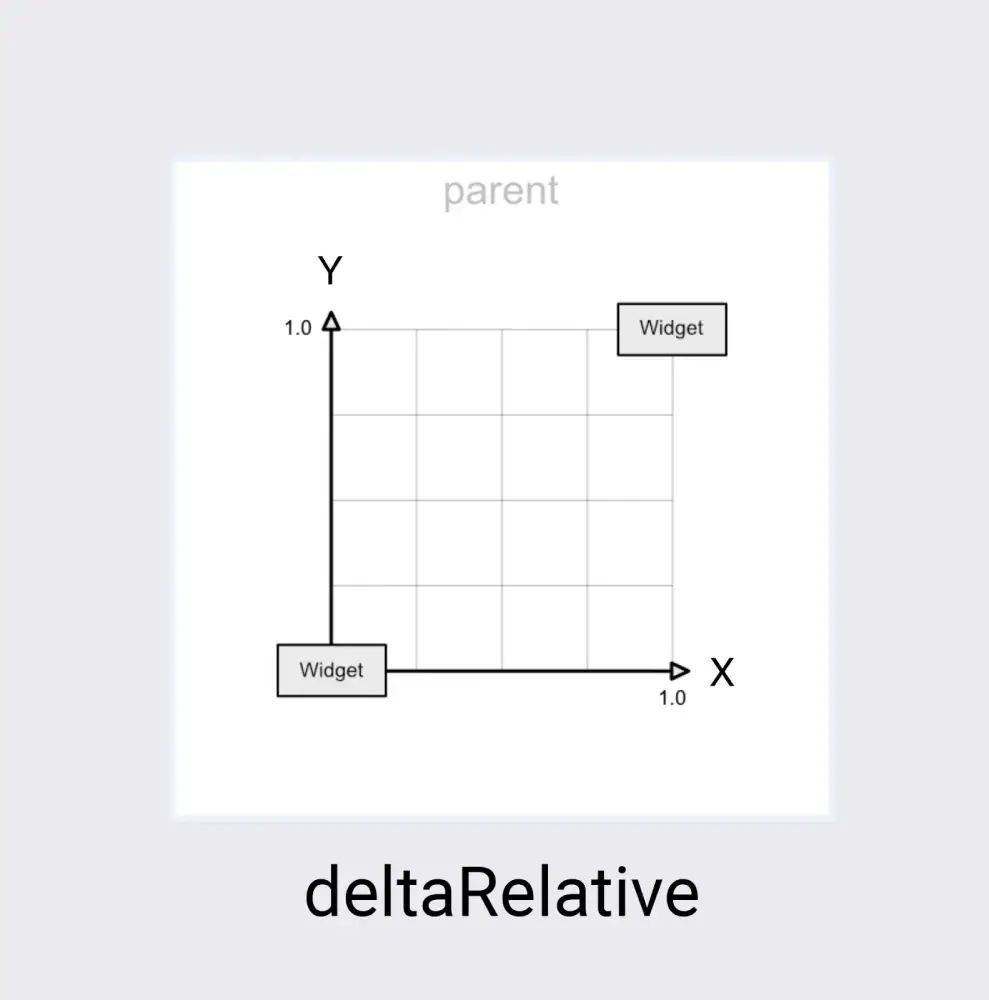
2) deltaRelative พิกัด (0, 0) อยู่ซ้ายล่าง เป็นตำแหน่งของ view ตั้งต้น ส่วน (1,1) อยู่ขวาบน เป็นตั้งแหน่งของ view สิ้นสุด ใช้เมื่อต้องการควบคุมการเคลื่อนที่ในแนวนอนหรือแนวตั้งแยกกัน
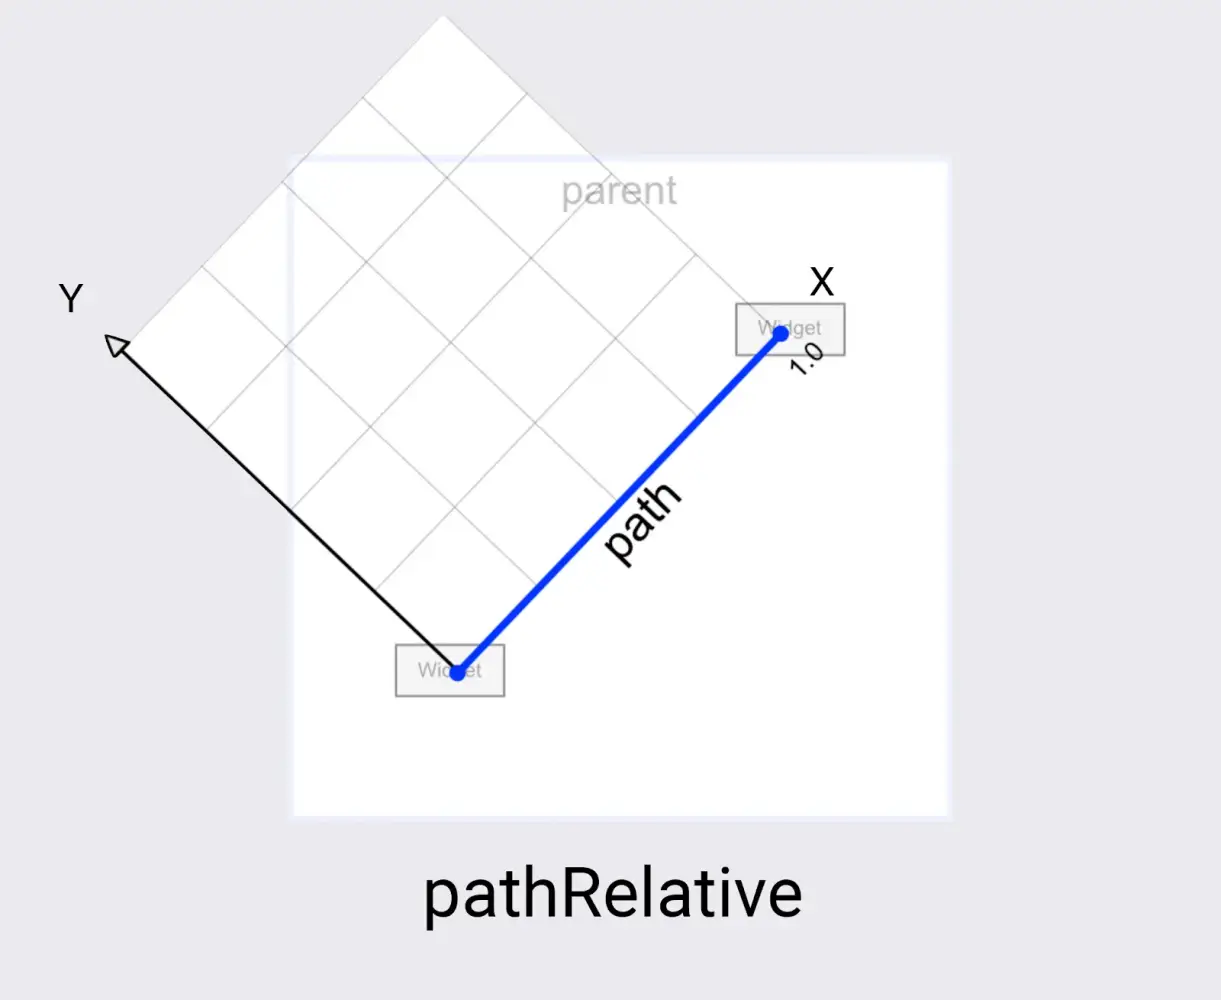
3) pathRelative พิกัด (0, 0) เป็นตำแหน่งของ view ตั้งต้น และ (1,0) เป็นตำแหน่งของ view สิ้นสุด ใช้เมื่อตอนเร้งขึ้น ช้าลง หรือหยุก view ในระหว่างทางที่แสดง animation อันนี้เราอ่านแล้วก็มีความงงๆ แหะๆ
percentXและpercentYเป็นค่าในการแก้ path ของframePositionมีค่าระหว่าง 0 - 1 ถ้าค่าpercentYเท่ากับ 1 ก็คือเป็นเส้นตรง (default)
ส่วนประกอบใน path ที่เพิ่มขึ้นมาจะเป็นแบบรูปเพชร นั่นคือตำแหน่งของ KeyPosition นั่นเอง

และเราสามารถกำหนด KeyPosition ได้มากกว่า 1 จุด
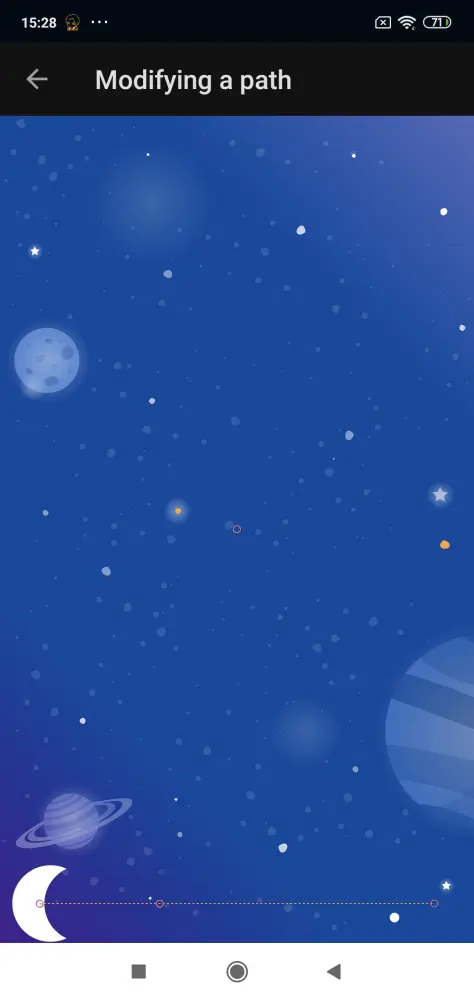
เท่าที่ลองตามใน codelab เราสามารถกำหนดการเดินทาง (Path) ของ view ต่างๆ ได้ผ่าน KeyPosition โดยเราสามารถกำหนดจุดและตำแหน่งที่เราต้องการ ได้ดังนี้
<KeyFrameSet>
   <KeyPosition
           app:framePosition="25"
           app:motionTarget="@id/moon"
           app:keyPositionType="parentRelative"
           app:percentY="0.6"
           app:percentX="0.1"/>
   <KeyPosition
           app:framePosition="50"
           app:motionTarget="@id/moon"
           app:keyPositionType="parentRelative"
           app:percentY="0.5"
           app:percentX="0.3"/>
   <KeyPosition
           app:framePosition="75"
           app:motionTarget="@id/moon"
           app:keyPositionType="parentRelative"
           app:percentY="0.6"
           app:percentX="0.1"/>
</KeyFrameSet>
และนี่คือผลที่ได้จ้า
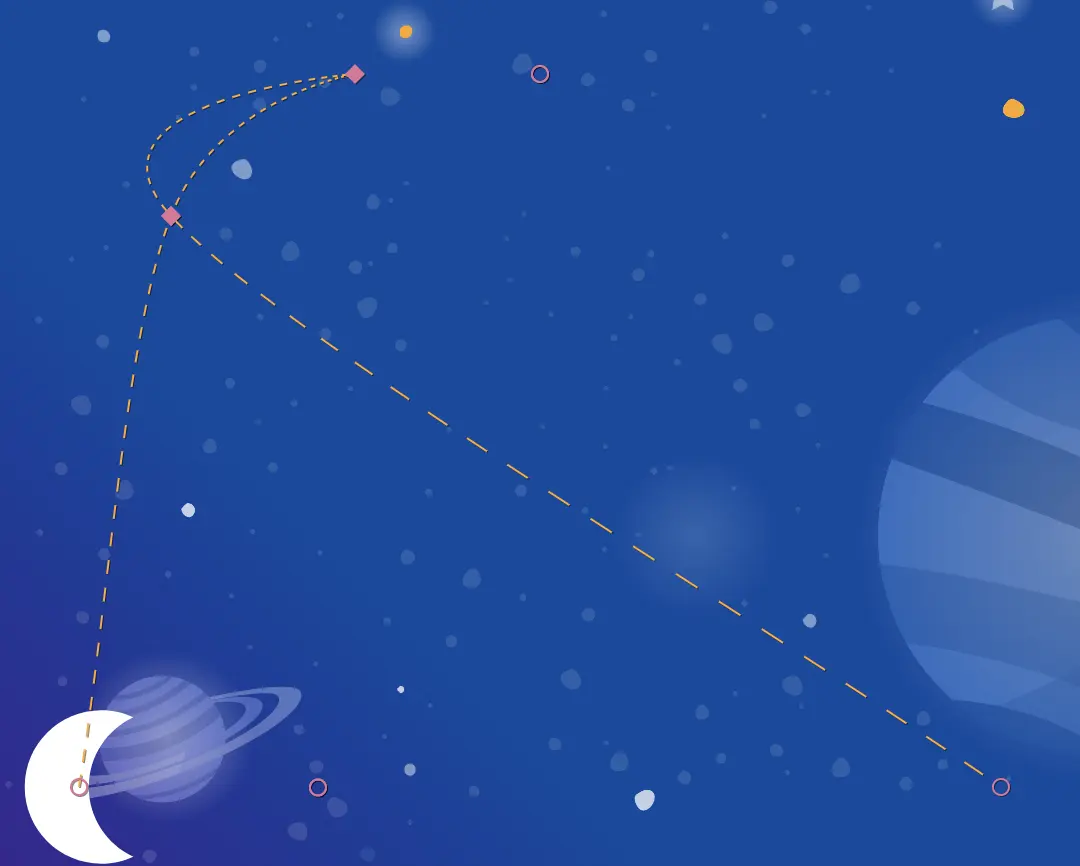
เราจะให้ดวงจันทร์เราวิ่งไปเฉยๆไม่ได้ ต้องเต้นรำตีลังกาเสียหน่อยเยอะ
KeyAttribute เอามาแสดง animation อื่นๆไม่ว่าจะเป็น
android:visibilityandroid:alphaandroid:elevationandroid:rotationandroid:rotationXandroid:rotationYandroid:scaleXandroid:scaleYandroid:translationXandroid:translationYandroid:translationZ
ซึ่งก็จะคล้ายๆ ObjectAnimator เนอะ
ตัวอย่างจ้า
ก่อนอื่นเราอยากให้น้องดวงจันทร์ของเรานั้นหมุน และให้ขนาดใหญ่เป็น 2 เท่าเมื่อมาตรงกลางเนอะ
<KeyAttribute
       app:framePosition="50"
       app:motionTarget="@id/moon"
       android:scaleY="2.0"
       android:scaleX="2.0"
       android:rotation="-360"/>
<KeyAttribute
       app:framePosition="100"
       app:motionTarget="@id/moon"
       android:rotation="-720"/>
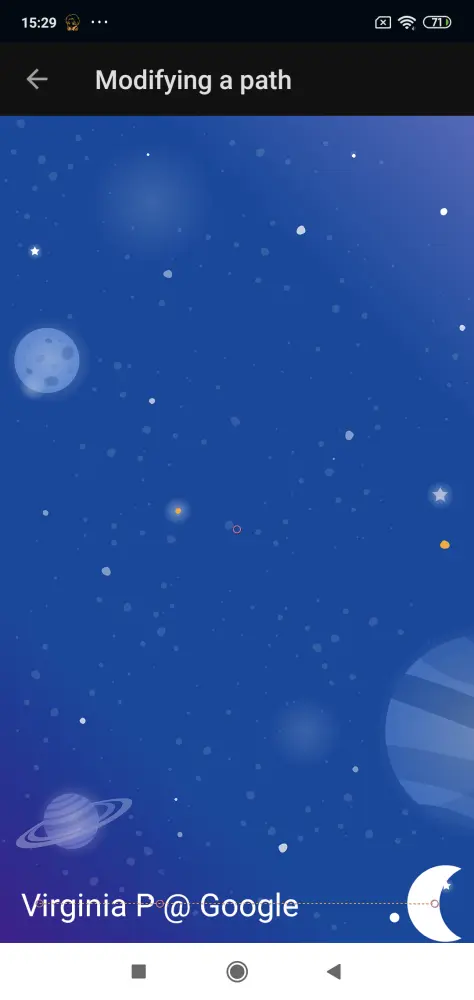
และเมื่อถึงตำแหน่ง framePosition ที่ 85 ช่วย จะเริ่ม show text หล่ะ โดยเรา set alpha = 0 ที่ตำแหน่งนั้น และพอถึง 100 ค่า alpha จะเป็น 1.0 ตามที่ set ไว้ใน Constraint end เนอะ
<KeyAttribute
       app:framePosition="85"
       app:motionTarget="@id/credits"
       android:alpha="0.0"/>
จากนั้นทำการเปลี่ยนสีดวงจันทร์ โดยการเปลี่ยนสีจะใช้ CustomAttribute ใส่ app:attributeName เป็น "colorFilter" และใส่สีโดย app:customColorValue เอ้ออเอาจริงๆมันจะแปลกๆหน่อยอ่ะ
<KeyAttribute
       app:framePosition="0"
       app:motionTarget="@id/moon">
   <CustomAttribute
           app:attributeName="colorFilter"
           app:customColorValue="#FFFFFF"/>
</KeyAttribute>
<KeyAttribute
       app:framePosition="50"
       app:motionTarget="@id/moon">
   <CustomAttribute
           app:attributeName="colorFilter"
           app:customColorValue="#FFB612"/>
</KeyAttribute>
<KeyAttribute
       app:framePosition="100"
       app:motionTarget="@id/moon">
   <CustomAttribute
           app:attributeName="colorFilter"
           app:customColorValue="#FFFFFF"/>
</KeyAttribute>
สุดท้าย สามารถทำ MotionLayout จากการเขียนโค้ดได้ด้วยนะ
เช่น เมื่อเราเลื่อนจอขึ้นไป ก็จะแสดง animation ที่ AppBarLayout ให้เราดูด้วย ดังรูป

ก่อนอื่นทำการสร้าง layout กันก่อน โดยเจ้า MotionLayout นั้นจะอยู่ภายใต้ AppBarLayout นะ ซึ่งเขาจะอยู่ภายใต้ CoordinatorLayout อีกทีนุง
ทำการเคลื่อนไหว MotionLayout ด้วยโค้ด โดยเราจะเพิ่ม listener ของ AppBarLayout ที่มีชื่อว่า OnOffsetChangedListener โดยให้ progress ของ MotionLayout เท่ากับ verticalOffset / appBarLayout.totalScrollRange.toFloat()
และ AppBarLayout ไม่สามารถเปลี่ยนขนาดของ MotionLayout ได้นะจ๊ะ
สรุปใน MotionScene โครงสร้างจะเป็นแบบนี้เนอะ โดยชื่อไฟล์ก็ไปใส่ไว้ใน MotionLayout ไปว่า motion:layoutDescription="@xml/{motion_scene_name}" เนอะ
<MotionScene>
    <Translation>
        <OnSwipe/>
        <OnClick/>
        <KeyFrameSet>
            <KeyPosition/>
            <KeyAttribute/>
        </KeyFrameSet>
    </Translation>

    <ConstraintSet android:id="@+id/start">
        <Constraint/>
    </ConstraintSet>

    <ConstraintSet android:id="@+id/end">
        <Constraint/>
    </ConstraintSet>
</MotionScene>
จบบล็อกแล้วเนอะ หวังว่าคนอ่านคงจะไม่มึนจนเกินไปเนอะ 555555 (ขำแห้ง)
ก่อนจากกันแปะของ Material Design Components ไว้ด้วย ว่าจะเขียนถึงแต่ขี้เกียจหล่ะ555

และ Video Series ของทาง Android Developer เกี่ยวกับ Motion Layout นี่แหละ มีทั้งหมด 10 ตอน ไปดูกันได้เลยยยย
ติดตามข่าวสารตามช่องทางต่าง ๆ และทุกช่องทางโดเนทกันไว้ที่นี่เลย
ติดตามข่าวสารแบบไว ๆ มาที่ Twitter เลย บางอย่างไม่มีในบล็อก และหน้าเพจนะ
สวัสดีจ้า ฝากเนื้อฝากตัวกับชาวทวิตเตอร์ด้วยน้าา
— Minseo | Stocker DAO (@mikkipastel) August 24, 2020